Unity has a bunch of great components that make game development much easier, but one thing they are still missing is a 2D version of a Character Controller. So today we found a 2D controller that uses 2D Physics and modified it to make it our own. Let’s dive in!
Part 1: 2D Character Controller Setup
At their core, Character Controllers are rather simple, but incredibly important. They manage the important task of moving our character through our levels based upon our input, running, jumping, and not falling through the floor. And by providing situational information such as the answer to “are we on the ground?” which is a critical question when figuring out whether or not we can “jump”.
While Unity provides a 3D Character Controller component for their games, they have yet to release their own 2D controller As such, there are a significant number of controllers that others have created and published. Today, we looked at a lovely little controller script from the Sharp Coder blog that I prefer – it’s simple, straightforward, and uses 2D Physics to handle gravity and collisions. We incorporated much of their code, with some modifications that simplify our process.
You can find their blog post and code here: Sharp Code – Unity 2D Character Controller
The first neat feature about this script is the RequireComponent instruction at the head of the file. This tells the Unity Editor that this script requires these components to be attached to the same object (in this case, Rigidbody2D and CapsuleCollider2D). If you attach this script to an object without these components, they will automatically be added.
[RequireComponent(typeof(Rigidbody2D))]
[RequireComponent(typeof(CapsuleCollider2D))]
The next feature that I appreciate about this particular controller is that they modify the rigidbody properties during the Start( ) function, to ensure that the right settings are in place. In this case, they make sure that Rigidbody2D.freezeRotation is set to true (so our character doesn’t roll over) and that the collision detection mode is set to “Continuous” rather than the default setting of “Discrete”. Continuous detection is going to be the preferred method for your player object and probably your enemy objects – you want those collisions running all the time. Finally, it set the rigidbody’s gravityScale to a value defined by this script. This is important because it will affect the speed of your vertical movement.
// preset some values
rb.freezeRotation = true;
rb.collisionDetectionMode = CollisionDetectionMode2D.Continuous;
rb.gravityScale = gravityScale;
We left out all references to camera control from the script, as we will be making our own custom camera controller later in this lesson.
Part 2: Character Controller Inputs
The Update( ) method is used to fetch our user Inputs, which currently consist of moving horizontally, and jumping (which is a vertical motion). We modify the ridigbody’s velocity, which is expressed as a Vector2, in order to move the controller in that direction.
Jumping can only occur when we are “grounded” (more on that in a minute) and simply replaces the velocity’s y-value with whatever we set out “jumpHeight” value to be.
Horizontal movement is a little more complicated. Sharp Coder’s features a lot of logic to determine whether how to set our “moveDirection”.
// Movement controls
        if ((Input.GetKey(KeyCode.A) || Input.GetKey(KeyCode.D)) && (isGrounded || Mathf.Abs(r2d.velocity.x) > 0.01f))
        {
            moveDirection = Input.GetKey(KeyCode.A) ? -1 : 1;
        }
        else
        {
            if (isGrounded || r2d.velocity.magnitude < 0.01f)
            {
                moveDirection = 0;
            }
        }
This version looks to see if we are pressing the A or D key, AND if we are either grounded, or already moving horizontally (by testing the absolute of the velocity’s x-value). This means that we can move while on the ground, or can adjust our movement in air if we were already moving horizontally in air. Whether or not you can control your character’s horizontal movement while in-air makes for a heated debate amongst designers. Also, what’s up with this line?
moveDirection = Input.GetKey(KeyCode.A) ? -1 : 1;
This is what is known as a “ternary operator”. It’s a conditional that works like a simplified “if” conditional. It’s structure is something = statement ? <true value> : <false value> Here, moveDirection can be set to one of two values, based on “is the A key is pressed”. If true, a value of -1 is returned, if false, 1 is returned.
The else on the original statement says if we are not pressing A or D, then our move direction should be 0. Doesn’t this sound like Input.GetAxisRaw? That’s one option that we can use for sure
// Movement controls
moveDirection = Input.GetAxisRaw("Horizontal");
But yesterday we looked at the new Input System because we can access an action that can have multiple bindings depending on the device. How could we use this method? We set up the InputAction moveAction just like we did yesterday, then pull the x-value from the resulting Vector 2 value.
// set the move direction
moveDirection = moveAction.ReadValue<Vector2>().x;
Part 3: Actual Making things Move
We used the Update( ) loop to take our settings, but for actually *moving* our object, we want to take advantage of FixedUpdate( ). FixedUpdate is called at a steady, regular interval (usually 50 times per second) and is the preferred method for working with Rigidbodies / Physics. Update is frame dependent – and that framerate will fluctuate, which is why we have to include a “deltaTime” measurement when creating motion. With FixedUpdate( ), the interval is the same every time.
Towards the end of Sharp Coder’s FixedUpdate( ) function, we see the code that sets the velocity value of our rigid body. Replacing the rigidbody with our variables this now looks like so:
// Apply movement velocity
rb.velocity = new Vector2((moveDirection) * maxSpeed, rb.velocity.y);
This is super-simple – take the horizontal movement direction we have designated, multiply it by the max speed and place it in the x-value. We preserve the y-value of the velocity, as this will be set elsewhere through a “jump”, react to the -y forces of gravity, or return to 0 in the event that we are on a surface.
Speaking of jumping, how can we get the value of our jump button with the new Input System? It turns out there are multiple ways. First, we can directly access keyboard keys, and evaluate their state. If we want to see if the space bar was recently released we could use any of the following formats:
Keyboard.current.spaceKey.wasReleasedThisFrame   // this looks like enumeration but is more like a property
Keyboard.current[Key.Space].wasReleasedThisFrame  // this uses an enumerated key
Notice that when accessing KeyControl directly we are testing the wasReleasedThisFrame property rather than a method. These are mapped slightly different from the Legacy input :
| Legacy Input (uses method) | New Input System – KeyControl (uses property) |
| Input.GetKey(KeyCode.Space) | Keyboard.current.spaceKey.isPressed |
| Input.GetKeyDown(KeyCode.Space) | Keyboard.current.spaceKey.wasPressedThisFrame |
| Input.GetKeyUp(KeyCode.Space) | Keyboard.current.spaceKey.wasReleasedThisFrame |
But this is just specifically querying the keyboard. The power of the Input System is that it allows us to bind actions to multiple platforms, and so there we can access this action slightly differently. First we define an InputAction variable and connect it
InputAction jumpAction;

...

void Start( )
{
    jumpAction = InputSystem.actions.FindAction("Jump");
}
And now we can access the value of that action. Note that we do this with a function rather than a property.
if (jumpAction.WasPressedThisFrame() && isGrounded)
{
    rb.velocity = new Vector2(rb.velocity.x, jumpHeight);
}
Using the action approach, we use methods to detect the states of buttons/keys:
jumpAction.isPressed();
jumpAction.WasPressedThisFrame();
jumpAction.WasReleasedThisFrame();
Part 4: Are we on the ground?
The beginning of the original FixedUpdate( ) function contains a considerable amount of logic to identify a point in space that exists inside of our player collider, and the width of the collider itself. The reason this information is important is that it will be used to create a custom collision check to see if our collider is indeed touching something. The logic goes something like this:
- Find a point just about the radius point of the lower arc on the capsule.
- Create a circle that will reach just a little lower than that arc, and check within that circle for any colliders.
- Take the list of returned colliders and check to see if one of those is NOT the player collider.
- If you find a non-player collider, you’re on the ground! If not, isGrounded remains false.
This method certainly does work, but I have a few issues with it. First, it just assumes that ANY collider that it detects is automatically the ground – but later we will use colliders with the “trigger” function that our player object will pass through, but this Physics2D.OverlapCircleAll will definitely detect. We saw before how we could use the layer matrix in Physics settings to “mask” layers from one another (like objects in Enemy layers ignoring one another). Since we only care if we hit colliders that represent the ground, why don’t we just use layers to check specifically for that?
In order to do this, I can use the third parameter of Physics2D.OverlapCircleAll( ) – a integer named layerMask. The layer mask is what is known as a “bitmask” – a way of using and manipulating the bits in a byte of information, otherwise known as a bitwise operation. These bits are set on or off, and used as a way to store information as a number. If you look at the Layer panel, you’ll notice that we only have slots in Layer 0-31, or 32 total possible values that can be set to “on” or “off”. We have a data type that is made of 32 bits – the integer. And so there is a single numeric value that represents the over 4 million possible combinations of on-off in those 32 slots. Sound complicated? It is!
Thankfully we don’t have to worry about the math for this, because Unity has already built this into our editor, with the LayerMask type. You’ve seen these variables before, in the Camera Mask settings, which determine whether a camera can view a layer or not. We declare a variable to set in the editor like so:
public LayerMask groundLayer;
This gives us a dropdown that we can use to set the layers we are interested in looking at. I’ve created a layer named “Ground”, and put all of our environment objects on that layer.
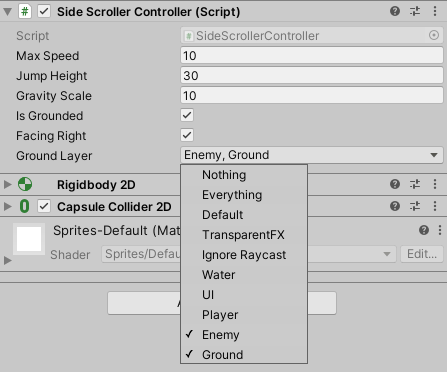
Now in FixedUpdate( ) we modify that custom physics call to include the layerMask so that it only returns colliders on the layers that we defined in the editor, which in the above image would be colliders on the “Ground” or “Enemy” layers.
Rather than go through the complicated (and frequent) calculation of the bounds and radius of the capsule collider, we are going to simply define our own. We create a Transform value to hold the center position for a circular collider. We create an empty game object as a child of the Player object and place it just slightly below the lower radius point of our capsule collider. We also create a float value to adjust the radius to our liking.
public Transform groundCheckPosition;
public float groundCheckRadius;
public LayerMask groundLayerMask;
Now we can use these to define our overlap sphere – but how can we visualize this? Thankfully, we can draw our own gizmos in the editor. The OnDrawGizmos command can be used on objects in the editor, even when the game is not playing. Here we use the Gizmos.DrawWireSphere( ) method to draw a circle that will use the same parameters as our ground test circle, and will update its color to reflect the grounded status:
private void OnDrawGizmos()
    {
        //show the grounded radius
        if (isGrounded) {Gizmos.color = Color.yellow;} else {Gizmos.color = Color.red;}
        Gizmos.DrawWireSphere(groundCheckPosition.position, groundCheckRadius);
    }
Nextwe set up the collision test with the layermask in FixedUpdate( ). Rather than sort through all of the colliders the way that SharpCoder does, I can simply check to see if there ARE any colliders returned! I set my grounded variable equal to false, then if there is length, I turn it to true.
        // check our grounded status
        isGrounded = false;
        // look for colliders
        Collider2D[] colliders = Physics2D.OverlapCircleAll(groundCheckPosition.position, groundCheckRadius, groundLayerMask);
        // was there a collider
        if (colliders.Length > 0) { isGrounded = true; }
Of course, if I wanted to be fancy, I could use our ternary operator to express these in one line.
isGrounded = colliders.Length > 0 ? true : false;
Tomorrow we will finish our controller by simplifying the physics check, and generating some helpful gizmos to visualize their range of effect.
SideScrollerController.cs
using UnityEngine;
using UnityEngine.InputSystem;

// Character Controller 2D is based upon the 2D character controller for Unity by Sharp Blog Code
// URL: https://www.sharpcoderblog.com/blog/2d-platformer-character-controller
//
// Adapted by: Tom Corbett on 6/3/2025

[RequireComponent(typeof(Rigidbody2D))]
[RequireComponent(typeof(CapsuleCollider2D))]

public class CharacterController2D : MonoBehaviour
{
    // Move player in 2D space
    public float maxSpeed = 3.4f;
    public float jumpHeight = 6.5f;
    public float gravityScale = 1.5f;

    float moveDirection = 0;
    bool isGrounded = false;

    InputAction moveAction;
    InputAction jumpAction;

    Rigidbody2D r2d;

    public Transform groundCheckPosition;
    public float groundCheckRadius;
    public LayerMask groundLayerMask;

    // Use this for initialization
    void Start()
    {
        r2d = GetComponent<Rigidbody2D>();

        r2d.freezeRotation = true;
        r2d.collisionDetectionMode = CollisionDetectionMode2D.Continuous;
        r2d.gravityScale = gravityScale;


        moveAction = InputSystem.actions.FindAction("Move");
        jumpAction = InputSystem.actions.FindAction("Jump");
    }

    // Update is called once per frame
    void Update()
    {
        // set the move direction
        moveDirection = moveAction.ReadValue<Vector2>().x;

        // are we jumping?
        if (jumpAction.WasPressedThisFrame() && isGrounded)
        {
            r2d.linearVelocity = new Vector2(r2d.linearVelocity.x, jumpHeight);
        }
    }

    void FixedUpdate()
    {
        // reset the grounded state
        isGrounded = false;

        // look for colliders that are not us
        Collider2D[] colliders = Physics2D.OverlapCircleAll(groundCheckPosition.position, groundCheckRadius, groundLayerMask);

        // was there a collider
        if (colliders.Length > 0) { isGrounded = true; }

        // Apply movement velocity
        r2d.linearVelocity = new Vector2((moveDirection) * maxSpeed, r2d.linearVelocity.y);
     }

    private void OnDrawGizmos()
    {
        // show the grounded radius
        if (isGrounded)
        {
            Gizmos.color = Color.yellow;
        } else
        {
            Gizmos.color = Color.red;
        }

        // draw the circle for the ground check
        Gizmos.DrawWireSphere(groundCheckPosition.position, groundCheckRadius);
    }
}