Today we dive deeper into the Animator Controller, which operates much the same way as our state engine, transitioning us between clips based upon parameters that we will set via scripts. We also look at how to animate properties beyond the Sprites themselves.
Part 1: Animation on Demand
Often times, we will want to switch between animation sequences, or call a property animation on demand. Perhaps this is in response to some current property value (like health or speed) or due to an interaction (like “dying”). The Animator component allows us to define a simple state machine to power an animation, comprised of Clips and Transitions, and queued through the values of Parameters which can be accessed and set externally.
In this case, we wish to augment our enemy character with a walk cycle, and then make that character “blink” when the player stomps on his head (determined here by the player collider intersecting with a trigger on the enemy’s head).
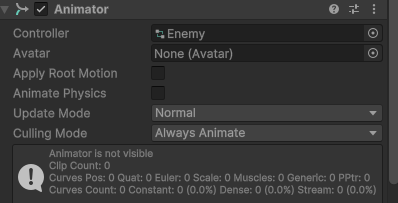
When we set-up our Walk Cycle animation for our sprite object, an Animator component is added to our game object.
Next we want to create a “blinking” animation to give our player feedback that the enemy character has been killed by us. Like before, we want to set up the animation clip using the Animation window, but this time we add the SpriteRenderer.Enabled property.
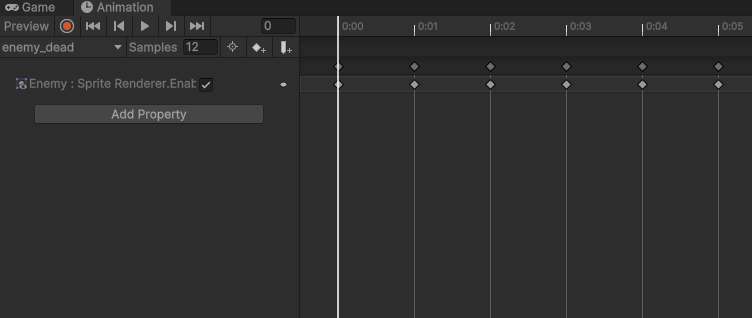
In this case, we set up a keyframe during each new frame and toggle the value of the sprite renderer.
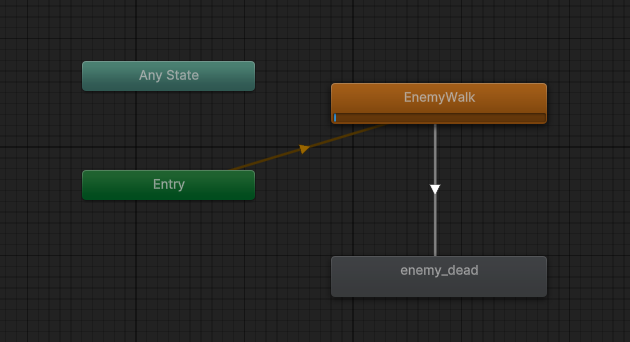
There is another window to add to our editor, the Animator window. You can open this by accessing it through the menu system (Window > Animation > Animator), or if you double-click the Controller field in the Animator Component on your game object. Once you open this, you will see an animation states machine set with your two clips, one of which is connected to the Entry note, and is colored orange. This is your “default” state, the first state you will arrive at when the animation start (or restarts). If you wish to make another clip the default state, right-click that node and select “Set As Layer Default State”.
For our animations to be able to move between these states, we must define and configure the Transitions. Right click on the Walking state, select “Make Transition” and drag your mouse over to the death clip. This will create a thin line with an arrow indication the direction of the transitions. the movement clip and click it to establish the line.
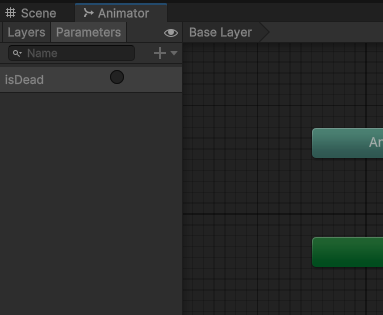
Before we move on, we also want to set up a Parameter, which is a condition that the Animator will use to determine when it is time to move to the next clip. With the Parameters tab selected, we press the “+” button and add a new Trigger. (Not to be confused with Collider triggers, an Animator trigger is like a function call – it is only active at the moment it is called. The other types – float, int, and bool, compare their values throughout playback. ) Here we create a Trigger called “isDead”.
When we select our transition you will see details about it appear in the Inspector. There are a few important settings for Sprite animation – you will want to uncheck the Has Exit Time checkbox, and set the Transition Duration to 0.0 (this is found under the Settings dropdown). Blending is great for 3D animation, where we need to interpolate between one set of movements and another to make our transition smooth, but in sprite frame animation there is no such thing as “blending” and so we want to use these settings to instantly jump to the next clip.
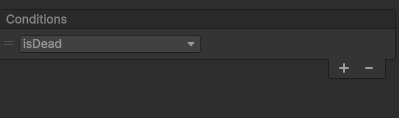
At the bottom of the Inspector you will see the Conditions panel, which defines the conditions that must be met in order for this transition to take place. Right now we only have one option – the isDead trigger.
Now if we play our game, our platform remains stationary. This is because we now need to pass a command to the Animator to fire the trigger that we defined, thus moving us through the clip. (If you have the object selected and the Animator window open, you can do this by clicking the button next to the isDead parameter.
Next, we add some script to our Enemy object to access and adjust these parameters. First we declare a type to hold our Animator component:
public Animator animator;
… and next we get the component in the start menu …
animator = GetComponent<Animator>();
… and finally we set our trigger to set the transition into motion.
private void OnTriggerEnter2D(Collider2D collision)
{
    if (collision.gameObject.tag == "Player")
    {
        // Queue the dying
        animator.SetTrigger("isDead");
    }
}
While this code demonstrates what we must do to trigger an animation by accessing that parameter, there are number of other steps that we performed in class to make the interaction complete, including turning off the rigidbody of the enemy object, setting the velocity to 0, and destroying its colliders. This is so that our player character does not continue through the enemy’s head trigger and get killed, despite having killed the player. Code for this is below.
Part 2: Player Animation States
The principles behind our player animation are very similar to those of our Enemy object, except now we have many more clips to move between. For this section, I highly recommend watching the video walkthrough, as a writeup will not do the process justice. However, here is a brief summary of the various animation states we attach to the player object.
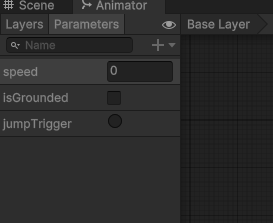
We set up parameters to assist with the various conditions that we will want to cause a transition to occur. These include:
- speed: a float value that will determine if our character should walk, run, or stand idle.
- isGrounded: a boolean that we will use to determine if our player is mid-air or grounded.
- jumpTrigger: a trigger that we will call as events to move us between states
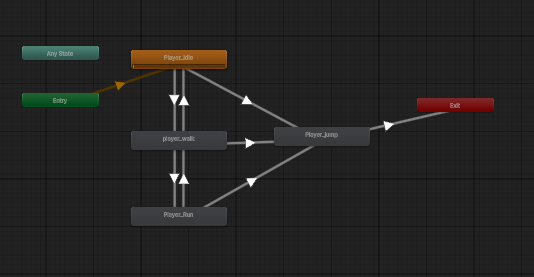
Above is our finished controller, with transitions in place. Here is how I have them configured:
- Entry: This step is automatic. Anytime the animation controller is enabled, or if another animation passes through the “Exit” state we will reset to here. Immediately moves to the default state, “player_idle” which holds our idle animation.
- Idle/Walk: uses the “speed” float as a condition to move between states. If we are Idle and speed is > 0.1 we will move to “player_walk”. If the current state is Walk and speed is < 0.1 we will move back to “player_idle”.
- Walk/Run: Similar to Idle/Walk, transition occurs when the speed crosses a value of 0.9
- Jump: All three of these transitions will use the “grounded” boolean, which we will populate from the “isGrounded” property of our character controller. A value of “false” will trigger this transition.
- Exit from Jump: Rather than creating multiple return paths and testing each path for speed values inside a range, we end our jump by exiting the animation when “isOnGround” equals “true”. This sends us back to the “Entry” state, which moves us to Idle and then evaluates based on our current speed to arrive at the correct position.
- Death: Because we may die at any time, we build the transition to the “Death” animation from the “Any State”, and set the condition to the “Death” trigger.
- Exit from Death: We did not use this path this year, but in past years I have also set a trigger “PlayerRevive” to act as a singular event that can move us out of the “Death” state. By going to Exit, we re-enter the flow at the “Entry” point and our animation starts again. However, this only makes sense if we are going to have our player object continue to exist. Since we are likely going to reset by destroying and instantiating, or by simply reloading a scene, this is extraneous and so we did not use it this year.
For all sprite transitions, I recommend turning off the Has Exit Time checkbox and setting the Transition Duration to 0 to assure instant transition from one clip to the next.
Animations can be looped by selecting the individual animation in the Asset Window and checking the Loop Time box in the Inspector. Our “Death” animation does NOT loop, as we do not want to die over and over again.
Part 3: Connecting the Parameters
Now we need to send values into the parameters. Previously, we have only used the SetTrigger( ) command, which is similar to calling a function. And because this was a one-time event, we simply ran the GetComponent<Animator> method in-line.
But now we want to submit regular updates to our Animator, indicating our current speed (for the walk cycle) and our grounded state (for the “jump” clip).
We first define an Animator type variable, and assign our component in the Start( ) command, so that we have a steady reference to it.
private Animator animator;
...
void Start()
{
    ...
    animator = GetComponent<Animator>();
}
Next, we pass in our values – “moveDirection” for the speed and “isGrounded” for the grounding status. Previously we used Input.GetAxisRaw for movement, but because we want to have our character’s speed ramp up, we changed our input to Input.GetAxis. That still returns values between -1 and 1, but our speed check is only looking for numbers between 0 and 1, so we find the absolute value using Mathf.Abs( ).
We place this check inside of the Update( ) command rather than FixedUpdate( ), because we only need to update the values when the frame is preparing to draw.
    void Update()
    {
        ...
        // speed
        playerAnimator.SetFloat("speed", currentSpeed);
        // grounded status
        playerAnimator.SetBool("isGrounded", isGrounded);
     }
We use the SetFloat(string, float) command to say which float parameter, and the value (here an absolute value). We pass the grounded status with SetBool(string, bool), and this will make our character enter the jump animation whenever he leaves the ground.
Finaly, we set our Jump animation to occur upon a collision with the Enemy Object, using the SetTrigger() method.
EnemyScript.cs
using UnityEngine;

public class EnemyScript : MonoBehaviour
{
    public float enemySpeed;
    public bool faceLeft;

    private Rigidbody2D rb;
    private SpriteRenderer sprite;

    private Animator animator;
    private bool amIAlive = true;

    void Start()
    {
        rb = GetComponent<Rigidbody2D>();
        sprite = GetComponent<SpriteRenderer>();

        sprite.flipX = faceLeft ? false : true;   // if facing left, don't flipX, if not facing left, flip X

        animator = GetComponent<Animator>();
        animator.SetBool("isAlive", amIAlive); // or I could say "true"

    }

    private void FixedUpdate()
    {
        if (amIAlive)
        {
            float direction = faceLeft ? -1f : 1f;  // set the direction with a ternary operator

            rb.linearVelocityX = enemySpeed * direction;
        }
    }

    private void OnTriggerEnter2D(Collider2D collision)
    {
        if (collision.gameObject.tag == "TurnAround")
        {
            faceLeft = !faceLeft;

            sprite.flipX = faceLeft ? false : true;
        }

        if (collision.gameObject.tag == "Player")
        {
            // trigger our death
            animator.SetBool("isAlive", false); // letting the animator know to trigger the death animation

            amIAlive = false;

            Destroy(this.gameObject, 1.0f);
        }
    }
}
CharacterController2D.cs
using System.Collections;
using System.Collections.Generic;
using UnityEngine;
using UnityEngine.InputSystem;

[RequireComponent(typeof(Rigidbody2D))]
[RequireComponent(typeof(CapsuleCollider2D))]

public class CharacterController2D : MonoBehaviour
{
    // Move player in 2D space
    public float maxSpeed = 3.4f;
    public float jumpHeight = 6.5f;
    public float gravityScale = 1.5f;

    float moveDirection = 0;
    bool isGrounded = false;

    InputAction moveAction;
    InputAction jumpAction;

    Rigidbody2D r2d;

    // public Transform groundCheckPosition;
    public Vector3 groundCheckOffset;
    public float groundCheckRadius;
    public LayerMask groundLayerMask;

    // animation parameters
    public Animator animator;


    // Use this for initialization
    void Start()
    {
        r2d = GetComponent<Rigidbody2D>();

        r2d.freezeRotation = true;
        r2d.collisionDetectionMode = CollisionDetectionMode2D.Continuous;
        r2d.gravityScale = gravityScale;


        moveAction = InputSystem.actions.FindAction("Move");
        jumpAction = InputSystem.actions.FindAction("Jump");
    }

    // Update is called once per frame
    void Update()
    {
        moveDirection = Input.GetAxis("Horizontal");
        animator.SetFloat("Speed", Mathf.Abs(moveDirection));
        animator.SetBool("Grounded", isGrounded);


        // are we jumping?
        if (jumpAction.WasPressedThisFrame() && isGrounded)
        {
            r2d.linearVelocity = new Vector2(r2d.linearVelocity.x, jumpHeight);
        }

        // are we facing the right direction

        Vector3 currentScale = transform.localScale;

        if (moveDirection > 0f && currentScale.x < 0f)
        {
            transform.localScale = new Vector3(Mathf.Abs(currentScale.x), currentScale.y, currentScale.z);

        } else if (moveDirection < 0f && currentScale.x > 0f)
        {
            transform.localScale = new Vector3(-Mathf.Abs(currentScale.x), currentScale.y, currentScale.z);
        }
    }

    void FixedUpdate()
    {
        // reset the grounded state
        isGrounded = false;

        // look for colliders that are not us
        Collider2D[] colliders = Physics2D.OverlapCircleAll(transform.position + groundCheckOffset, groundCheckRadius, groundLayerMask);

        // was there a collider
        if (colliders.Length > 0) { isGrounded = true; }

        // Apply movement velocity
        r2d.linearVelocity = new Vector2((moveDirection) * maxSpeed, r2d.linearVelocity.y);
     }

    private void OnDrawGizmos()
    {
        // show the grounded radius
        if (isGrounded)
        {
            Gizmos.color = Color.yellow;
        } else
        {
            Gizmos.color = Color.red;
        }

        // draw the circle for the ground check
        Gizmos.DrawWireSphere(transform.position + groundCheckOffset, groundCheckRadius);
    }
}