Today we build out the flow of our game logic – setting up the game, starting a round, identifying a scoring event, and starting the next round. There are many steps to consider and so we visually map them out into a flow diagram that we will use to build our “finite state machine”. We will also use an “enumerated type” to create an easy-to-read variable to hold our current state, and use the “GameObject.Find( )” command to allow one object to easily locate another. Let’s go!
Part 1: The Finite State Engine
Right now our “game” isn’t much of a game yet. We are lacking the basic components of a game such as rules and objectives. We need to add the steps and stages and rules and mechanics that make this a game of Pong! rather than a really basic screensaver.
The goal of our game is for one player to win, which they do by scoring more points than their opponent. This objective implies that we need a method by which to score points, and multiple opportunities for players to score. A score is registered when the ball gets past and hits the wall behind the opposing player’s paddle. In order to have multiple attempts, we need to create “rounds” of playing through our core bouncing ball mechanic. Each round starts with the ball reset to the center, and ends when a score is registered.
Given that, we can generate a diagram of the “flow” of our game as such:
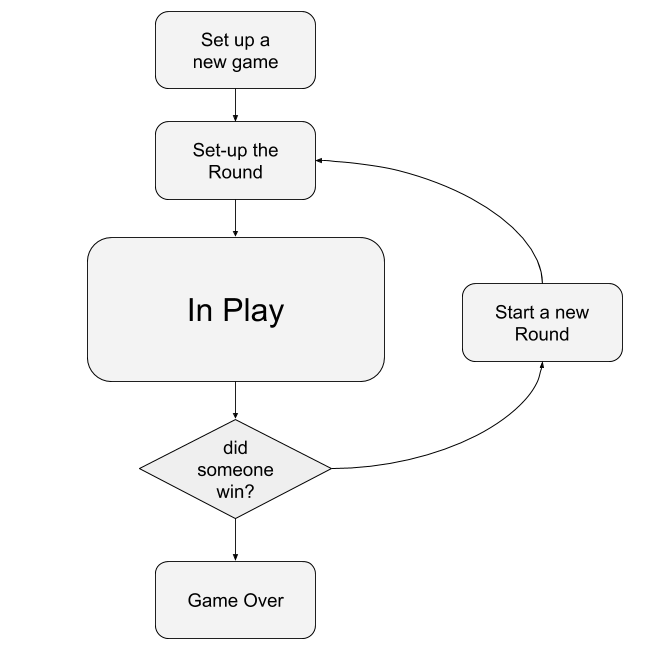
This is an example of a Finite State Machine – a model of our the logic of our game, where our game will inhabit only one state at a time, and certain conditions must be met to move or transition from state to state.
In our model, we can see the need for a few particular stages as we progress. First we have to set up or initialize a new game. This is where we will set our initial score of 0-0 and initialize all of the objects back into their start state. Next we have to set up the individual round. This state is separate from the initialize game state because we will return to this frequently as each new round begins. Here we expect to see behaviors like putting the ball back at the origin, and resetting any modifications that we made to the pitch of the sound or speed of the ball. Once the round begins, we enter the actual gameplay state, which continues until one side scores. Once a point is scored, we need to register that event and determine if someone has won the game, or if we need to reset our board and start a new round. If the objective number of points have been scored, it’s time to declare a winner and move to a “game over” state.
It is important to note that this is an abstract machine – we will use this model to code the states and transitions and object behaviors, but these components will be assembled through composite parts so that the preferred action occurs, rather than coding everything into one giant instruction set in one particular function.
Enumeration
Since we will share the responsibility for moving between states across the objects in our scene, we need a reliable method to get and set our current state. Traditionally one might use a string to hold a value so that it hold an easy to read value, or one might use an integer and assign values to each index so that the lookup is fast. Instead, we will use a method that combines the advantages of both – Enumeration.
Enumeration lets us define all of the possible values for a set, which fits very well when working with a finite number of states. An commonly given example of this would be to create an enumerated set of directions (north, east, south, west) so that the values are plain English, but are also the only possible values for the type.
In our case, we want to define some states for our game – setting up the game, getting a round ready, the actual gameplay itself, and finally the game over state. We define our enumeration by declaring a public enum outside of the EasyPong class declaration in our project. This will make the type available to use across all scripts in our scene.
using UnityEngine;

public enum GameState { SetUp, GetReady, Playing, GameOver };

public class EasyPong : MonoBehaviour
{
...
Now that I’ve declare the enumerations, I can declare my own variable in the class and by default put it in the “SetUp” state…
// define my gamestate variable
public GameState currentState = GameState.SetUp;
With this variable in place, we now have something that we can test. Moving over to PaddleScript we can see an example of how we can use this.
We previously placed our paddle movement code inside of the Update( ) method so that it would be called once per frame. But what if we only want to move our paddles when the ball is in play? To do this, we first move our paddle movement code to a new function called MovePaddle( ). We then replace the Update( ) code with a call to that function inside of an “if” statement that checks to see if we are in the Playing state.
    void Update()
    {
        if (game.currentState == GameState.Playing)
        {
            MovePaddles();
        }
    }

    void MovePaddles()
    {
        Vector3 currentPosition = transform.position;

        if (Input.GetKey(upButton))
        {
            currentPosition.z += speed * Time.deltaTime;
        }
        if (Input.GetKey(downButton))
        {
            currentPosition.z -= speed * Time.deltaTime;
        }

        // clamp the paddle values to the offset
        currentPosition.z = Mathf.Clamp(currentPosition.z, -offset, offset);
        // update the paddle position
        transform.position = currentPosition;
    }
If we try to run this now, Unity will be cross with us and we will get a Null Reference Exception, because we have no connection to the EasyPong script that is running on our EasyPongManager object.
We could build a public GameObject variable and use our drag-and-drop method to connect the Game Manager object, but let’s try another useful method – the Find( ) command.
Rather than continue to hide our main script in the Main Camera object, we can look for the GameObject that script is on, and then get the EasyPong component from that.
private EasyPong game; // set the game manager object

// Start is called once before the first execution of Update after the MonoBehaviour is created
void Start()
{
    // get the game manager object
    GameObject gameManager = GameObject.Find("EasyPongManager");

    // get the EasyPong component
    game = gameManager.GetComponent<EasyPong>();
}
Here, we declare a GameObject variable named “gameManager” (this cleverly named variable will hold the reference to the object with the script that is managing our game), and then we access the “EasyPong” script attached to that object using GetComponent<EasyPong>( ).
Inside of the Start( ) method, we set gameManager equal to GameObject.Find(“EasyPongManager”).Find() will return the first object in the scene that it finds with a matching name.
Next we set our EasyPong object “game” by running a GetComponent<EasyPong >() on gameManager, and now we have direct access into the public variables and methods of that script.
Armed with this new information, we update our Update( ) “if” statement to read as: if (game.myState == GameState.playing)
NOTE:
Although I used two separate variables here, we could have also done this with just one running GetComponent on the GameObject that Find( ) would return like so:
game = GameObject.Find(“EasyPongManager”).GetComponent<EasyPong>( );
… but here I chose the extra step for clarity. Note that I declared “gameManager” as a GameObject type variable inside of the function, as opposed to at the start of the class. This mid-function declaration is a local variable, meaning it is only available within the function itself, and is released when finished. Since I only need “gameManager” once – to find the EasyPong component – it makes sense to declare it here and let that variable expire when the function is over. My “game” variable is an instance variable, which means that value is available to that instance of the script. This means that multiple instances can have different values, such as our paddles holding different strings for which button is up or down.
You may think it would make more sense to call this a class variable, but that term is reserved for a variable whose value is consistent across every instance of the class. We will learn more about this next week when we dive into “singletons”.
Now go back to Unity and hit play to see what happens. If you have done this correctly, nothing should occur – the paddles should stay in the same place and be unresponsive to key presses. This is because our gamestate is not set to “Playing”. Because we made this public, we can change the setting in our Editor. You will see a dropdown for the Game State – set that to “Playing” and click on your game window and now your paddles should move.
Part 2: Moving Through States
Initializing the Game
Most games that we play in life will require some sort of preparation before the game itself can begin. Bases must be placed, cards must be dealt, game pieces must be distributed. Our game is no different – before we can play our game, we need to set the objects and attributes and place them into a ready state for play to begin.
In order for our game to have a winner, we need to be able to keep score. We also should have some definition of what “winning” is. (Here it will be the first player to reach 3 points.)
    // score tracking
    private int playerOneScore, playerTwoScore;
    private int MAX_SCORE = 3;
Note here that I named two variables – playerOneScore and playerTwoScore – on the same line. You can use commas to declare more than one variable of the same type and settings, and this works the same as if I had written an individual declaration for each. I also have declared a variable for MAX_SCORE, but here I assigned a value in the declaration. I did this because I only intend to read that variable, not set it, hence the use of ALL_CAPS_SNAKE_CASE to remind me that I should treat this as a constant value. The value for our player one and player two scores will be set in our Start( ) menu because those will change regularly, and will be reset at the start of each game.
    void Start()
    {
        ballRB = ballObject.GetComponent<Rigidbody>(); // assign rigidbody
        // get the start position of the ball
        ballStartPosition = ballObject.transform.position;

        // initialize the score
        playerOneScore = 0;
        playerTwoScore = 0;

        // set the gamestate
        currentState = GameState.SetUp;
        overlayMessage.enabled = false;

        // start the first round
        NewRound();
    }
In our start we reset the scores to 0, fetch the position of the ball object (so that we have a reference point to use once a round is over), and make sure the GameState is at “setup”. Finally, move to our next stage – starting an individual round, which we do with our new method NewRound( )
Starting the Round
The start of a new round, whether it is the first round or comes after a scoring event, consists of two primary steps:
- Resetting the ball to the start position
- Starting the round by pushing the ball into motion
To handle this, we created three new functions – NewRound( ), ResetBall( ), and StartBall( ). NewRound( ) will handle the configuration of a new round that is about to play. Here we should be in the “setup” stage. It will call ResetBall( ) for us, which will move the ball back to the origin, and could be used to reset any other modifications that we made such as returning the AudioSource pitch to a value of 1. Once ResetBall( ) has completed its execution, we move on to the StartBall( ) function that will put the ball into motion.
private void NewRound()
{
    // reset the ball position
    ResetBall();

    StartBall();
}

private void ResetBall()
{
    // make the ball kinematic
    ballRB.isKinematic = true;

    // move the ball
    ballObject.transform.position = ballStartPosition;
}

private void StartBall()
{
    direction.Normalize(); // normalize the direction

    // start the ball in motion
    ballRB.isKinematic = false;
    ballRB.AddForce((direction * force), ForceMode.VelocityChange);

    // set the gamestate
    currentState = GameState.Playing;
}
New here is the isKinematic value that we are modifying on our Rigidbody object “ballRB”. The Rigidbody.isKinematic flag is a boolean – that is, it can only be set to true or false. When you set an object’s isKinematic value to true, you can now control and move the object, instead of Unity’s physics system. It is a simple way to take physics out of the equation. Without this, your change of the balls position could be misinterpreted by the physics system. Also, our momentum/velocity does not reset when we move this without kinematic control and so the ball will continue to move as soon as it is replaced. Setting this to isKinematic will reset all momentum, movement, and velocity.
Here in ResetBall( ) we set isKinematic to TRUE. We then move the ball back to the original spot by setting the transform.position value to ballStartPosition.
Once we finish resetting the ball, we return to the execution of NewRound( ), and StartBall( ) is called. This script turns ball Physics back on (by setting isKinematic to FALSE), and then applies the direction and force that we previously held inside Start( ). Finally, we set the game state “currentState” to GameState.Playing.
In order to set this machine into motion, we made the last line of our Start( ) method a call to NewRound( ). Now the ball is in action and our paddles finally move!
Now that we’ve started the round, we need a way to stop it, and we do this by recognizing that back wall has been hit, and registering the scoring event.
Part 3: Registering the Score
We set up our system so that the back walls would detect whether or not they had been hit by the ball, and tell the game manager to register the scoring event. We did this so that we could set a variable on each wall to indicate to whom the score should be attributed.
In order to talk to the EasyPong script, we needed a reference to the Game Manager so that we could access the component, and call the public function RegisterScore( ). We once again need access to the EasyPongManager object’s EasyPong script, and here we use a similar method to the PaddleScript, except we remove the need to declare a GameObject variable and instead immediately perform the GetComponent<>() function directly on the results of GameObject.Find( ).
public class BackWallScript : MonoBehaviour
{
    private EasyPong game;
    public int playerNumber;

    void Start()
    {
        // populate the game object
        game = GameObject.Find("EasyPongManager").GetComponent<EasyPong>();
    }

    private void OnCollisionEnter(Collision collision)
    {
        if (collision.gameObject.name == "BallObject")
        {
            game.RegisterScore(playerNumber); // tell the game manager that we scored
        }
    }
}
Another change from our previous scripts can be found in our collision script – this time we tested the name of the game object that we collided with, verifying that it is indeed the “BallObject”. Once we have confirmed this, we tell the EasyPong instance to run the RegisterScore function, and pass it an integer that we will populate with the player id who should receive the point.
Back in EasyPong, we define RegisterScore(int playerNumber) as such:
public void RegisterScore(int playerNumber)
{
    // process the score
    if (playerNumber == 1)
    {
        playerOneScore++;
    }
    else if (playerNumber == 2)
    {
        playerTwoScore++;
    }
    else
    {
        Debug.Log("Player number not assigned correctly: " + playerNumber);
    }

    // show the score
    Debug.Log("The Score is: " + playerOneScore + " - " + playerTwoScore);

    // get out of playing gamestate
    currentState = GameState.SetUp;

    // start a new round
    NewRound();
}
There’s a lot going on here, so let’s unpack it:
- We check to see which player scores, and increment their score value by one (the ++ is the same as saying that something “+= 1” or something = something + 1)
- We use Display.Log( ) to put the score into the console to track our progress
- We prepare for a move back to the setup stage by setting the currentState to “SetUp” and running NewRound( ).
- This is also where we would test to see if either player had just made it to our MAX_SCORE value, and if so, move to the Game Over state instead, but that part is for you to complete as your homework.
Part 4: Beginning Coroutines
In a previous class, we have discussed that Unity does not use multi-threading, meaning that it runs through the code and objects sequentially. It is a very linear process. When the “Awake” message is sent out, Unity goes down the list of objects that it maintains (and that you will not control) and one by one passes it the “Awake” message. That message is passed to each one of that object’s components, and if that object has an Awake( ) function it is executed, line by line. Once every object has received the “Awake” message, the “Start” message is called prior to rendering the next frame, and Unity again goes down the list, object by object, component by component, and any corresponding function will execute.
When a function is called, it must run until it is completes every line (or until it encounters a “return”, which is a type of completion). If another function is called during that original function, then THAT new function must run to completion before moving to the next line in the original, and so forth and so on.
Using this method, it can be difficult or cumbersome to create functions that execute periodically (such as a timed event), or to occur across a span of time and across many frames (such as a fading transition). Creating and maintaining internal timers can be tricky, and it requires a lot of extra calls.
A coroutine is a function that lets us break out of this pattern by allowing us to pause it’s execution, hand control back to Unity, and then resume later and pick back up where it left off after some measure.
In our game, we would like to create a new state to let the player “get ready” to begin a round. A moment between when the ball is reset, and the action begins. For our first co-routine, we are going to make this moment last for 3 seconds.
In our EasyPong script, we create our function by declaring an IEnumerator. This function will wait for three seconds, and then call the StartBall( ) function.
    public IEnumerator GetReady()
    {
        // wait for 3
        yield return new WaitForSeconds(3.0f);

        // start the ball
        StartBall();
    }
We launch this function in NewRound( ) by removing the StartBall( ) function call and replacing it with the StartCoroutine( ) function and passing our coroutine as the parameter.
    private void NewRound()
    {
        // reset the ball position
        ResetBall();

        // get ready to play
        StartCoroutine(GetReady());
    }
Now when we run this, our ball sits there for three seconds and then begins to move.
Part 5: Basic UI
Three seconds can be a long time, and we don’t want our player to get confused, so first we should build a message to the player letting them know that now is the time to Get Ready!!!
To do this, we create a new text object by going to Game Object > UI > Legacy > Text or Create > UI > Legacy > Text.
Make sure to use the “Legacy” Text objects for this assignment. In a future assignment we will look at TextMeshPro, which is a more advanced (and thus more complicated) system.
When you do this, you will see a few new objects appear in your scene, including a Canvas object, and an EventSystem object. We will cover the UI system more in a future lesson, for now just know that the Canvas is the two-dimensional space where UI elements live, and renders as an overlay for the active camera.
One change you will definitely want to make now is in the Canvas object. Look for the Canvas Scaler component and change the UI Scale Mode to Scale with Screen Size. This ensures that your UI elements will fill the same proportions of the screen whether it is in the Game window or full screen.
Select the text object that you have created and change the name. We used myOverlayTextObject (because we will use this for more than one message). In the Text component, change the Text field (a longform text area, and yes, text inside text is redundant) to read something besides “New Text”. I chose “GetReady”. Set your Alignments to “Center” and “Middle”, and set your Horizontal and Vertical overflow values to Overflow. Finally, adjust the font size until you have something that looks good to you.
Next, go to the EasyPing script, and add a Text object variable to hold a reference to our text object. UI elements have their own Unity library, which we have to call first by adding the following line to the “using” commands at the very top:
using UnityEngine.UI
Without this line, your calls to get and set text objects will return errors because Unity does not recognize that you will be using them.
Next, create the text object to hold the message text, and use our drag-and-drop method in the Unity editor to assign the text object to this field.
// UI elements
public Text overlayMessage;
Now inside of the Start( ) function, we set the enabled property to false so that it will not display until we tell it to.
overlayMessage.enabled = false;
We want to make our message display while the GetReady coroutine is running, and turn off again when the stage is over and we move into the Playing state. We do this by adjusting the text object’s enabled property like so:
    public IEnumerator GetReady()
    {
        // tell the manager to wait three seconds, then start the round

        // get ready state
        currentState = GameState.GetReady;

        // put up the message
        overlayMessage.enabled = true;

        // wait for 3
        yield return new WaitForSeconds(3.0f);

        // turn off the message
        overlayMessage.enabled = false;

        // start the ball
        StartBall();

    }
Now we should see the message appear for 3 seconds, then disappear as the ball starts moving.
Tomorrow we will continue to modify our code to better prepare the player, and take a deeper look at Coroutines and UI.
BackWallScript.cs
using UnityEngine;

public class BackWallScript : MonoBehaviour
{
    private EasyPong game;
    public int playerNumber;

    // Start is called once before the first execution of Update after the MonoBehaviour is created
    void Start()
    {
        // populate the game object
        game = GameObject.Find("EasyPongManager").GetComponent<EasyPong>();
    }

    private void OnCollisionEnter(Collision collision)
    {
        if (collision.gameObject.name == "BallObject")
        {
            game.RegisterScore(playerNumber); // tell the game manager that we scored
        }
    }

}
PaddleScript.cs
using UnityEngine;

public class PaddleScript : MonoBehaviour
{
    public string upButton;
    public string downButton;

    private float speed = 50.0f;
    private float offset = 20.0f;

    private EasyPong game; // set the game manager object

    void Start()
    {
        // get the game manager object
        GameObject gameManager = GameObject.Find("EasyPongManager");

        // get the EasyPong component
        game = gameManager.GetComponent<EasyPong>();
    }

    // Update is called once per frame
    void Update()
    {
        if ((game.currentState == GameState.Playing) || (game.currentState == GameState.GetReady))
        {
            MovePaddles();
        }
    }

    void MovePaddles()
    {
        Vector3 currentPosition = transform.position;

        if (Input.GetKey(upButton))
        {
            currentPosition.z += speed * Time.deltaTime;
        }
        if (Input.GetKey(downButton))
        {
            currentPosition.z -= speed * Time.deltaTime;
        }

        // clamp the paddle values to the offset
        currentPosition.z = Mathf.Clamp(currentPosition.z, -offset, offset);
        // update the paddle position
        transform.position = currentPosition;
    }

}
EasyPong.cs
using UnityEngine;
using UnityEngine.UI;

public enum GameState { SetUp, GetReady, Playing, GameOver };

public class EasyPong : MonoBehaviour
{

    // ball object
    public GameObject ballObject;
    private Rigidbody ballRB;
    public Vector3 direction;
    public float force;
    private Vector3 ballStartPosition;

    // define my gamestate variable
    public GameState currentState = GameState.SetUp;

    // score tracking
    private int playerOneScore, playerTwoScore;
    private int MAX_SCORE = 3;

    // UI elements
    public Text overlayMessage;

    // Start is called once before the first execution of Update after the MonoBehaviour is created
    void Start()
    {
        ballRB = ballObject.GetComponent<Rigidbody>(); // assign rigidbody
        // get the start position of the ball
        ballStartPosition = ballObject.transform.position;

        // initialize the score
        playerOneScore = 0;
        playerTwoScore = 0;

        // set the gamestate
        currentState = GameState.SetUp;
        overlayMessage.enabled = false;

        // start the first round
        NewRound();
    }

    private void NewRound()
    {
        // reset the ball position
        ResetBall();

        // get ready to play
        StartCoroutine(GetReady());
    }

    private void ResetBall()
    {
        // make the ball kinematic
        ballRB.isKinematic = true;

        // move the ball
        ballObject.transform.position = ballStartPosition;
    }

    private void StartBall()
    {
        // pick a direction
        direction.Normalize(); // normalize the direction

        // start the ball in motion
        ballRB.isKinematic = false;
        ballRB.AddForce((direction * force), ForceMode.VelocityChange);

        // set the gamestate
        currentState = GameState.Playing;
    }

    public void RegisterScore(int playerNumber)
    {
        // process the score
        if (playerNumber == 1)
        {
            playerOneScore++;
        }
        else if (playerNumber == 2)
        {
            playerTwoScore++;
        }
        else
        {
            Debug.Log("Player number not assigned correctly: " + playerNumber);
        }

        // show the score
        Debug.Log("The Score is: " + playerOneScore + " - " + playerTwoScore);

        // get out of playing gamestate
        currentState = GameState.SetUp;

        // start a new round
        NewRound();
    }

    public IEnumerator GetReady()
    {
        // tell the manager to wait three seconds, then start the round

        // get ready state
        currentState = GameState.GetReady;

        // put up the message
        overlayMessage.enabled = true;

        // wait for 3
        yield return new WaitForSeconds(3.0f);

        // turn off the message
        overlayMessage.enabled = false;

        // start the ball
        StartBall();

    }
}