In this exercise, we are going to create the beginning of a Pong style game from scratch. We will use Unity primitives to create a playing field, make objects move with code and input from our keyboard, and finally have our ball bounce off of the walls.
But first, a quick note about the coding exercises…
This write-up is a summary of the lesson that has been recorded and posted to the class YouTube channel. Each week, this companion document will be posted to follow along with the concepts, provide helpful links, an include the code from the workshops. DISCLAIMER: Some of these write-ups have been repurposed from previous iterations of the class, and while I will edit them to bring them up to date and in sync with the video content, there may still be some discrepancies between this version and the video, such as the level of detail in a step, the order in which steps occur, or in the names and/or values of functions and variables. When in doubt, go with the instruction from the video.
Part 1: Setting up the playing field
The first thing we need is a field of play. We decided on a rectangle that is 100 units wide by 50 units high. We build this by creating a plane by selecting GameObject > 3D Object > Plane. Make sure our plane is at the origin by clicking the gear icon in the upper right corner of the Transform component and select Reset. This will set your plane’s (x,y,z) position to (0,0,0), reset all rotations to 0, and the scale to 1. Now set your plane’s transformation to the following:
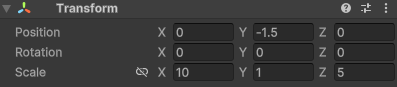
Note: Unity plane objects are 10 units by 10 units at their natural scale, so we only need to scale our x to 10 and our z to 5.
Next we create a wall by adding a Cube (GameObject > 3D Object > Cube) and setting the scale to X: 100 | Y: 2 | Z: 2. We move this wall to the side (a position of X:-26 | Y: 0 | Z: 0 should work) duplicate it, and place the copy at the other side wall. Do the same for the shorter walls, scaling your cubes to fit.
Set your camera’s Position to (0, 50, 0), and Rotation to (90, 0, 0). Adjust the height until you can see the entire board in your Game view.
At this point, the Plane and the Walls are becoming difficult to discern from one another, as everything is currently a bright white color. Let’s change this.
We are going to create a new materials. You can do this by right-clicking your mouse in the Asset window and selecting Create > Material. You will see a new material pop up in the Asset window. Give this a name, and select it. In the Inspector, look for the Albedo setting, and click the color swatch next to it. This will bring up a color picker that lets you choose a setting. Next, change the Smoothness setting to 0. This will give our material a matte finish. Assign the material to the Plane by clicking and dragging the icon from the Asset window onto the Plane. (You will see objects temporarily assuming this material when the mouse is over them, indicating which object you will affect.
Next, we need a ball. Create a sphere (GameObject > 3D Object > Sphere). Reset the transformation to put it at the origin, and set the XYZ scale to 3.
Notice that for the plane we set the position’s Y value to -1.5. This moves the plane down, to keep it from intersecting with the ball (whose radius is now 1.5 units). We could keep it at zero, and set the ball’s Y position to 1.5, but since the ball is the object we will move and interact with the most, it is simpler to keep it at the origin and move the other components around it.
Note: In Unity, the “Y” axis moves up/down. This differs from many modeling programs that treat “Z” as the up axis. “X” is still left to right, so if you want to make something move on the ground, as we do here, you are moving along the XZ plane.
Part 2: Making Objects Move
At the heart of our game is a moving ball, and so that is where we will begin with motion. In class, we discussed the concept of “animation”, that as we are shown still images in rapid succession, our brain interprets objects that are slightly altered or offset across those images (or “frames”) as moving. Our game engine works the same way – it draws a single still frame by rendering the camera view of the game world, then replaces that frame with an updated frame where the “moving” objects have adjusted their position or appearance, or the camera is rendering from a new location or orientation, and this gives us the effect of movement.
Moving incrementally with scripting
In this version of our game, we will move the ball incrementally in each successive frame. To do that, we will need to know a few things:
- the current position of the ball
- the direction in which the ball should move
- the speed at which the ball should move
Based upon these three pieces of information we can calculate and move the ball to its new position to create this experience of motion.
We start by creating and attaching a new script to our Main Camera. (For these early exercises we will use the camera because it is an object that we expect to be always present in the scene.) With the camera selected, click the Add Components button and then navigate to New Script. Give your script a name (I named mine HardPong, because it sounds like a terrible 80s action movie.) The camera gains a Script component with this name, and by double-clicking the file in the component, we can open it in our code editor.
Once our script has opened, we edit it to look like this:
using System.Collections;
using System.Collections.Generic;
using UnityEngine;

public class HardPong : MonoBehaviour
{
    // ball variables
    public GameObject ball;  // the game object of the ball

    public Vector3 direction;  // the vector indicating heading
    public float speed = 1.0f;  // value to move as speed/velocity

    // Start is called before the first frame update
    void Start()
    {
        ball.transform.position = Vector3.zero;

    }

    // Update is called once per frame
    void Update()
    {
        ball.transform.position = ball.transform.position + (direction * speed);
    }
}
There are three important components to this. First, we establish the class variables that will be used in this script. The GameObject type allows us to hold a reference to an object. By declaring this as “public”, we can populate this variable from the Unity Editor, in a field that will be provided in the corresponding Script component.
Next, we declare a float variable for our speed, and assign it a value of 1.0f. The “f” indicates that this is a floating point number. This is also declared “public”, so that we can adjust our speed in the editor, without having to rewrite the code. Although we assign a value here in the declaration, any adjustment in the editor will override this value. (If we adjust the value later within the code, such as during the Start( ) method, that new value will override what is in the editor during runtime, but revert to the editor value when playback stops.)
Finally, we declare a Vector3 for the direction. This is a structure that holds three floating point values (representing the “x”, “y”, and “z” values of the position or direction). By making this public, we expose the X/Y/Z values in the editor so that we can experiment or modify.
Once our variables are declared, we edit our methods. The Start( ) method runs prior to the first frame that this object will be a part of. It is a one-time operation, and is primarily used to set up an object’s attributes, connect to other objects or scripts, or populate variables that later scripts will use. Here, we use it to reset the ball’s position to the origin. In our editor, we will assign our sphere object as the “Ball” by dragging the sphere from the hierarchy into the “Ball” field on our script component. This establishes a relation where our script now has a reference to the ball object and can access the public variables, such as the position (an attribute of the transform component). The position of an object can only be set by submitting a Vector3, you cannot individually set the floats within that position, so we need a Vector3 to pass in. By calling Vector3.zero, we fetch a pre-made vector with a value of [0,0,0]. We do this initial move to make sure our ball is properly located at the beginning of a round.
When the game is running, the Update( ) method is called prior to drawing each frame. This is where most of our common game loop activities will be located. For now, we want to move the ball in each frame, which we do by adding our direction vector, scaled by our speed, to the current position of the ball. The end result is the ball moves off the screen, rather quickly.
Normalizing direction
Currently, our “direction” values create a vector of indeterminate length. Because we express our movement here as speed * direction, we have implied that we only want Direction to contribute to the heading of the motion, not to have an effect on the velocity. To do this, we need to normalize our direction vector. Normalizing a value refers to adjusting numeric values to fit a scale or standard, usually as an expression of a number between 0 and 1 (essentially the decimal representation of a percentage). In this case, our standard unit is the direction of vector, expressed as a vector with a magnitude (length) of 1. The Normalize( ) command will find the magnitude of a Vector3 (the distance from [0,0,0] to the point expressed by [x,y,z]) and divide all 3 vector values by that number, resulting in a Vector3 with a magnitude of 1.0. This means that our scalar value speed will be the distance traveled (the magnitude of our motion vector) in each frame.
We normalize our value by adding the following line to our Start( ) command:
direction.Normalize();
Smoothing the motion
You may notice that our movement is rather fast, or maybe choppy. This is because our scalar value of speed right now does not change, and is applied equally in each frame, but our framerate is not steady. Our speed value should represent a velocity (expressed as distance/time) instead of distance/frame. To smooth this motion out, we want multiply our speed value against the amount of seconds that have passed since the previous frame. We do this by multiplying our speed (velocity) by Time.deltaTime.
To do this, we edit our ball moving command in the Update( ) method to this:
ball.transform.position = ball.transform.position + (direction * speed * Time.deltaTime);
Part 3: Moving things with Input
Next we need to create a paddle object. Here, rather than moving in every frame, we only want the motion of the paddles to occur when we are pressing a particular button. Also, the button (or buttons) being pressed will determine the direction that this paddle should move. Now we need to start using conditionals (specifically, “if” statements) to test our keyboard keys, and respond accordingly.
Make a new paddle object by placing and scaling a cube. Once this has been created, convert it into a prefab (by dragging it from our Hierarchy to our Assets folder) and placed prefab instances of the paddle on the left and right of the field of play, with x-values of -40 and 40.
We define a new function MovePaddles( ), which we call from Update( ) so that it runs every frame. We define public variables for the GameObjects leftPaddle and rightPaddle (and associated them in the browser), and created a paddleSpeed value to control the motion.
    // paddle variables
    public GameObject leftPaddle, rightPaddle;
    public float paddleSpeed = 1.0f;
Note: in the above code, I have declared two variables – leftPaddle and rightPaddle – in the same line, separated by a comma. Since these are both of the same type (GameObject), we can declare multiple on the same line.
In the function definition, we made the following steps:
- Get the position of the paddles (leftPaddlePosition, rightPaddlePosition)
- Test certain keys to see if they are pressed, and if they are, increment or decrement the x-value of the corresponding paddle position.
- Pass the new positions back to the paddles.
This creates the effect of moving the left and right paddle when we press the W, S, up arrow, and down arrow keys.
    void MovePaddles()
    {
        // Where are the paddles
        Vector3 leftPaddlePosition = leftPaddle.transform.position;
        Vector3 rightPaddlePosition = rightPaddle.transform.position;

        // figure out how far each should move
        float paddleDistance = paddleSpeed * Time.deltaTime;

        // left paddle
        if(Input.GetKey("w"))
        {
            leftPaddlePosition.z = leftPaddlePosition.z + paddleDistance;
        }

        if (Input.GetKey("s"))
        {
            leftPaddlePosition.z = leftPaddlePosition.z - paddleDistance;
        }

        // right paddle
        if (Input.GetKey("up"))
        {
            rightPaddlePosition.z += paddleDistance;
        }

        if (Input.GetKey("down"))
        {
            rightPaddlePosition.z -= paddleDistance;
        }

        // update the paddle position
        leftPaddle.transform.position = leftPaddlePosition;
        rightPaddle.transform.position = rightPaddlePosition;
    }
Note that we use the same Time.deltaTime to keep the paddle movement equally smooth. Finally, we add the call to MovePaddles( ) to the Update( ) loop.
Part 4: Bouncing the Ball
Now it is time to create some rudimentary collisions. Eventually we will ask Unity to process our collisions for us, and it will do it quite efficiently. But for now, we are going to create our own collision detection system using a two-step process:
- Identify whether or not our ball was still inside of the field of play
- If we are outside of the box, figure out what our position inside should be and move the ball there.
Our ideal solution is that the walls have perfect reflection, and if the ball were to move in a path that would move it beyond the edge of the playing field, it would bounce back to remain in play.
Since we are only reflecting based upon the outer walls, this process is easy – we simply need to make sure that with each move, the ball remains inside of the outer boundaries, and if it does not, we need to adjust the position to keep it inside. These checks will require us to know the exact numeric position of these border lines, and we will refer to them repeatedly. Rather than repeatedly hard code these values, it would make sense for us to define a set of private variables to hold these values.
    private float FIELD_LEFT = -48.5f;
    private float FIELD_RIGHT = 48.5f;
    private float FIELD_TOP = 23.5f;
    private float FIELD_BOTTOM = -23.5f;
In the video, we originally set these as 50, -50, 25, and -25, to reflect the edges of the plane that we created. But since our ball has a 1.5 unit radius, we eventually trim 1.5 units off of each side to give it the appearance of bouncing off of the “edge”. Also note the use here of SNAKE_CASE for the variable names. While we are not setting these to be “static” variables (meaning their value will not change), we are going to treat them as such, and use the snake case format to remind us that these are holding constants, ones that we should not alter.
Now that we know our boundaries, we have to check each time the ball moves to see if it crossed one of these boundaries. If it did, we will have to process that bounce. Let’s start by creating the following code to check our ball position.
    void CheckBallPosition()
    {
        // get the current position of the ball
        Vector3 currentPosition = ball.transform.position;

        // test the boundaries
        if (currentPosition.z >= FIELD_TOP)
        {
            // bounce off of the top
            BounceBall(currentPosition, "top");
        } else if (currentPosition.z <= FIELD_BOTTOM)
        {
            // bounce off of the bottom
            BounceBall(currentPosition, "bottom");
        }

        if (currentPosition.x >= FIELD_RIGHT)
        {
            // bounce off of right
            BounceBall(currentPosition, "right");
        } else if (currentPosition.x <= FIELD_LEFT)
        {
            // bounce off of left
            BounceBall(currentPosition, "left");
        }
    }
In this function, we do the following:
- Get the current position of the ball (assuming the ball just moved). Note that we don’t have to declare a “new” Vector 3, because the object we are passing into this variable, the current position of the ball, is already of that structure.
- We test to see if it has crossed the upper or lower boundaries. Since both will never be true, we can use a “if-elseif” statement to check one condition, and then the other if the first is not met.
- If the condition is met (i.e., the ball crossed the left or right boundary), we run the BounceBall ( ) command that we will create next. Notice that this time we actually put something inside of the parenthesis of the function. These are called “parameters”, and they are values that are passed to the function to be processed. In this case we are passing the position of the ball, and the direction it should be bouncing off of.
- Repeat the process for left/right walls.
The “switch” statement
Now let’s make BounceBall ( ). We start out with the declaration of the function like so:
void BounceBall (Vector3 ballPosition, string bounceObject) {
This function, like most, will be declared as a void. This is because we do not expect anything to return from it. If we were writing a function that would return the value of two decimals added together, we would declare it as a float. If we wanted to write a function that would return TRUE or FALSE conditions, we would define it as a bool. But for functions where stuff happens but nothing comes back, we use void.
During this declaration, we create two parameter variables to hold the values the function call is passing to this. These variables must be appropriately typed, so here we declare a Vector3 called “ballPosition” that will receive the position of the ball, and a string called “bounceObject” that will hold the text of which wall we are bouncing off of so that we know how to reposition the ball and change the heading.
Since we have four possible bounces here (top, bottom, left, and right), we are going to use a switch statement to determine which code runs. Switch statements look like this:
    switch (someVariable) {

         case [value 1]:
             [some code]
             break;
         case [value 2]:
             [some other code]
             break;
         case [value 3]:
             [yet more code]
             break;
             ...
         default:
             [default code]
             break;
         }
The “switch” tests a variable against conditions and if it finds a match in a “case”, it runs that code. If it does not find a match and reaches the end, the “default” option will run. Notice that each case has a “break” call. This will stop any further evaluation and move back outside of the switch statement. If you do not include a “break”, then your case will run and “default” will also run, so make sure you remember to escape the statement with a break.
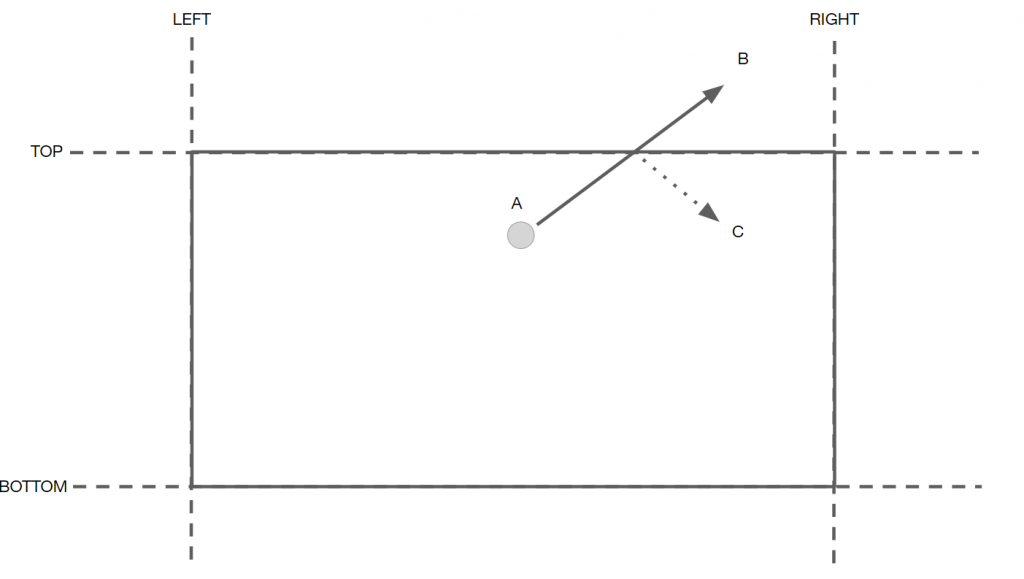
To process the bounce, we covered some basic geometry in class that we will use as our “bounce math”. To summarize, if a ball is traveling up and to the right and encounters the top wall, the bounced ball will still move as far to the right as it would have had the wall not been there. So for a “top” bounce, we know our X value is still valid. Our math tells us that our Z value needs to be changed to be the same distance below the top edge as it currently is above (CURRENT POSITION minus BOUNDARY). So our new position = BOUNDARY – (CURRENT POSITION – BOUNDARY), or (2 * BOUNDARY) – CURRENT POSITION.
With that in mind, we write the following function that tests the condition (which surface did I bounce off of?), applies our bounce math to the X or Z position, sets the ball’s position to this new location, and changes the direction of the heading by flipping the X or Z value accordingly. Once we are doing defining the new location, we set the ball position to that spot.
And that’s it!
HardPong.cs
using System.Collections;
using System.Collections.Generic;
using UnityEngine;

public class HardPong : MonoBehaviour
{
    // ball variables
    public GameObject ball;  // the game object of the ball

    public Vector3 direction;  // the vector indicating heading
    public float speed = 1.0f;  // value to move as speed/velocity


    // paddle variables
    public GameObject leftPaddle, rightPaddle;
    public float paddleSpeed = 1.0f;

    // boundary variables
    private float FIELD_LEFT = -48.5f;
    private float FIELD_RIGHT = 48.5f;
    private float FIELD_TOP = 23.5f;
    private float FIELD_BOTTOM = -23.5f;


    // Start is called before the first frame update
    void Start()
    {
        ball.transform.position = Vector3.zero;
        direction.Normalize();
    }

    // Update is called once per frame
    void Update()
    {

        // call move paddles
        MovePaddles();

        // move the ball by a small offset  (speed * direction)
        ball.transform.position = ball.transform.position + (direction * speed * Time.deltaTime);

        // check to see if the ball should bounce
        CheckBallPosition();
    }

    void MovePaddles()
    {
        // Where are the paddles
        Vector3 leftPaddlePosition = leftPaddle.transform.position;
        Vector3 rightPaddlePosition = rightPaddle.transform.position;

        // figure out how far each should move
        float paddleDistance = paddleSpeed * Time.deltaTime;

        // where the paddles should move to

        // left paddle
        if(Input.GetKey("w"))
        {
            leftPaddlePosition.z = leftPaddlePosition.z + paddleDistance;
        }

        if (Input.GetKey("s"))
        {
            leftPaddlePosition.z = leftPaddlePosition.z - paddleDistance;
        }

        // right paddle
        if (Input.GetKey("up"))
        {
            rightPaddlePosition.z += paddleDistance;
        }

        if (Input.GetKey("down"))
        {
            rightPaddlePosition.z -= paddleDistance;
        }

        // update the paddle position
        leftPaddle.transform.position = leftPaddlePosition;
        rightPaddle.transform.position = rightPaddlePosition;
    }

    void CheckBallPosition()
    {
        // get the current position of the ball
        Vector3 currentPosition = ball.transform.position;

        // test the boundaries
        if (currentPosition.z >= FIELD_TOP)
        {
            // bounce off of the top
            BounceBall(currentPosition, "top");
        } else if (currentPosition.z <= FIELD_BOTTOM)
        {
            // bounce off of the bottom
            BounceBall(currentPosition, "bottom");
        }

        if (currentPosition.x >= FIELD_RIGHT)
        {
            // bounce off of right
            BounceBall(currentPosition, "right");
        } else if (currentPosition.x <= FIELD_LEFT)
        {
            // bounce off of left
            BounceBall(currentPosition, "left");
        }
    }

    void BounceBall(Vector3 ballPosition, string bounceObject)
    {
        // process the bounce of the ball, reflect it based upon direction

        switch(bounceObject)
        {
            case "top":
                // bounce off of the top
                ballPosition.z = FIELD_TOP - (ballPosition.z - FIELD_TOP);
                direction.z = -direction.z;
                break;

            case "bottom":
                // bounce off of the bottom
                ballPosition.z = FIELD_BOTTOM - (ballPosition.z - FIELD_BOTTOM);
                direction.z = -direction.z;
                break;

            case "left":
                // bounce off of the left side
                ballPosition.x = (2 * FIELD_LEFT) - ballPosition.x;
                direction.x *= -1;
                break;

            case "right":
                // bounce off of the right
                ballPosition.x = (2 * FIELD_RIGHT) - ballPosition.x;
                direction.x *= -1;
                break;

             default:
                Debug.Log("Invalid Bounce Object: " + bounceObject); break;
        }

        // update the ball position with new value
        ball.transform.position = ballPosition;
    }
}