This week, we replicate last week’s accomplishments in a matter of minutes by using the tools that Unity affords us. This frees up extra time to build out even more of our game, and allow us to start working on the logic of moving through the stages of gameplay. This week we work with Physics, Collisions, Sounds, Scripting Prefabs, Enumeration, Coroutines, and take an early look at Unity’s UI system. Let’s jump in!
Part 1: Starting Over with Rigidbody Physics
Our first step for today was to recreate our efforts from last week with a more efficient solution, Unity’s built-in Physics system. We used Save Scene As… to generate a new version of this same object, and removed our HardPong script from the main camera.
Physics in Unity rely on three main components. The “Rigidbody”, which gives control of the object over to the physics system and allows forces such as collisions and gravity to apply; the “Collider”: a procedural or mesh volume that determines the physical “shape” of an object for collision detection; and the Physic Material which defines the physical properties of objects and determines how they should react during collisions.
In Unity, most meshes (including all primitive objects) come with a Collider component already defined. This allows objects that are controlled by the physics systems to react and respond to the rest of our world, without having to subject them to the arduous calculations that would be required if they were moveable objects, each subject to forces and gravity.
In our case, we only need to apply physics to one object here, our ball. We do this by adding a Rigidbody component, available by selecting Add Component > Physics > Rigidbody. As soon as we add this, we can run our game and if our ball is located outside of our plane, we see it fall away very slowly. (Or at least, it feels slow. The speed here is accurate as Unity’s default gravity accelerates at 9.8 m/s2 just like real life. The “slow” here comes from our expectations of size – remember that our ball is 3 units in diameter, meaning it is ~10 feet high – but we expect it to be small like a ping pong ball and so our visual perception is that it is falling slowly).
Now, reposition the ball to the origin point (0,0,0) and run the game again. Hmm… it just sits there. And of course it does – we haven’t done anything to make it move. Previously, we had to tell the ball to move in every frame. This time, we are going to give the ball one big push and let physics do the rest. Time to start a new script, but this time I placed it on an empty game object I created (GameObject > Create Empty). I named the object “GameManager” and called this script EasyPong, but you can name it whatever you want.
    public GameObject ballObject;
    private Rigidbody ballRigidbody;
    public float force;
    public Vector3 direction;

    // Start is called before the first frame update
    void Start()
    {
        ballRigidbody = ballObject.GetComponent<Rigidbody>(); // assign the rigidbody
        direction.Normalize();  // make the direction vector a heading
        ballRigidbody.AddForce(direction * force);
    }
In this script, we declare a public GameObject variable so that we can make the assignment of the ball object to our script through the Inspector. Then we declare a private Rigidbody variable which will get the ball’s Rigidbody component using the appropriately named GetComponent<Rigidbody> ( ).
At the end of our Start( ) function we call the AddForce( ) command to give our ball’s rigidbody a push. Our variables for “force” and “direction” are also made public, so that we can adjust the force of that push in our Inspector. You might soon notice that your force requires a significantly high value in order to set the ball in motion. This is because there are different “force modes” that describe the manner which the force is being applied to the object. There are important distinctions to these, so it is important to understand when you might want to choose a particular option.
ForceMode is an enumeration of the options for applying a force to an object. Some use the object mass, while others treat all objects equally (like the accelerative force of gravity). The default option for AddForce is ForceMode.Force, where mass matters, and the force is applied over time, meaning that a single call of AddForce only sends a fraction of the value based upon the short time of frame. For our purposes, it is best to use an Instant force like ForceMode.Impulse or ForceMode.VelocityChange.
ForceMode Options
From the Unity Scripting API
Force
Add a continuous force to the rigidbody, using its mass.
Acceleration
Add a continuous acceleration to the rigidbody, ignoring its mass.
Impulse
Add an instant force impulse to the rigidbody, using its mass.
VelocityChange
Add an instant velocity change to the rigidbody, ignoring its mass.
We declare that like this: ballRigidbody.AddForce(direction * force, ForceMode.Impulse);
When we hit play, the ball starts moving. It collides with the paddle, then sort of sits there. If you watch this through the side view (I recommend selecting the ball object so that you can use the collision sphere widget to see how it is moving) you’ll notice it is rolling over to the paddle, then gaining some friction and rolling slightly up the side of the paddle before falling down and coming to rest.
Obviously this is not the behavior we want, so we need to make a few changes. First, we should restrict the motion of our ball to the XZ plane to make sure we don’t fly off the board. Do this by setting the Constraints in the Rigidbody controller of the ball. While you are there, restrict all rotation as well.
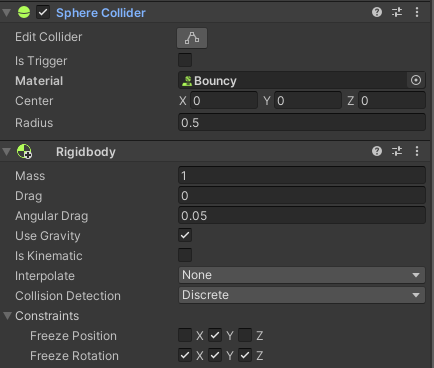
Next, we need to control how our object interacts with others. We do this by creating a Physic Material (in Assets > Create > Physic Material). Friction is what made the ball move, so we want to get rid of both Dynamic Friction (the friction that slows objects in motion) and the Static Friction (the friction that prevents objects from moving in the first place). Set both of these values to 0. Next, set our “Bounciness” to 1, and our “Friction Combine” to Minimum and our “Bounce Combine” to Maximum. The “Combines” are used to determine how to calculate these forces when multiple materials are present. “Minimum” uses the smaller value of the two, “Maximum” uses the larger. “Average” and “Multiply” apply a combination of both. Apply this Physic Material to the ball by dragging it into the Material slot in the Sphere Collider.
Now when we hit play, our ball slides smoothly from paddle to paddle. Changing our direction lets us try a few more scenarios. Looking good! Now all we need to do is move the paddles
Part 2: Prefabs and Overrides
For our paddle object, we create a Prefab object by dragging one of our paddles into the Assets folder. This converts it into a saved object that we can Instantiate as a clone in our scene. We can make changes to the instances of a prefab that exist in our scene, or we can make edits to the original Prefab object that will propagate to the instances in our scene, unless the instance in the scene has modified that property or component. Modifications to the scene instances are called Overrides, and you can use the Inspector to visualize the difference between instance and source, and you can revert the instance or push your change back to the prefab if you choose to do so.
Prefabs are especially useful when we want to create instances of objects, and in this case we will use it to create two paddles that respond to input, rather than creating a master script to handle all inputs. This script we create will perform the same task, using the Update( ) method to test to see whether a particular set of buttons is being pressed, and then move the object accordingly.
First, I define two public strings, to hold the key codes for the keyboard buttons I intend to use for “up” and “down” motion.
public string upButton;
public string downButton;
Next I define two private variables – one to regulate the speed of the paddles, and the other to create an offset value to restrict movement beyond a certain amount.
private float speed = 50.0f;
private float offset = 23.0f;
Then I edit the Update( ) method to include the following code:
void Update()
{
    Vector3 currentPosition = transform.position;

    if (Input.GetKey(upButton))
    {
        currentPosition.z += speed * Time.deltaTime;
    }

    if (Input.GetKey(downButton))
    {
        currentPosition.z -= speed * Time.deltaTime;
    }

    currentPosition.z = Mathf.Clamp(currentPosition.z, -offset, offset);

    transform.position = currentPosition;

}
Walking through this line by line, first we get the position of the paddle by creating a Vector3 called currentPosition and assign it a value of “transform.position” which is shorthand for “this.transform.position”. This returns the current XYZ coordinates of the object.
Next, we test to see if the “upButton” and “downButton” keys are pressed. We test both, using separate if statements, to make sure that we capture situations where both up and down are pressed at the same time. (If they are, their movements will cancel each other out and the paddle will remain still.) If we determine one of the buttons to be pressed, we either increase or decrease the “z” value of the position by an increment of (speed * Time.deltaTime). If you are curious why we do not just multiply by speed, it is because this script will fire every frame, and framerates are often not steady. This can result in jerky motion, while the ball will continue to move smoothly thanks to the physics engine. Instead, we treat our “speed” variable as a “units per second” value, and Time.deltaTime returns the number of seconds that have passed since the previous frame. (If you are running at a steady 60fps, Time.deltaTime will return a float value of 1/60, or approx 0.0167s)
Closing this out, we have this line:
currentPosition.z = Mathf.Clamp(currentPosition.z, -offset, offset);
Here we introduce the Mathf library (a library of math functions for floating point numbers) and the Clamp method, which allows us to set a minimum and maximum value and see if our value falls within that range, and if not returns one of those values instead. Now the paddle position will be constrained to move no farther than “offset” number of units from the 0 position.
Finally, we set transform.position to be equal to currentPosition. Note that we have to pass this value back – transform.position is not an object that can be passed and held as reference, you can only perform a “get” or “set” to it.
Now in your paddles, assign the left paddles buttons to “w” and “s”, and the right paddle to “up” and “down” (which translate to the up and down arrows on the keypad), and we should be good to go.
Part 3: Detecting collisions and making noise
It’s fun to watch our ball bounce around, but we should add some sound to really make this pop. I’ve uploaded a few sounds to use for this demo, feel free to use those or a noise of your own creation. Just remember, the sound should be quick, and the noise should start at the very beginning of the file, otherwise you’ll have a brief period of dead air and it will appear as though the sound is delayed. Import your sound using Assets > Import New Asset…, or simply drag the files into the Assets folder.
Since the only thing in our current design that should make a noise is when the ball collides with something, I’ve decided to assign all noise making duties to the ball itself.
In order to make sounds, an object must have the AudioSource Component attached to it, so I add one to the “ball” object. When you add this component, you will notice an empty AudioClip property which is the audio file to be played – leave this empty, as we will fill it later using our script.You will also notice that, by default, Play On Awake is checked. De-select this option, as we will control when we want things to play.
We want our clip to play whenever the ball hits the paddle, so we need to figure out when that event occurs. To do this, we will test every collision that the ball experiences.
Whenever a collision occurs, the game generates a Collision Event. We can set our scripts to listen for these events and use them to perform actions, in this case playing our sound. Add a new script to the Ball object (I called mine BallScript. Add the following code for the variable declaration and Start ( ) function:
private AudioSource audio;

// Start is called before the first frame update
void Start()
{
    audio = GetComponent<AudioSource>();
}
Just like we created a Rigidbody typed variable, here we create an AudioSource type variable and assign it using GetComponent<AudioSource> ( ). Notice, however, that before we used a reference to a separate game object (“ballobject”) as our source, and here we simply use “this”. This gives us access to the object which it is running through. It is self-referential, so no extra association steps required.
Our next step is to identify when a collision occurs, then look to see if we have hit the right type of collision.
private void OnCollisionEnter(Collision collision)
{
    if(collision.gameObject.tag == "Wall")
    {
        audio.Play();
    }
}
OnCollisionEnter ( ) runs when a collision event occurs involving this object – meaning that this object’s collider has initiated contact with another object’s collider. It is only called one time per collision. When the objects separate / stop touching, there is an OnCollisionExit ( ) message that will be called. If objects remain in contact, OnCollisionStay ( ) messages will issue once per frame.
Our collision event has a parameter that is of the type Collision, which here we assign to a variable “collision”. This Collision object contains data about the collision, such as the point of contact, the object that was hit, and the relative velocity of the two objects. Here we test the Tag of the other object against a known value, and if it returns as true, we tell the audioSource to run the Play( ) command.
Unity projects have a few pre-existing tags that you can use, but I recommend creating your own.
Select your paddle prefab, and in the inspector look for the Tag dropdown near the top. In there, select Add New Tag… and add a new named tag. Call this one “Wall”. Now select your paddle again and from the dropdown give it the tag Wall. Now play your game and you should get a satisfying “bonk” noise when your ball hits a wall. Let’s look a little closer at the Audio Source component:
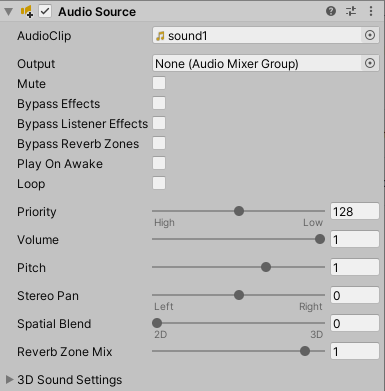
As the name suggests, this component makes our object the “source” of a bit of audio, by having it emit a sound. The sound that will be emitted is defined using the AudioClip setting, which gives us access to the AudioSource.clip property. Once a clip has been set, we can use AudioSource.Play( ) to play the sound, and AudioSource.Stop( ) to stop it.
But the AudioSource is only one half of the equation. We also need to have an AudioListener in our scene, to act as our “ears”. By default, the AudioListener is added as component on the Main Camera.
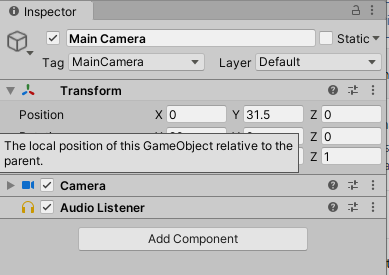
The reason this configuration makes sense is that your Main Camera is usually your best representation of where you as the observer are in relation to the world of the game itself. The Spatial slider in your AudioSource component allows you to set the sound to be:
- “3D” – meaning that the sound is interpreted as emitting from that point in space in relation to your camera. Volume is attenuated based upon distance to the source, and the balance between your speakers is based upon the heading. (Unity’s audio source is set to Stereo by default, but can support other configurations such as Mono or 5.1 Surround Sound.) This is useful for diegetic sounds – those that are happening inside our game like enemy footsteps or a character voice calling to you.
- “2D” – meaning that the sounds emanates from everywhere, or according to the balance set in the source such as through Stereo Pan. This is useful for non-diegetic sounds – those that are not implied to occur inside the game world such as background music, or voice-overs, or UI sounds.
- Blend – the slider lets you adjust your sound to a combination of these. This is especially useful if you want something to always be audible at a certain level even if the source is distant. Important character dialogue may fall into this category.
One important note about an AudioSource – it can only play one clip at a time. If you have multiple clips that need to play simultaneously, you need multiple AudioSources, which means multiple objects.
In a future class, I will show you methods for creating a more sophisticated Sound Manager, but for now, we are going to make our different sounds by switching the clip on our ball’s AudioSource.
In our BallScript.cs script, we declare the following public AudioClip variables. This will create three audio clip slots in our script component in the Inspector, which we will fill with sounds from our Assets folder.
    public AudioClip wallSound;
    public AudioClip paddleSound;
    public AudioClip deathSound;

Next, we create a script to play the Paddle sound (as opposed to the default Wall sound)
    private void MakeWallSound()
    {
        audio.Stop(); // stop the audio if it is already playing
        audio.clip = wallSound; // set the new clip
        audio.Play(); // play the new clip
    }
Here we first issue a Stop( ) command, in case something else is already playing. Next we set the clip for this AudioSource to be the sound we wish it to make, in this case the paddle sound. Finally, we issue the Play( ) command which will cause the sound to start playback at the beginning.
    private void OnCollisionEnter(Collision collision)
    {
        if (collision.gameObject.tag == "Wall")
        {
            // make the paddle sound
            MakeWallSound();
        }
    }
Next we add similar functions for the paddle and back wall sounds. For these functions, we will use another method of AudioSource – PlayOneShot( )
    private void MakePaddleSound()
    {
        audio.PlayOneShot(paddleSound); // play the paddle sound once
    }

    public void MakeDeathSound()
    {
        audio.PlayOneShot(deathSound); // play the death sound once
    }
PlayOneShot( ) will load and play the included clip one time and immediately stop once it is complete. It is important to note that this will NOT change the value of our AudioSource.clip. If you ran the Play( ) command after PlayOneShot( ) the audio clip playing would be the same clip that was loaded before.
Finally, just for fun, we added increase in the Rigidbody.velocity of our ball object so that the ball speeds up each time it is hit by a paddle, and we also increased the value of AudioSource.pitch which will make the sounds move to a higher tone and reinforce that effect of more speed.
Part 4: The Finite State Engine
Right now our “game” isn’t much of a game yet. We are lacking the basic components of a game such as rules and objectives. We need to add the steps and stages and rules and mechanics that make this a game of Pong! rather than a really basic screensaver.
The goal of our game is for one player to win, which they do by scoring more points than their opponent. This objective implies that we need a method by which to score points, and multiple opportunities for players to score. A score is registered when the ball gets past and hits the wall behind the opposing player’s paddle. In order to have multiple attempts, we need to create “rounds” of playing through our core bouncing ball mechanic. Each round starts with the ball reset to the center, and ends when a score is registered.
Given that, we can generate a diagram of the “flow” of our game as such:
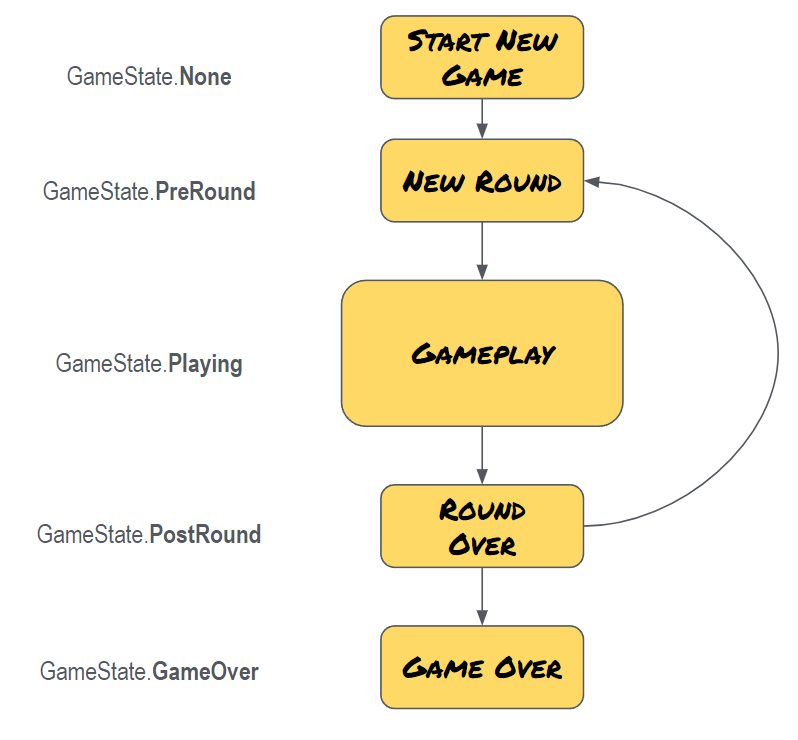
This is an example of a Finite State Machine – a model of our the logic of our game, where our game will inhabit only one state at a time, and certain conditions must be met to move or transition from state to state.
In our model, we can see the need for a few particular stages as we progress. First we have to set up or initialize a new game. This is where we will set our initial score of 0-0 and initialize all of the objects back into their start state. Next we have to set up the individual round. This state is separate from the initialize game state because we will return to this frequently as each new round begins. Here we expect to see behaviors like putting the ball back at the origin, and resetting any modifications that we made to the pitch of the sound or speed of the ball. Once the round begins, we enter the actual gameplay state, which continues until one side scores. Once a point is scored, we need to register that event and determine if someone has won the game, or if we need to reset our board and start a new round. If the objective number of points have been scored, it’s time to declare a winner and move to a “game over” state.
It is important to note that this is an abstract machine – we will use this model to code the states and transitions and object behaviors, but these components will be assembled through composite parts so that the preferred action occurs, rather than coding everything into one giant instruction set in one particular function.
Enumeration
Since we will share the responsibility for moving between states across the objects in our scene, we need a reliable method to get and set our current state. Traditionally one might use a string to hold a value so that it hold an easy to read value, or one might use an integer and assign values to each index so that the lookup is fast. Instead, we will use a method that combines the advantages of both – Enumeration.
Enumeration lets us define all of the possible values for a set, which fits very well when working with a finite number of states. An commonly given example of this would be to create an enumerated set of directions (north, east, south, west) so that the values are plain English, but are also the only possible values for the type.
In our case, we want to define some states for our game – setting up the game, getting a round ready, the actual gameplay itself, and finally the game over state. We define our enumeration by declaring a public enum outside of the EasyPong class declaration in our project. This will make the type available to use across all scripts in our scene.
using System.Collections;
using System.Collections.Generic;
using UnityEngine;

public enum GameState { None, PreRound, Playing, PostRound, GameOver};

public class EasyPong: MonoBehaviour
{
    public GameObject ballObject;
    private Rigidbody ballRigidbody;
    ...
Now that I’ve declare the enumerations, I can declare my own variable in the class and by default put it in the “Setup” state…
    // define my gamestate variable
    public GameState currentState= GameState.None;
Now we have something that we can test. Let’s hop over to the PaddleScript to see an example of how we can use this…
Last time, we left the instructions for moving the paddle inside of the Update( ) method, meaning that it would be called once per frame. But paddles should only move while the game is in play, not before or after the round. We want to constrict the paddle movement to only occur when the game state is set to “playing”.
First, we take the contents of the Update( ) method and move them into a new void function called MovePaddle( ). We rewrite Update( ) to feature a check to see if the game state is set to “GameState.Playing”, and if it is, we run the MovePaddle( ) command.
    void Update()
    {
        if (gameManager.currentState == GameState.Playing)
        {
            MovePaddles();
        }
    }

    private void MovePaddles()
    {
        Vector3 currentPosition = transform.position; // get my position

        if (Input.GetKey(upButton))
        {
            currentPosition.z += speed * Time.deltaTime;
        }

        if (Input.GetKey(downButton))
        {
            currentPosition.z -= speed * Time.deltaTime;
        }

        currentPosition.z = Mathf.Clamp(currentPosition.z, -offset, offset);

        transform.position = currentPosition;
    }
If we try to run this now, Unity will be cross with us and we will get a Null Reference Exception, because we have no connection to the Game Manager object reference to the game manager to access the “currentState” variable.
We could build a public GameObject variable and use our drag-and-drop method to connect the Game Manager object, but let’s try another useful method – the Find( ) command.
    private EasyPong gameManager;

    // Start is called before the first frame update
    void Start()
    {
        // get the game manager object
        gameManager = GameObject.Find("GameManager").GetComponent<EasyPong>(;
    }
Here, we define a private object – an EasyPong variable which we name gameManager – this cleverly named variable will hold the reference to our Game Manager’s EasyPong script. This is because we are specifically looking for the script component attached to the “Game Manager” object, and we need a place to hold it. The script is of the class EasyPong, so the type we declare here has to match that.
Inside of the Start( ) method, we start to assign gameManager with GameObject.Find(“GameManager”). Find( ), which will return the first object in the scene that it finds with a matching name, and then we add GetComponent<EasyPong>() on that result, and now we have direct access into the public variables and methods of that script.
Armed with this new information, we update our Update( ) “if” statement to read as follows:
if (gameManager.currentState == GameState.Playing)
NOTE:
Although we used a single variable here, we could have also done this by declaring a GameObject variable that we find, and then a second variable that uses GetComponent<> on the object we just retrieved. Both are valid methods, ours here just shortened the trip.
NOTE:
You may have noticed the Debug.Log( ) commands also used here. This is a function that allows you to print a message directly to the Log and the Console Window for debugging purposes. I tend to have these scattered throughout my code as they are useful for tracking down whether or not a particular function is being called, and what values are set at different locations. Note the use of the “+” symbol to concatenate a string with another value. More on Debug.Log( )…
Now go back to Unity and hit play to see what happens. If you have done this correctly, nothing should occur – the paddles should stay in the same place and be unresponsive to key presses. This is because our currentState value is not set to GameState.Playing. Because we made this public, we can change the setting in our Editor. You will see a dropdown for the Game State – set that to “Playing” and click on your game window and now your paddles should move.
Part 5: Moving Through States
Initializing the Game
Most games that we play in life will require some sort of preparation before the game itself can begin. Bases must be placed, cards must be dealt, game pieces must be distributed. Our game is no different – before we can play our game, we need to set the objects and attributes and place them into a ready state for play to begin.
In order for our game to have a winner, we need to be able to keep score. We also should have some definition of what “winning” is. (Here it will be the first player to reach 3 points.)
// score tracking
private int playerOneScore, playerTwoScore;

private int MAX_SCORE = 3;
Here I set two float values for the player scores (putting both declarations on one line with a comma will create two variables of the same time) and a float variable for MAX_SCORE. I’m using the ALL_CAPS_SNAKE_CASE because I only intend to read that variable, not set it, and this format helps me to remember that. But our player one and two scores I will set in our Start( ) menu because these could reset again, for instance when we restart the game.
void Start()
{
    ballRigidbody = ballObject.GetComponent<Rigidbody>(); // assign the rigidbody

    // initialize the score
    playerOneScore = 0;
    playerTwoScore = 0;

    // get the start position of the ball
    ballStartPosition = ballObject.transform.position;

    // set the game state
    currentState= GameState.PreRound;

    // start the first round
    InitializeRound();
}
In our start we reset the scores to 0, fetch the position of the ball object (so that we have a reference point to use once a round is over), and make sure the GameState is at “PreRound”. Finally, move to our next stage – starting an individual round, which we do with our new method InitializeRound( )
Starting the Round
The start of a new round, whether it is the first round or comes after a scoring event, consists of two primary steps:
- Resetting the ball to the start position
- Starting the round by pushing the ball into motion
To handle this, we created three new functions – InitializeRound( ), ResetBall( ), and StartBall( ). InitializeRound( ) will handle our initial setup of a new round. Here we should start in the “setup” stage. It will call ResetBall( ) for us, which will move the ball back to the origin, and reset any other modifications we made such as pitch modulation. Finally StartBall( ) will put the ball into motion.
private void InitializeRound()
{
    // set the state
    currentState = GameState.PreRound;

    // Reset Ball
    ResetBall();

    // Start Ball
    StartBall();
}

private void ResetBall()
{
    // make sure we have control of the ball, not physics
    ballRigidbody.isKinematic = true;

    // move the ball to the start position
    ballObject.transform.position = ballStartPosition;

}

private void StartBall()
{
    // turn kinematics off
    ballRigidbody.isKinematic = false;

    // make the direction vector a heading
    direction.Normalize();

    // move the ball by adding force
    ballRigidbody.AddForce(direction * force, ForceMode.Impulse);

    // change the state to playing
    currentState = GameState.Playing;
}
New here is the isKinematic value that we are modifying on our Rigidbody component of “ballRigidbody”. The Rigidbody.isKinematic flag is a boolean – that is, it can only be set to true or false. When you set an object’s isKinematic value to true, you can now control and move the object, instead of Unity’s physics system. It is a simple way to take physics out of the equation. Without this, your movement of the ball would be considered to be a physical move and well… let’s just say bad things can happen.
Here in ResetBall( ) we set isKinematic to TRUE. We then move the ball back to the original spot by setting the transform.position value to ballStartPosition.
Once we finish resetting the ball, InitializeRound( ) calls StartBall( ). This script turns ball Physics back on (by setting isKinematic to FALSE), and then applies the direction and force that we previously held inside Start( ). Finally, we set the currentState to GameState.playing.
In order to set this machine into motion, we made the last line of our Start( ) method a call to InitializeRound( ). Now the ball is in action and our paddles finally move!
Now that we’ve started the round, we need a way to stop it, and we do this by recognizing that back wall has been hit, and registering the scoring event.
Part 6: Registering the Score
We set up our system so that the back walls would detect whether or not they had been hit by the ball, and tell the game manager to register the scoring event. We did this so that we could set a variable on each wall to indicate to whom the score should be attributed.
In order to talk to the EasyPong script, we needed a reference to the Game Manager so that we could access the component, and call the public function RegisterScore( ). In the past, we have referenced a GameObject and the used GetComponent<>( ) to access the script, but here we shortcut that by defining a public variable of type EasyPong and now we can ONLY associate objects with the appropriate component attached.
public class BackWallScript : MonoBehaviour
{
    public EasyPong gameManager;
    public int playerNumber;

    private void OnCollisionEnter(Collision collision)
    {
        if (collision.gameObject.name == "Ball")
        {
            gameManager.RegisterScore(playerNumber);
    }
}
Another change from our previous collisions – this time we tested the name of the game object that we collided with, verifying that it is indeed the “BallObject”. Once we have confirmed this, we tell our EasyPong instance to run the RegisterScore function, and pass it an integer that we will populate with the player id who should receive the point.
Back in EasyPong, we define RegisterScore(int playerNumber) as such:
    public void RegisterScore(int playerNumber)
    {
        // stop the action
        ballRigidbody.isKinematic = true;

        // process the score
        if (playerNumber == 1)
        {
            playerOneScore++;
        } else if (playerNumber == 2)
        {
            playerTwoScore++;
        } else
        {
            Debug.Log("Player Number was not assigned correctly.  Value=" + playerNumber);
        }

        // Display the Score
        Debug.Log("The Score is " + playerOneScore + "-" + playerTwoScore);

        // go to postround state
        currentState = GameState.PostRound;

        // go start the next round
        InitializeRound();
    }
There’s a lot going on here, so let’s unpack it:
- We set isKinematic to true, effectively stopping the ball and removing it from the physics equation
- We check to see which player scores, and increment their score value by one (the ++ is the same as saying that something “+= 1” or something = something + 1)
- We use Display.Log( ) to put the score into the console to track our progress
- We put put our currentState value to “PostRound”
- We get ready to run the next round by calling InitializeRound( ).
- This function is also where it would make sense to test if either player had just made it to our MAX_SCORE value, and if so, move to the Game Over state instead, but that part is for you to complete as part of your homework.
Part 7: Coroutines
In past discussions, I have mentioned that Unity runs through its objects and those objects’ scripts sequentially. It is a very linear process. When the “Awake” message is sent out, Unity goes down the list of objects that it maintains (and that you do not control) and one by one passes it the “Awake” message to each. That message is passed to each one of that object’s components, and if that object has an Awake( ) function in it, that function is executed, line by line. Once every object has received the “Awake” message the “Start” message is called on every object before moving to rendering the next frame, and Unity again goes down the list, object by object, component by component, and any corresponding function will execute.
When a function is called, it must run until it is completes every line (or until it encounters a “return”, which is a type of completion). If another function is called during that original function, then THAT new function must run to completion before moving to the next line in the original, and so forth and so on.
Using this method, it can be difficult or cumbersome to create functions that execute periodically (such as a timed event), or to occur across a span of time and across many frames (such as a fading transition). Creating and maintaining internal timers can be tricky, and it requires a lot of extra calls.
A coroutine is a function that lets us break out of this pattern by allowing us to pause it’s execution, hand control back to Unity, and then resume later and pick back up where it left off after some measure.
In our game, we would like to create a new state to let the player “get ready” to begin a round. A moment between when the ball is reset, and the action begins. For our first co-routine, we are going to make this moment last for 3 seconds.
We create our function by declaring an IEnumerator. This function will wait for three seconds, and then call the StartBall( ) function.
public IEnumerator GetReady()
{
    // tell the engine to come back in three seconds
    yield return new WaitForSeconds(3.0f);

    // resumes after the pause
    StartBall();
}
Next we call this by replacing the StartBall( ) function call in InitRound( ) with the StartCoroutine( ) function, passing our coroutine’s call as the parameter.
private void InitRound()
{
    // Reset Ball
    ResetBall();

    // start the coroutine
    StartCoroutine(GetReady());
}
Now when we run this, our ball sits there for three seconds and then begins to move.
Basic UI
Three seconds can be a long time, and we don’t want our player to get confused, so first we should build a message to the player letting them know that now is the time to Get Ready!!!
To do this, we create a new text object by going to Game Object > UI > Legacy > Text or Create > UI > Legacy > Text.
When you do this, you will see a few new objects appear in your scene, including a Canvas object, and an EventSystem object. We will cover the UI system more in a future lesson, for now just know that the Canvas is the two-dimensional space where UI elements live, and renders as an overlay for the active camera.
One change you will definitely want to make now is in the Canvas object. Look for the Canvas Scaler component and change the UI Scale Mode to Scale with Screen Size. This ensures that your UI elements will fill the same proportions of the screen whether it is in the Game window or full screen.
Select the text object that you have created and change the name. We used myOverlayTextObject (because we will use this for more than one message). In the Text component, change the Text field (a longform text area, and yes, text inside text is redundant) to read something besides “New Text”. I chose “Hello World”. Set your Alignments to “Center” and “Middle”, and set your Horizontal and Vertical overflow values to Overflow. Finally, adjust the font size until you have something that looks good to you.
Next, go to the EasyPong script, and add a Text object variable to hold a reference to our text object. UI elements have their own Unity library, which we have to call first by adding the following line to the “using” commands at the very top:
using UnityEngine.UI;
Without this line, your calls to get and set text objects will return errors because Unity does not recognize that you will be using them.
Next, create the text object to hold the message text, and use our drag-and-drop method in the Unity editor to assign the text object to this field.
    // define text objects
    public Text overlayMessage;
Now inside of the Start( ) function, we set our text message to read “Get Ready!!!”, and then set the enabled property to false so that it will not display until we tell it to.
        // set the text message to read "Get Ready!!!"
        overlayMessage.text = "Get Ready!!!";
        overlayMessage.enabled = false;
We want to make our message display while the GetReady coroutine is running, and turn off again when the stage is over and we move into the Playing state. We do this by adjusting the text object’s enabled property like so:
public IEnumerator GetReady()
{
    overlayMessage.enabled = true // turn the message visibility on

    // tell the engine to come back in three seconds
    yield return new WaitForSeconds(3.0f);

    overlayMessage.enabled = false  // turn the message visibility off

    // resumes after the pause
    StartBall();
}
Now we should see the message appear for 3 seconds, then disappear as the ball starts moving.
Using the Renderer
Three seconds still feels like a long time, doesn’t it? Players might still think our game is broken or stalled. And just when they let their guard down, the ball shoots off!
Let’s help show our players that something is happening, and help them anticipate the beginning of the round. We will do this by making the ball and the message blink.
To achieve this, you might be tempted to the enabled property of the ball object, but don’t do that! Making the ball inactive can destroy the connections, and reactivating it will run the Start( ) command all over again. Instead, we want to manipulate only the visibility of the ball, which we do by enabling and disabling the Mesh Renderer component.
In our EasyPong declarations, we create a new private variable of the type Renderer, like so:
private Renderer ballRender;
… then in our Start( ) method we assign the Renderer component like this:
ballRender = ballObject.GetComponent<Renderer>();
Finally, we modify our GetReady( ) script to enable and disable the Renderer component, alternated with our overlay message. We will display one configuration for a half second, and then the other for another half second. The use of a for loop lets us cycle through this three times. Once the loop completes, StartBall( ) is called and our Coroutine ends.
public IEnumerator GetReady()
{
    for (int i=0; i <3; i++)
    {
        // turn on the message
        overlayMessage.enabled = true;
        // turn off the ball
        ballRender.enabled = false;
        yield return new WaitForSeconds(0.5f);

        // turn off the message
        overlayMessage.enabled = false;
        // turn on the ball
        ballRender.enabled = true;
        yield return new WaitForSeconds(0.5f);
    }

    StartBall();

}
Now our ready message and ball alternate in quick half-second blinks that let the player get a good sense of the timing that is coming. Now we’ve covered everything that is needed to complete Assignment #2!
EasyPong.cs
using System.Collections;
using System.Collections.Generic;
using UnityEngine;
using UnityEngine.UI;

public enum GameState { None, PreRound, Playing, PostRound, GameOver };

public class EasyPong : MonoBehaviour
{
    // ball variables
    public GameObject ballObject;
    private Rigidbody ballRigidbody;
    public float force;
    public Vector3 direction;
    private Vector3 ballStartPosition;

    private Renderer ballRender;

    // game variables
    public GameState currentState = GameState.None;

    private int playerOneScore, playerTwoScore;
    private int MAX_SCORE = 3;

    // UI Variable
    public Text overlayMessage;


    // Start is called before the first frame update
    void Start()
    {
        // fetch the ball components
        ballRigidbody = ballObject.GetComponent<Rigidbody>();   // assign the rigidbody TO THE BALL
        ballRender = ballObject.GetComponent<Renderer>();


        // set my initial score values
        playerOneScore = 0;
        playerTwoScore = 0;

        // get the ball start location
        ballStartPosition = ballObject.transform.position;

        // Make sure text is turned off
        overlayMessage.enabled = false;

        // start the first round
        InitializeRound();
    }

    // Update is called once per frame
    void Update()
    {

    }

    private void InitializeRound()
    {
        // set our gamestate
        currentState = GameState.PreRound;
        // Debug.Log("current state is preround");

        // move the ball back to start position
        ResetBall();


        // start the GetReady coroutine
        StartCoroutine(GetReady());

    }

    private void ResetBall()
    {
        // make sure we have control of the ball
        ballRigidbody.isKinematic = true;


        // st the ball to the original position
        ballObject.transform.position = ballStartPosition;
    }

    private void StartBall()
    {
        // turn off isKinematic
        ballRigidbody.isKinematic = false;

        direction.Normalize(); // making the vector a heading
        ballRigidbody.AddForce(direction * force, ForceMode.Impulse); // push our ball

        // start playing
        currentState = GameState.Playing;
        // Debug.Log("currentstate = playing");
    }

    public void RegisterScore(int playerNumber)
    {
        // stop the action
        ballRigidbody.isKinematic = true;

        // process the score
        if (playerNumber == 1)
        {
            playerOneScore++;
        } else if (playerNumber == 2)
        {
            playerTwoScore++;
        } else
        {
            Debug.Log("Player Number was not assigned correctly.  Value=" + playerNumber);
        }

        // Display the Score
        Debug.Log("The Score is " + playerOneScore + "-" + playerTwoScore);

        // go to postround state
        currentState = GameState.PostRound;

        // go start the next round
        InitializeRound();
    }

    public IEnumerator GetReady()
    {
        // set my overlay message
        overlayMessage.text = "Get Ready!!!";

        for (int i = 0; i < 3; i++)
        {
            // turn on the message
            overlayMessage.enabled = true;

            // turn off the ball
            ballRender.enabled = false;

            yield return new WaitForSeconds(0.5f);

            // turn off the message
            overlayMessage.enabled = false;

            // turn on the ball
            ballRender.enabled = true;

            yield return new WaitForSeconds(0.5f);

        }

        // turn off the message
        overlayMessage.enabled = false;

        // resume after the pause
        StartBall();

    }

}
PaddleScript.cs
using System.Collections;
using System.Collections.Generic;
using UnityEngine;

public class PaddleScript : MonoBehaviour
{
    public string upButton;
    public string downButton;

    private float speed = 50.0f;
    private float offset = 18.0f;

    private EasyPong gameManager;

    private void Start()
    {
        gameManager = GameObject.Find("GameManager").GetComponent<EasyPong>();

    }

    // Update is called once per frame
    void Update()
    {

        if ((gameManager.currentState == GameState.Playing) || (gameManager.currentState == GameState.PreRound))
        {
            MovePaddle();
        }


    }

    private void MovePaddle()
    {
        // get the current position of the paddle
        Vector3 currentPosition = transform.position;

        // check the buttons
        if (Input.GetKey(upButton))
        {
            currentPosition.z += speed * Time.deltaTime;
        }

        if (Input.GetKey(downButton))
        {
            currentPosition.z -= speed * Time.deltaTime;
        }

        currentPosition.z = Mathf.Clamp(currentPosition.z, -offset, offset);

        // update our position
        transform.position = currentPosition;
    }
}
BackWallScript.cs
using System.Collections;
using System.Collections.Generic;
using UnityEngine;

public class BallWallScript : MonoBehaviour
{
    public EasyPong gameManager;
    public int thisPlayerScores;

    private void OnCollisionEnter(Collision collision)
    {
        // Debug.Log("BackWall Collision is called");

        if (collision.gameObject.name == "BallObject")
        {
            // Debug.Log("Ball has hit the wall");
            gameManager.RegisterScore(thisPlayerScores);
        }
    }
}
BallScript.cs
using System.Collections;
using System.Collections.Generic;
using UnityEngine;

public class BallScript : MonoBehaviour
{
    private AudioSource audio;
    private Rigidbody rb;

    public AudioClip wallSound, paddleSound, deathSound;

    // Start is called before the first frame update
    void Start()
    {
        audio = GetComponent<AudioSource>(); // get the access to the audio source
        rb = GetComponent<Rigidbody>(); // get the rigidbody
    }

    // Update is called once per frame
    void Update()
    {

    }

    private void OnCollisionEnter(Collision collision)
    {
        if (collision.gameObject.tag == "Wall")
        {
            // play the wall sound
            MakeWallSound();
        } else if (collision.gameObject.tag == "Paddle")
        {
            MakePaddleSound();
            // make the ball faster, if it isn't already going full speed
            if (audio.pitch < 4.0f)
            {
                audio.pitch = audio.pitch * 1.05f;
                rb.velocity *= 1.1f;
            }


        } else if (collision.gameObject.tag == "BackWall")
        {
            MakeDeathSound();
        }
    }

    private void MakeWallSound()
    {

        // play the sound one time
        audio.PlayOneShot(wallSound);

    }

    private void MakePaddleSound()
    {
        audio.PlayOneShot(paddleSound);
    }

    private void MakeDeathSound()
    {
        audio.PlayOneShot(deathSound);
    }
}