Today we started out on our new game – “Astral Attackers” – a Space Invaders inspired alien shooter that we will use to illustrate the ways in which the objects in our object-oriented program interact with one another. Instead of a coordinated central script controlling the action, the gameplay instead emerges from the behaviors we give the objects themselves.
Intro: Object Awareness
The main principle behind “object oriented programming” is right there in the name – Objects. Every item in our scene is a “game object”, and it is the interaction and behaviors of those objects that makes our machine do something compelling.
In class, we discussed my favorite (yet still undercooked) metaphor for this process, which is to image our scene as a train station – a busy transit hub like Grand Central Terminal in New York City. If Grand Central is the scene, the objects are the people passing through. By and large, the people/objects tend to be very independent of one another, just going about their own path or instructions, and are generally unaware of the existence of the others around them. They may see the other people there, but they know little about the individual objects unless they are somehow introduced, actively seeking out a particular object so that they can approach and interact with that other object.

He is completely oblivious!
Last week, we made a few of these connections in our Pong game. We created public GameObject variables which allowed us to assign a specific object from either the Scene or the Asset window to the script component in the editor. That script then becomes aware of and has a reference to this assigned object. But that assigned object has no awareness of its connection to our script. Think of the spy movies where someone is secretly following a target – they are watching closely, but the person they are watching is unaware that they are being watched.
In that same project we also used a Find( ) command to get the reference to our GameManager object by searching for it by name. When the Find( ) command is used, Unity checks each object in the scene until it finds one with a matching name, and returns the reference to that object which we can hold in our own GameObject type variable. Again, the target has no idea who is watching them.
Then there is another type of interaction that is very close and personal – a collision. When two objects collide in the physics system (and at least one of them must has a Rigidbody component) they are both given the opportunity to respond to that moment through a collision message that is sent out to both of them.
Think about when you have been walking somewhere and suddenly you and a stranger roughly bump shoulders. What do you do? Probably you both are shocked and turn to look at one another. You are both aware of the presence of one another. Maybe you both ignore it and walk away. Or maybe you say something to the other person, tell them to watch where they are going. Or perhaps you reflexively check your pocket to make sure you still have your wallet, as you have seen too many spy movies and think that a shoulder bump probably means that you were just the victim of a pick-pocketing.
In that moment of contact, the Collision events are broadcast to both objects. If either object has a handler script for that message, it will not only run, it will receive all of the properties of the collision, including information about the other object, such as its transform, rigidbody component, and the reference to the game object itself. This passing of the object reference is where so much of games truly occurs.
Part 1: Setting Up the Game Field
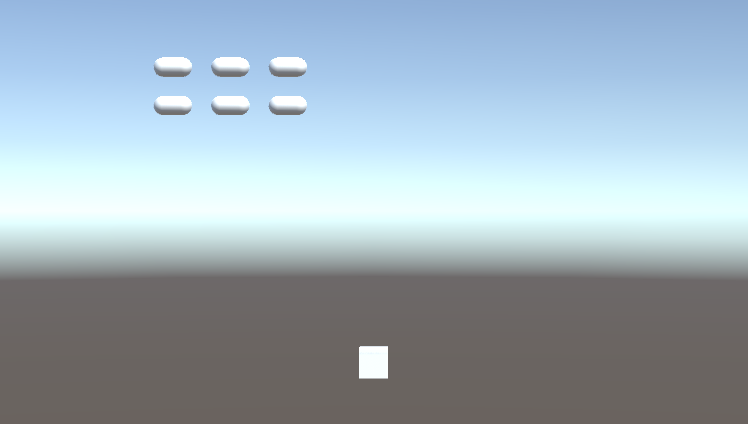
Our setup for today is relatively simple – we created three simple primitives and assigned them roles. A cube will act as our “player” object, the ground based cannon. A capsule turned on its side will be our “enemy”, an alien attacker in the sky. And a sphere will be our “bullet”.
Players will shoot bullets at the enemy objects. If a bullet hits the enemy object, it will be destroyed. Enemy objects will also drop bombs that can damage or destroy our Player object. And bullets should be destroyed as soon as they contact anything.
Since all of our primary objects have multiple destructions and reincarnations ahead of them, we are going to make each of these a prefab, which we do by dragging the object down into the Asset window.
A few quick camera adjustments, and we have our test screen:
Part 2: Player Motion with Input.GetAxis( ) and Input.GetAxisRaw( )
The first thing we want to do is move our player from side to side. In the past we have used Input.GetKey( ) to see if a particular button has been pressed. But this time we are going to use an axis based input, specifically Input.GetAxis( ). The idea of the axis input is that there exist common mappings between input devices that can be similarly interpreted as directional motion, such as the WASD or Arrow keys on a keyboard, and the thumbsticks on a game controller.
In this case, we want to move side to side, so we use Input.GetAxis(“Horizontal”) to returns a value that is between -1 and 1, and centers at 0 when nothing is pressed. In a script assigned to our Player object, we set up variables for our player object’s speed and a MAX_OFFSET variable to hold the maximum range from 0 that we should travel, and then moves the player in the Update( ) function using this:
void Update()
    {
        // move by the horizontal speed
        Vector3 currentPosition = transform.position;  // get location
        currentPosition.x = currentPosition.x +  (Input.GetAxis("Horizontal") * speed * Time.deltaTime);  // move by get axis

        // clamp my position
        currentPosition.x = Mathf.Clamp(currentPosition.x, -MAX_OFFSET, MAX_OFFSET);

        transform.position = currentPosition; // set location

    }
This is very similar to our Paddle movement from the previous assignment – we get the current position, have it offset by a small increment (here the value of GetAxis multiplied by the speed and Time.deltaTime), clamp our values to make sure we remain inside of our defined range, and then pass the resulting vector back into the position of the object itself.
When you play this, you may notice that your Player object feels a bit…. loose? You’ll lift your finger off the button and it will continue to move briefly as it slows down to a stop. Pressing a button again will cause it to start to move but it takes a moment to get up to speed. It is hard to make a precise move.
This floaty behavior happens because GetAxis( ) has a gravity to it – an amount of time designated for the result to arrive at a full value, taking its time to build or decay. For some games, this can create a natural behavior, such as a platform game where your character may take a moment to accelerate or slow down to a stop. For this game, however, we want our movement to be swift and precise, so instead we are going to use GetAxisRaw( ) which returns the same -1 to 1 range, but without the smoothing. Values are instant. Now our player moves swiftly and stops on a dime.
Part 3: Instantiating Objects
Our bullet is our main projectile, our primary collision object, and we will spawn many of these over the course of our game. We assigned a Rigidbody component to this object, and then turned off “Use Gravity” so that we don’t have to worry about managing our forces here.
Our Player object will be responsible for spawning the bullet, but we will make the bullet responsible for moving itself. We create a script that we attach to the prefab and add the following:
    public float speed;

    // Start is called before the first frame update
    void Start()
    {
        Rigidbody rb = GetComponent<Rigidbody>();
        rb.velocity = (Vector3.up * speed);
    }
Upon entering the first frame, the bullet’s script grabs the Rigidbody component, and applies a velocity expressed as speed times the direction “up” (a Vector3 that resolves to [0, 1, 0])
Finally, we will create a new tag, “PlayerBullet” and assign it to our bullet prefab object. We will use this to let the enemy test whether a bullet just hit it or not.
Now back in our Player object’s script, we add a public GameObject to hold the Bullet Prefab. You will want to make sure that you use the prefab from the Asset window for this, rather than any bullet you may have in the scene. When an object in the scene is destroyed, so is the object reference that other scripts may be holding onto, even if that object is recreated or respawned.
In our Player’s Update( ) we add in a check to see if the space button is pressed, and if so we call the FireBullet( ) command which looks like this:
void FireBullet()
    {
        // make a bullet
        Instantiate(bulletPrefab, (transform.position + (Vector3.up * 1.5f)), Quaternion.identity);
    }
Here we call Instantiate( ) using the (Object, Vector3 position, Quaternion rotation) version of the method. This version will create an object at the top level, meaning the parent is “null”. It will appear at the position passed, so in this case we use the current position of the player, plus 1.5 units in the “up” direction so as to appear outside of our player object and avoid any collisions at inception. The “rotation” here uses Quaternion.identity which is the fancy math way of saying “0, 0, 0” rotation.
Because the Bullet object contains its own script to move, it will “fire” as soon as it appears.
Part 4: Destroying Objects
Finally… the enemy. What good is a game if we have nothing to shoot at?
If we just pause here and play our game, we see our bullets run up against the enemy objects, and maybe bounce off of each other. Not much is going on here. We need these enemy to react.
When the bullet object hits the enemy object, both of them receive the collision notice. In this case, we will put the collision handling on the enemy object. For now they will be destroyed instantly with one shot, but in the future we may wish to have a handling script capable of taking multiple hits.
To process the collision, we test for the “PlayerBullet” tag, and if found, we tell the object to destroy itself using the Destroy( ) command.
    private void OnCollisionEnter(Collision collision)
    {
        if (collision.transform.tag == "PlayerBullet")
        {

            // tell the bullet to destroy itself
            Destroy(collision.gameObject);

            // destroy ourselves
            Destroy(this.gameObject);

        }
    }
You will notice we actually have two Destroy( ) commands here, and that is because we want the bullet to disappear also. The first command tells the game object that we collided with (the bullet) to destroy itself, and the second passes the reference to the game object that this behavior is running in.
What about those other bullets? The ones that miss and head into space? While it is perfectly OK to leave them there for our small little game, in a large game over time they may add up and be a drag on our memory. It’s good form to clean up after ourselves and remove them from the equation if they have gone unused after a period of time. To do this, we can use the timed version of Destroy( ) which takes both the object and a float time value. We edit the Player script to include a GameObject type variable that we will use to hold a reference to the object we just instantiated, and then submit that object to be destroyed, but with a 2 second delay. Now if the bullet still exists past 2 seconds, it will self destruct. (Your destruction time will vary, just make sure to leave enough time for the bullet to leave your screen.
    void FireBullet()
    {
        // make a bullet
        GameObject bulletObject = Instantiate(bulletPrefab, (transform.position + Vector3.up), Quaternion.identity);

        // set the self destruct timer
        Destroy(bulletObject, 2.0f);
    }
Part 5: Enemy Movements (Inheritance & Coroutines)
A good Space Invaders game needs to feature rows and rows of aliens moving in perfect unison with one another. (That synchronization and slow beeping noise is super-creepy!) While we could spend time telling each and every one of our aliens to move to a new position every time we hit a new beat, there is a faster path – they can inherit the motion from a parent object.
We create an empty object that we will call “MotherShipObject”, and we make our enemy objects children of this by dragging their listing on the hierarchy onto the “MotherShipObject” object, thus making them child objects, which you can tell because “MotherShipObject” now has a collapsible arrow next to it.
Next, we create a new script – MotherShipScript.cs – that we will add to the Mother Object. The goal of this script is to move the fleet in that snaking pattern that we know so well. The enemy fleet will march in a pattern slowly downward until one of three things occurs which will end the current round:
- The player destroys all of the enemy objects
- An enemy object destroys the player
- An enemy object touches the ground
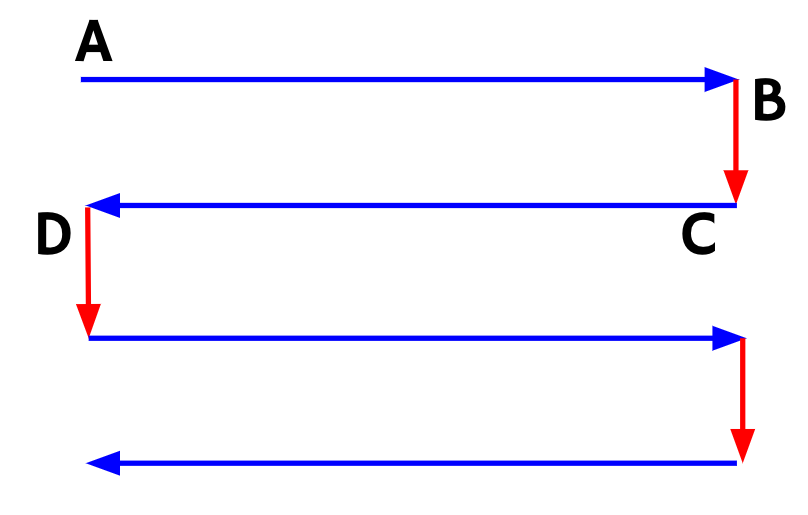
The downward march has four distinct moves, each happening in a series of rhythmic steps:
A) The objects move to the right in X number of steps
B) The objects move down on the next step
C) The objects move to the right in X number of steps
D) The objects move down on the next step
Since we do not know the precise measurements we will want to use yet, we expose the variables we will use to loop through these movements.
    public int stepsToSide;
    public float sideStepUnits;
    public float downStepUnits;
    public float timeBetweenSteps;
We have stepsToSide which will determine how many steps will be used to travel parts A and C. We next have sideStepUnits and downStepUnits which we will use as a measure of how far to proceed when moving sideways or downward. And finally we have timeBetweenSteps, which will hold the interval in seconds between steps. We make this a variable instead of a hard coded value because later we will want to increase the speed of the attack as the alien force’s numbers are depleted.
Next, we are ready to create the coroutine MoveMother( ). This function will move laterally for the designated number of steps, then move down for one step, pausing in between each movement. For now, we will continue this cycle so long as our Mother object has children. This is for testing and debugging purposes. Later, we will perform a faster detection of how many objects remain as children and end the round as soon as that number hits zero, calling an end to the coroutines with the StopCoroutine( ) command.
Here is our script that we created:
public IEnumerator MoveMother()
{
    // define the step vector
    Vector3 sideStepVector = Vector3.right * sideStepUnits;
    Vector3 downStepVector = Vector3.down * downStepUnits;

    while (transform.childCount > 0) {

        // move to the side
        for (int i = 0; i < stepsToSide; i++)
        {
            // move by the offset
            transform.position = transform.position + sideStepVector;

            // wait for the next move
            yield return new WaitForSeconds(timeBetweenSteps);
        }

        // move the piece down
        transform.position += downStepVector;
        yield return new WaitForSeconds(timeBetweenSteps);

        // flip the direction
        sideStepVector *= -1;

    }
}
First, we define a Vector3 object that will serve as the offset for our lateral step – defining how far we should move. We define this by multiplying a Vector3.right (which returns [1,0,0]) with our sideStepUnits value to create a our offset vector.
The reason that we declare this vector is so that it can be applied directly to the transform.position through addition. We cannot directly set a value inside the position, so we could not use a statement like:
transform.position.x += 1.0f; // this won't work
… but we can change the position with vector math, so adding a Vector3 to this statement will work:
transform.position += offsetVector; // this will work
We create a similar offset vector for the “down step”, by multiplying Vector3.down (which returns [0,-1,0]) by the “downStepUnits” value.
Now that we have our offsets, we set up the while( ) loop with a condition that the Mother transform maintains a child count greater than zero.
Inside that loop, we have a three step process:
- Move to the side with the sideStepVector offset value, and we repeat this stepsToSide times… which we do by creating a simple “for” loop that moves us and then waits timeBetweenSteps before moving on to the next step.
- Move down with the downStepVector and then wait another interval of timeBetweenSteps
- Reverse the direction of the offset vector by multiplying it by -1
Step 3 is our real shortcut here. Because we are simply reversing the movement, we don’t have to designate the left direction. Instead of writing this out as [A] -> [B] -> [C] -> [D], we made this [A] -> [B] -> [-A] -> [B].
Now our enemies advance, and we can adjust the values for what makes for the best gameplay.
Part 6: Dropping Bombs (Selection in a set)
Next, we create a behavior where our enemies periodically fire an object that could hit our player. To do this, we create a new cylinder primitive, size it to an appropriate “thing a UFO would drop” size, and turn it into a prefab. We don’t need to put any scripts on this object, as our enemy will use gravity to deliver the bomb. We DO need to put a Rigidbody on the prefab, so don’t forget to do that step!
Now we want to make each and every one of our enemy ships capable of firing a bomb. In our Enemy.cs script, we add a GameObject variable to hold the reference to the prefab so that we can instantiate it.
public GameObject enemyBombPrefab;
Next we create a new function that we call DropABomb( ). Don’t forget to declare this function public, as we will want the order for this to come from our MotherShipScript.
public void DropABomb()
    {
        // make the bomb
        Instantiate(enemyBombPrefab, (transform.position + Vector3.down), Quaternion.identity);
    }
This script is similar to our bullet firing script – we Instantiate( ) the prefab object at a position that is closely relative to this enemy (only 1 unit down thanks to the addition of Vector3.down). The Quaternion.identity gives the placement a rotation value of 0,0,0.
To test this we made a simple Input.GetKey( ) check in the Update( ) function and called DropABomb( ) to ensure this works. Sure enough, every enemy made a bomb.
We want to be a little more conservative with our bombs, so we will have our MotherShipScript run another coroutine, where every certain number of seconds, a child object will be randomly chosen, and the command to drop a bomb will be sent.
     public IEnumerator DropOneBomb()
    {
        bool _isRunning = true;

        while (_isRunning)
        {
            // wait for the interval
            yield return new WaitForSeconds(timeBetweenBombs);

            // see how many children there are
            int enemyCount = transform.childCount;

            // if we have children,
            if (enemyCount > 0)
            {
                // pick one at random
                int enemyIndex = Random.Range(0,enemyCount);

                // get the child of this
                Transform thisEnemy = transform.GetChild(enemyIndex);

                // get the component
                EnemyScript thisEnemyScript = thisEnemy.GetComponent<EnemyScript>();

                if (thisEnemyScript)
                {
                    // have it send a bomb
                    thisEnemyScript.DropABomb();
                }

            } else
            {
                // else we don't have children, so stop the script.
                _isRunning = false;
            }
        }
    }
Here we create the isRunning variable as a boolean, but it serves the same purpose as the childCount in the last coroutine. In fact, we set it the same way. Our script runs Transform.childCount in each iterations, and if the count is zero then we set isRunning = false and end the loop.
If there is still a fleet of intrepid fighters out there, however, our script chooses one lucky participant by running the Random.Range( ) function. A word of caution regarding Random.Range – there is both a float and an int version of this function and they behave slightly differently from one another. In the float version, the min and max values are inclusive, meaning that if I ask it to return a random number in the range of 0.0f and 10.0f, it could be either of those numbers or any number in between. With the integer version of the script the max value is exclusive, meaning a range of min: 0, max: 10 will only return values between 0-9. This means we don’t have to calculate our usual [count – 1] for a value.
Next we get the Enemy script by declaring an “Enemy” type object, and running GetComponent<Enemy>( ) on the lucky ufo. We then test this value to make sure that GetComponent did not return a null value, or empty value. If this is empty, we have tried to grab a component from an object that does not have it. This helps us error check and avoid making an unsupported call. If our Enemy object evaluates to true, it means our object is there, and we can go ahead and send it the DropABomb( ) command.
Finally, at the end of the while loop, we run a WaitForSeconds( ) before trying this again.
Part 7: Physics Layers
As you test this, you’ve probably noticed that physics is doing some… unusual things. Our enemy bomb objects dropped from attackers in the top row are landing on the row below them. We don’t want our enemy to destroy themselves with friendly fire, lest we give our player an unfair advantage. We also don’t want bombs to ride around on top of the enemy objects. How can we fix this? This is a pretty common problem in game engines – you want some things to collide with others, but not EVERYTHING to collide all the time. Thankfully, Unity has a solution for us – Layer Masks.
Layers are kind of like Tags. Every object has a Layer assignment which can be viewed and modified in a dropdown in the bottom-left of the object info, next to the tag designation.

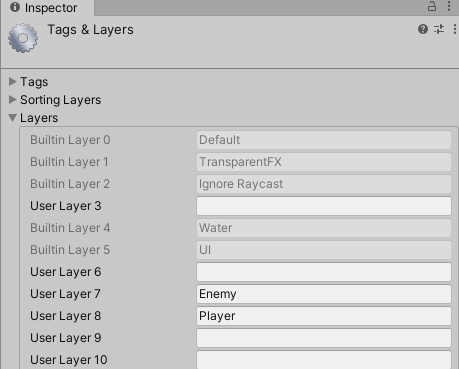
Although we view these layers as strings, they are stored as integer values. (GameObjects are automatically assigned to Layer 0) . There are 32 possible layers, the first 8 are reserved by Unity, and the remaining 24 are available for your use. You can edit these by selecting Add New Layer… in the Layer Dropdown, or by going to Edit -> Project Settings -> Tags and Layers.
For this project, let’s define two new layers – “Enemy” and “Player”.
By defining these layers, we now have a method by which to “mask” (or block) physics events from processing between certain layers. Go to Edit -> Project Settings -> Physics and scroll to the bottom of the panel. There you will see the Layer Collision Matrix, a grid of checkboxes, each row and column sharing a name with a layer in our system.
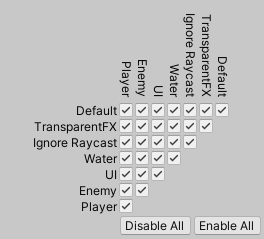
This collision matrix tells the Unity engine which collisions to process, and which to ignore. When a box is checked, objects from the layers in that row and column will collide. When unchecked, they ignore one another – no collision event is created, and they simply pass through one another.
For our game, I’m going to assume that objects on the Player layer (which I will assign our player object and our bullets) should not collide with one another. And objects on the Enemy layer (which will be the enemy objects and their bullets) should not collide with themselves. I uncheck the boxes at the intersection of Enemy/Enemy, and Player/Player like so:

Now our enemy bombs drop right through the attackers in lower rows, but will interact with our Player object. (And if you’re a good shot, you can also hit them with your player bullets and knock them off course. You’ll be asked to address this as part of this week’s assignment).
PlayerObjectScript.cs
using System.Collections;
using System.Collections.Generic;
using UnityEngine;

public class PlayerObjectScript : MonoBehaviour
{
    // movement variables
    public float playerSpeed;
    private float MAX_OFFSET = 15.0f;

    // bullet variables
    public GameObject bulletPrefab;

    // Start is called before the first frame update
    void Start()
    {

    }

    // Update is called once per frame
    void Update()
    {
        MovePlayer();

        if (Input.GetKeyDown(KeyCode.Space))
        {
            FireBullet();
        }

    }

    private void FireBullet()
    {
        // spawn a new bullet
        GameObject bulletObject = Instantiate(bulletPrefab, (transform.position + Vector3.up * 1.5f), Quaternion.identity);

        // set the self destruct timer
        Destroy(bulletObject, 2.0f);
    }

    void MovePlayer()
    {
        // getting the vector
        Vector3 currentPosition = transform.position;

        // set the x value based on input
        currentPosition.x = currentPosition.x + (Input.GetAxisRaw("Horizontal") * playerSpeed * Time.deltaTime);

        // check our values with clamp
        currentPosition.x = Mathf.Clamp(currentPosition.x, -MAX_OFFSET, MAX_OFFSET);

        // update our position
        transform.position = currentPosition;
    }

}
MotherShipScript.cs
using System.Collections;
using System.Collections.Generic;
using UnityEngine;

public class MotherShipScript : MonoBehaviour
{
    public int stepsToSide;
    public float sideStepUnits;
    public float downStepUnits;
    public float timeBetweenSteps;

    public float timeBetweenBombs;

    // Start is called before the first frame update
    void Start()
    {
        StartCoroutine(MoveMother());
        StartCoroutine(DropOneBomb());
    }

    // Update is called once per frame
    void Update()
    {

    }

    public IEnumerator MoveMother()
    {
        // define the  step vectors
        Vector3 sideStepVector = Vector3.right * sideStepUnits;
        Vector3 downStepVector = Vector3.down * downStepUnits;

        // move the swarm
        while (transform.childCount > 0)
        {
            // move to the side
            for (int i = 0; i < stepsToSide; i++)
            {
                // move by the offset
                transform.position = transform.position + sideStepVector;

                // wait for the interval
                yield return new WaitForSeconds(timeBetweenSteps);
            }


            // move down
            transform.position += downStepVector;
            yield return new WaitForSeconds(timeBetweenSteps);

            // flip the direction
            sideStepVector *= -1;


        }

    }

    public IEnumerator DropOneBomb()
    {
        bool _isRunning = true;

        while (_isRunning)
        {
            // wait for the interval
            yield return new WaitForSeconds(timeBetweenBombs);

            // see how many children there are
            int enemyCount = transform.childCount;

            // if we have children,
            if (enemyCount > 0)
            {
                // pick one at random
                int enemyIndex = Random.Range(0,enemyCount);

                // get the child of this
                Transform thisEnemy = transform.GetChild(enemyIndex);

                // get the component
                EnemyScript thisEnemyScript = thisEnemy.GetComponent<EnemyScript>();

                if (thisEnemyScript)
                {
                    // have it send a bomb
                    thisEnemyScript.DropABomb();
                }


            } else
            {
                // else we don't have children, so stop the script.
                _isRunning = false;
            }

        }
    }


}
EnemyScript.cs
using System.Collections;
using System.Collections.Generic;
using UnityEngine;

public class EnemyScript : MonoBehaviour
{
    public GameObject enemyBombPrefab;

    // Start is called before the first frame update
    void Start()
    {

    }

    // Update is called once per frame
    void Update()
    {
        if (Input.GetKeyDown(KeyCode.B))
        {
            DropABomb();
        }
    }

    private void OnCollisionEnter(Collision collision)
    {
        if (collision.transform.tag == "PlayerBullet")
        {
            // destroy this enemy object
            Destroy(this.gameObject);

            // destroy the bullet
            Destroy(collision.gameObject);
        }
    }

    public void DropABomb()
    {
        // make an instance of the bomb
        Instantiate(enemyBombPrefab, transform.position + Vector3.down, Quaternion.identity);
    }

}
BulletScript.cs
using System.Collections;
using System.Collections.Generic;
using UnityEngine;

public class BulletScript : MonoBehaviour
{
    public float bulletSpeed;

    // Start is called before the first frame update
    void Start()
    {
        // shoot our bullet
        Rigidbody rb = GetComponent<Rigidbody>();
        rb.velocity = (Vector3.up * bulletSpeed);
    }
}