In this week’s class, we discussed strategies for audio, and covered the Singleton pattern – a very powerful tool (but also a potentially tricky/dangerous one) for organizing our game and exposing our “manager” scripts to the objects in our scene. The videos this week will cover updates to our Astral Attackers game to build a Sound Manager, create the Game Manager which will handle our game state and flow, and finally we will make some visual improvements to our environment and to our enemies to spice things up.
Part 1-A: Making Better Enemies…
Our previous alien attackers were rather primitive – Unity primitives, to be exact. (Thank you, I’ll be here all week!) Now that we have a fancy setting, our enemies should be a little more… dramatic. For this section, we are going to look to the source material and draw some inspiration from the classic pixel-y goodness of the original, and build our enemies out of cubes.
Why cubes? First off, they are super easy to create and work with, and require surprisingly little overhead in terms of rendering and physics calculation. Second, I want to show you how you can create a game using just the tools provided – no need for special 3D modeling/animation software. Third, we are going to use Physics on those blocks to create a satisfying explosion effect on the alien ship that will add some fun to our game.
First, we create a single cube, using GameObject > 3D Object > Cube or Create… > 3D Object > Cube. I’m going to want my bottom center cube to represent the “position” of the object so I will set its position to the origin (0, 0, 0). If yours is not at that location, you can select the settings dropdown from the Transform component and select Reset Transform to do so.
Next we make copies of the cube and offset them by 1 unit increments so that you have a row of 5 cubes with their edges touching. Now copy those rows and move them up by 1 unit increments, until you have a 5×5 cube grid.
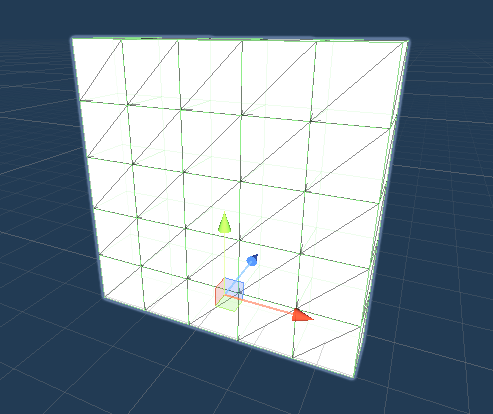
Then, we create an empty game object (GameObject > Create Empty or Create… > Create Empty) also located at (0, 0, 0) and make all of the cubes children of this empty object. Notice that when you add the cubes as children, they now indent under the parent object in the Hierarchy, and the parent object now has a small button that lets you roll-up the list.
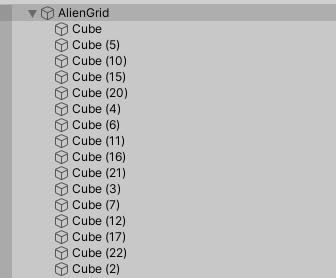
I expect to create a number of aliens using this same block grid, and so I will create a prefab object from it that I can use as a template for future iterations. I name the parent object “Base Grid” and drag it into my Asset window. Now that I have saved a copy, I want to unpack this prefab and convert everything back into a scene object so that I can make local edits. I do this by selecting Prefab > Unpack Completely. Once I have edited this to make an alien shape, I will save this as a different prefab. (This is my path to create these objects, but this is by no means the only path. Do what works for you!)
Once I have unpacked the object, I edit it by removing some of the blocks. You can delete these, or simply turn the cube objects off using the check box next to the GameObject name in the Inspector. This way, the block is preserved, in case you want to go back later and edit quickly. Remove some blocks and make an alien shape like so:
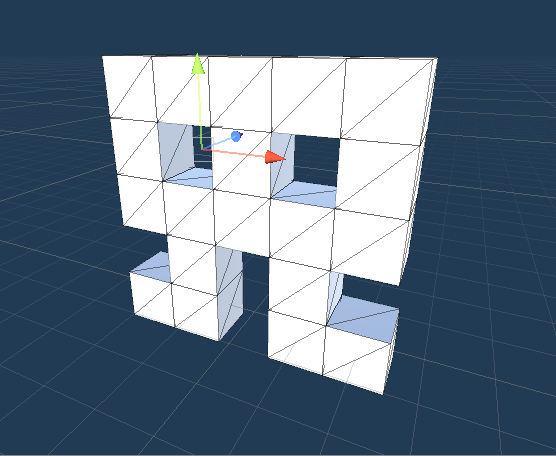
Time to give the parent object a name. I called mine AlienFrame1, since I will have multiple versions of this, each one representing a frame of animation.
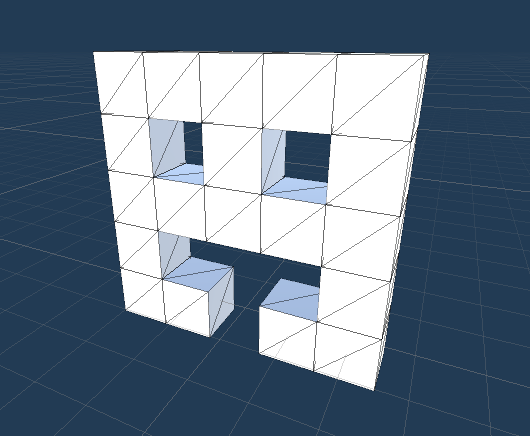
Now I turn off AlienFrame1, and place a new instance of the AlienGrid template in the scene at the same position. I unpack, edit it to look as though the legs have moved, and name the parent object AlienFrame2.
Now I am going to create a duplicate of AlienFrame1, but I will call this one AlienExplode. This object will be out “stunt double”, swapping places with the other frames when it is time for the ship to blow up. To get that great explosive force, add a Rigidbody component to each of the cubes in AlienExplode. (You can simply select all of the cubes at once and go to Add Component).
It is also worth noting that in my objects for frames 1 & 2, I have turned their colliders off. This is because I want to have to worry about managing collisions on the individual blocks – I want these to simply be a part of a cohesive whole.
I’m going to make each one of our alien parent objects a prefab by dragging it down into the Assets folder. Next, I am going to create a new empty game object and parent it to these prefabs, so that it serves as a container to the individual frames. Name this object EnemyTypeA and make this object into a prefab as well. I add my Enemy class to this, as well as a Box Collider component which I will resize to fit around my enemy object. (Don’t forget to change your layer designation to “Enemy”!)
Now, let’s add a little bit of scripting to bring our little attacker to life. We want to open our Enemy script and add variables to hold the three child objects of this particular enemy.
    // enemy voxel frame prefabs
    public GameObject enemyFrameOne, enemyFrameTwo, enemyExplode;
We define three objects (which we must populate with the Inspector), and then on Start( ) we set their conditions so that only the modelOne model is active. I use Awake so that this is set instantly, just in case something else is going to access our models when the Start( ) event runs.
private void Start()
{
    enemyFrameOne.SetActive(true);
    enemyFrameTwo.SetActive(false);
    enemyExplode.SetActive(false);
}
Next, we create a functional called SwapFrames( ) that will toggle the visibility of Enemy Frames 1 & 2. cond. It accomplishes this by nesting the call and the 1.0 second yield inside of a “while” loop that will run continuously for the duration of the object because the condition is set to “true”.
The SwapFrames( ) command simply set the active state of both frames to the opposite value. For now, this function will fire when we press the “S” button.
public void SwapFrames()
{
    enemyFrameOne.SetActive(!enemyFrameOne.activeSelf);
    enemyFrameTwo.SetActive(!enemyFrameTwo.activeSelf);
}
Now we need something to call this frame swapping function. Our game design calls for a highly coordinated attack orchestrated by a single entity – the MotherShip (or in this case the MotherShipScript) – and so it is there that we will issue the SwapFrames( ) call. In the previous lesson we examined how to access a child object through the transform of this object, so one strategy would be to count our children, then loop through them one-by-one, accessing the EnemyScript component and issuing the command, but today we will look at a different method.
Instead of individually accessing each child object, we can simply broadcast a command to every child object, much like a parent would yell to all of their children at once when it is time for dinner. We do this through the BroadcastMessage( ) function, which is similar to the SendMessage( ) function, but where as SendMessage( ) only calls this function on the components of a single target object, BroadcastMessage( ) will issue the message to every child object, and their children as well.
When our MotherShipScript’s coroutine causes the attackers to move, we also issue a SwapFrames( ) call to every object like so:
// move to the side
for (int = 0; i < stepsToSide; i++) {
    // move by the offset
    transform.position = transform.position + sideStepVector;

    // run swap frames
    BroadcastMessage("SwapFrames");

    // wait for the interval
    yield return new WaitForSeconds(timeBetweenSteps);
}
The benefit of this method of calling a function is that we can have multiple scripts that share the same method name and it will be called on all of them. (You already use something similar to this – Update( ), Start( ), and Awake( ) are examples of functions that respond to a message.)
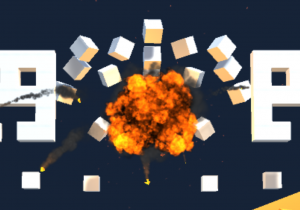
Part 1-B: … and cool Explosions!
For this next part, we want to test out our explosion effect – where we swap out our model frames with our “stunt double” and then apply an explosive force to the individual boxes. We do this by creating an EnemyExplode( ) command in our EnemyScript, like so:
    private void EnemyExplode()
    {
        // turn off the other objects and turn on the explosion frame
        enemyFrameOne.SetActive(false);
        enemyFrameTwo.SetActive(false);
        enemyExplode.SetActive(true);

        // Make the enemy explosion noise
        SoundManager.S.MakeEnemyExplosionSound();


        // get all of the rigidbodies
        Rigidbody[] enemyBlocks = GetComponentsInChildren<Rigidbody>();

        foreach (Rigidbody block in enemyBlocks)
        {
            block.AddExplosionForce(explosionForce, (transform.position + Vector3.back * 2f), explosionRadius, 0f, ForceMode.Impulse);

        }
        // orphan the explosion object
        enemyExplode.transform.parent = null;
    }
Once we have turned off our models and turned on our “stunt double” object, our goal is to apply the Rigidbody.AddExplosionForce( ) to each cube in the object. This method takes three arguments – a force to exert, an origination point for the explosion, and a radius within which the explosion will have an effect. We create public float objects for “explosionForce” and “explosionRadius” in the class declaration, and then set those values.
In our explode command, you see that we declared a variable as “Rigidbody[ ] enemyBlocks”. These brackets mean that we expect to receive more than one result – an array of Rigidbody components. We then generate this list using the GetComponentsInChildren<>( ) method which returns the array of all child objects for “modelExplosion” that have a Rigidbody component in their backpack. Finally we use a “foreach” loop that lets us cycle through each result in our array. In each pass of the loop (that is, for each Rigidbody object in enemyBlocks[ ]) we set that object to the variable “block”, and then apply our explosive force to that Rigidbody. By cycling through all of these we ensure that every object is affected by the force.
One thing that you will notice is that our other frames keep popping back into view. This is because we set our Coroutine to run continuously. We can try to prevent this by issuing a StopCoroutine( ) command, but there is a better solution – let the Enemy object be destroyed on impact, like it was.
Now, this creates a conundrum. If we destroy the object, the children will be destroyed as well, along with our “stunt double”. Everything will just blink out of existence. But what if our stunt double was not a child of the enemy object? To accomplish this, we are going to emancipate our stunt double from it’s parent object, making it an orphan (or as I like to call it, a “child of the world”). We do this by setting the parent of that object to “null”.
enemyExplode.transform.parent = null;
Now our enemy object destroys itself, but not before throwing the stunt double out into the world and applying the explosion just before it disappears. Because our EnemyExplode( ) command runs prior to the command that destroys the Enemy object, our stunt double makes it out alive (but not for long).
Finally, we are going to insert some special effects, using an explosion prefab built with Unity’s particle system. (More on these later…). You can download this prefab in the package posted on the course Box site. By adding this prefab as a child of our AlienExplode prefab, it will appear and play once when the stunt double wakes up. It make a fiery explosion with a bright orange light, sends out a “shockwave”, and shoots some smoking embers off into the distance.
Part 2: Improving the Layout
This still looks a lot like a Unity demo, and less like a real game. In this workshop section, we make some simple cosmetic changes to the game to create an alien landscape. Through the addition of some primitive shapes (a ground plane and some “mountains”), the addition of some color (via some new materials), and the removal of the skybox (by setting the camera background to solid color), we have added a lot of personality to our game.

Part 3-A: Audio Strategy
When we are making our game, there are a number of decisions that will center around how we want to treat the sounds in our game. When should they be playing in our game? What should be emitting the sound? Do I need to have control over the sound, such as starting and stopping playback, or adjusting the speed or pitch? Are my audio clips short or long? How often can I expect to hear each sound? These questions will inform our decisions as to which objects should emit what sounds, and how much control we may need to exert over them through code.
For most of my games, my sounds tend to fall into one of four categories:
- Omnipresent Sounds – these are sounds that will generally play throughout an experience, such as background music, or ambient noise. The sound is continuous, long, and probably loops. It tends to remain at a steady volume, regardless of position. For these types, I prefer to use an empty object that contains only an AudioSource component dedicated to playing the one sound, with the loop property selected. These may be set to play on awake or respond to a Play( ) command, depending on the start/stop conditions.
- Object Sounds – these sounds have an obvious point of origin. We perceive them as coming from some object in our scene – perhaps a character, perhaps an inanimate object. These may be lines of dialog, footsteps, music coming from a radio, a cat meowing, or a twinkling sound to indicate a point of interest. We expect these sounds to come from “somewhere” as opposed to “everywhere” so often we will want them to have a spatial quality or directionality. These are the most likely to be controlled by some behavior or react to some condition. In this case, I expect these to be generated from an AudioSource component that is attached to a GameObject or the child of an object in the scene, and managed some script, likely on the object itself. These sources will often have the 3D sound at least partially implemented, and will likely rely on the Play( ) command.
- Prefab Sounds – I see these as “object sounds on autopilot”. There is no logic expected to control the sound, they simply play when instantiated, and may continue for the duration of the instance object. These are best used for environmental sound effects that are a little longer or loop (such as a motor running, or a crackling fire), or a larger sound effect (such as a door opening, or longer explosion). Generally this involves a prefab object with an AudioSource with a preset AudioClip that will Play On Awake and may or may not Loop. This can be 2D or 3D sound depending on if your noise needs a point of origin. These will play through until the object is destroyed, or the clip is finished (if not looping).
- One-Shot Sounds – these are useful for quick sounds, especially repeating sounds, or sound that may overlap. PlayOneShot( ) is a play-and-forget function… once it begins you cannot stop it until it has played through. Also, this does not loop. It must be applied to an audio source, so it will respect the settings of that objects component, such as the spatial quality (and thus position of the object). This type is best for quick sound effects, especially those that may overlap from the same source. Footsteps, gunshots, UI noises, beeps, scoring noises, quick audio effects that don’t need to be controlled or shut off.
For our game, we chose audio clips for bullet and bomb sounds and attach those to their respective prefabs. These will play automatically when the prefab is spawned, and will stop playing immediately if their host object is destroyed.
For our explosion sounds, we will want to spawn those separately into the scene, so that we can de-activate them if our Player object is destroyed. (That is a solemn moment, we want to make sure to isolate that noise for maximum impact). As long as we are spawning explosion sounds, we should also
Finally, we set up a separate object that plays on awake and will host our background music / ambient sound, and play on a loop.
Part 3-B: Sound Manager (Singleton)
Back when we discussed our “train station” metaphor, I mentioned a special method for assigning and calling a single instance of an object, known as the “Singleton” pattern. This is a way of declaring a class so that there is only ever one single instance of it. In other situations, the Singleton instantiates itself. Our code, however, is living inside the confines of our game engine, so we will still need to attach it to an object that exists in our scene, rather than relying on self-instantiation.
Think of the Singleton as being similar to the Presidency. At any given time, there is only one President. A new President may come along and replace the old, and when they do the former ceases to be the President. The responsibilities of the office only ever point to one person at a time… the current President.
So the Singleton pattern is a programming method by which we can define a particular instance of a class within the class declaration itself, so that we never have to worry about “finding” or establishing a relationship or link… we simply call the only instance by calling a property in the class that holds the instance itself.
Sounds confusing, and it kind of is, but just roll with it and you’ll see how this works.
First, we need to create something to generate the sounds. I first create an empty game object by going to Create > Create Empty, and naming it “SoundManager”. I then add a script to this, which I also name “SoundManager”. (These don’t have to share the same name, this is just a personal preference as I only expect to have one of these). I also add an AudioSource component to the SoundManager object… this is what will emit our PlayOneShot( ) sounds.
In our Sound Manager script, I create a variable “audio” to hold the reference to the AudioSource component, and I assign it in the Start( ) command with GetComponent<AudioSource>( ).
Now we need to make our SoundManager into a singleton. This way we can adjust sounds or modify them or turn them off as needed. If we instantiate our sounds as children of the Sound Manager, we only need to look internally to make adjustments, rather than performing costly “find” processes.
The first step to declare a singleton is to define a public static version of the class within itself, like so:
public class SoundManager: MonoBehaviour
{

    public static SoundManager S;

...
Weird, right? We just set up a SoundManager type variable inside of our SoundManager type script?
Weirder still, watch what we do next:
private void Awake()
{
        S = this; // Singleton Definition
}
As our object wakes up, it declares itself to be this value “S”.
What is “public static” anyways? The “public” designation is pretty easy – it is a value that can be accessed from outside of the class. But the “static” designation means that all instances of the class share the same value for that variable. So in theory, you can create as many SoundManagers as you want, but if you access the “S” variable, you will always get a reference to the same object, the last one that woke up and set itself to “this”.
So why is this useful? Because now we no longer have to find our SoundManager. We can simply get directly to the active instance of our SoundManager script by writing SoundManager.S.{{whatever public variable or method}}
As a demonstration of this, we create a public function named MakeEnemySound( ) which will play my enemy advancement sound. The declaration is simple:
public void MakeTheEnemyAdvanceNoise()
{
    // make our enemy advance sounds
    managerAudio.PlayOneShot(enemyAdvanceSoundClip);
}
Now we can add a command in our MotherShipScript.cs script that calls this particular function to generate the sound by writing:
SoundManager.S.MakeTheEnemyAdvanceNoise();
It all simply works.
NOTE – Often times, the variable name “S” is used as shorthand for Singleton, but you can choose whatever name you want. You could call your SoundManager singleton “Jeffrey”, so our script made calls to SoundManager.Jeffrey.StopAllSounds( ) instead. “S” is just a commonly used shorthand because Singleton starts with S.
Next we want to make the explosion sound for our Enemy objects. These could be one shot sounds, however they do last for a little bit, and I want to make sure I cut off all sounds when our player object is destroyed. Because of this, I am going to make these sounds prefab objects and I will instantiate them into the scene, so that I can destroy them if I need to cut them off early.
public void MakeEnemyExplosionSound()
{
    GameObject thisExplosion = Instantiate(enemyExplosionSoundPrefab, transform);
    Destroy(thisExplosion, 5.0f);
}
Here, we generate an instance of the explosion prefab. We also set a self-destruct timer of 5 seconds to clean up the scene. (We could make this one second, but this better illustrates the point.) We also use the version of Instantiate( ) that takes a Game Object and Transform argument. By passing the current object’s transform, we make the Sound Manager the parent object. This will come in handy later when we want to stop all sounds.
Although we did not do this as part of the workshop, were we to set up a Player explosion sound I would likely set this up as a PlayOneShot( ) so that it emits from our manager’s Audio Source, and call that from the collision script on our player object.
Next, we set up a function to stop all of the sounds, named StopAllSounds( ). We set up a public AudioSource named “backgroundMusic”, associate our background track,and create two functions, StartTheMusic( ) and StopTheMusic( ) that run the Play and Stop commands on the associated AudioSource when this function is called. of the associate our ambient sound object.
Finally we set up a function to handle the player explosion and turn off all playing sounds. We get an array of all child objects that have the AudioSource component (this includes the Background Music object, which we made a child of the Sound Manager object). Next, we move through each AudioSource component in the array and issue the “Stop” command.
    public void PlayerExplosionSequence()
    {
        // turn off all currently playing sounds
        AudioSource[] childAudioSources = GetComponentsInChildren<AudioSource>();
        foreach (AudioSource thisChild in childAudioSources)
        {
            thisChild.Stop();
        }

        // play the player explosion sound

    }
Part 4: Sharper Text (with TextMeshPro)
One thing that you may have noticed when working with the text objects is that they do not scale well. When scaled up to a larger size, the characters in the text often appear to be blurry, with fuzzy edges. This is because Unity uses a “bitmap” texture – an image of the font – to build your text. It chops up the texture into small rectangles and displays those on your screen. Depending on the original size of your font, this jagged effect – an artifact of upscaling the anti-aliased font image – may be quite pronounced.
Thankfully, Unity now offers us an alternative solution that can render crisp text at any resolution. TextMeshPro was once a third-party asset, but was so popular that Unity acquired it and now includes it with the engine. It takes a few more steps to set up, and is implemented in a slightly different manner, but the end results are spectacular.
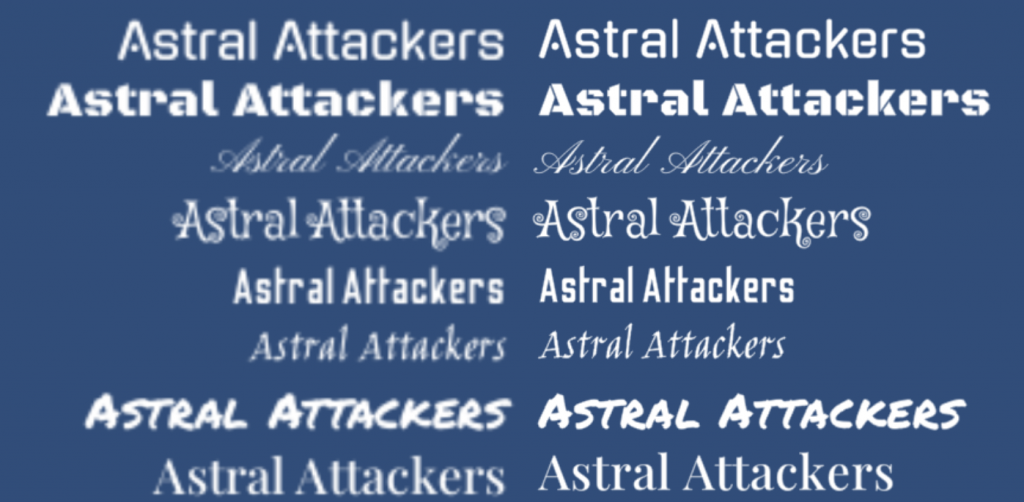
Both set to a font size of 18
TextMeshPro differs from the legacy Unity text system in that it does not display bitmap textures – instead it uses a technique called a Signed Distance Field (SDF). In simple terms, it uses a low resolution image that looks like a blurry version of the font texture and applies a bunch of crazy graphics math on those images to generate a crisp looking render at any distance. If you would like to read more about the process, check out this SIGGRAPH paper from the folks at Valve who invented the technique.
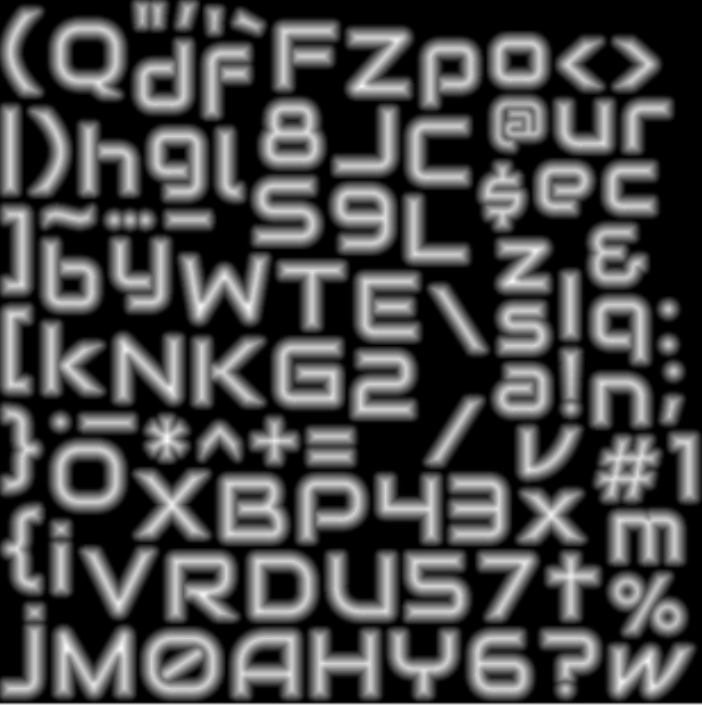
What this means for us is that we cannot simply load and assign a font as we can with a Text object. Instead, we need to generate a Font Atlas by importing a font and letting TextMeshPro process it into one of these fancy blurry texture maps.
To begin, launch the font creator by going to Window > TextMeshPro > Font Asset Creator. If this is the first time you have launched TextMeshPro in this project, you will get a menu asking you to Import TMP Essentials. Click this and install. You do not need to load the Examples & Extras.
Importing Fonts
In the Font Asset Creator, assign a Source Font File – this is a font file that you have already loaded into your Assets folder. As a reminder, Unity supports both True-Type Font (.ttf) and Open-Type Font (.otf) formats. Click the Generate Font Atlas button and the creator will generate the font image. Select Save As… to save the font atlas to your asset folder.
TextMeshPro will also create a folder in your Asset directory that includes some instructions and documentation if you want to dig deeper into the settings.
TextMeshPro UI
To create a TextMeshPro UI object, select the option from the UI menu, such as Create > UI > TextMeshPro – Text.
For a TextMeshPro object, the Text component is replaced with a TextMeshPro UGUI component with more settings than before. One of the first things you will notice is that you will load a Font Asset instead of a Font. Directly below that is the Material Preset. This will refer to the “Material” settings at the bottom of the panel – the options that allow you to modify the appearance of your TMP object with effects like Outline, Underlay, or Bevel.
What you will notice is that by default, as you create more items they will also share the same Material settings. To create a new instance of the material, right-click the Material panel and select Create Material Preset.
NOTE: Some features like Bevel are only available when the material shader is set to TextMeshPro/Distance Field (Surface Shader). In general this is slightly more computationally expensive, but for our project will not make much of a difference.
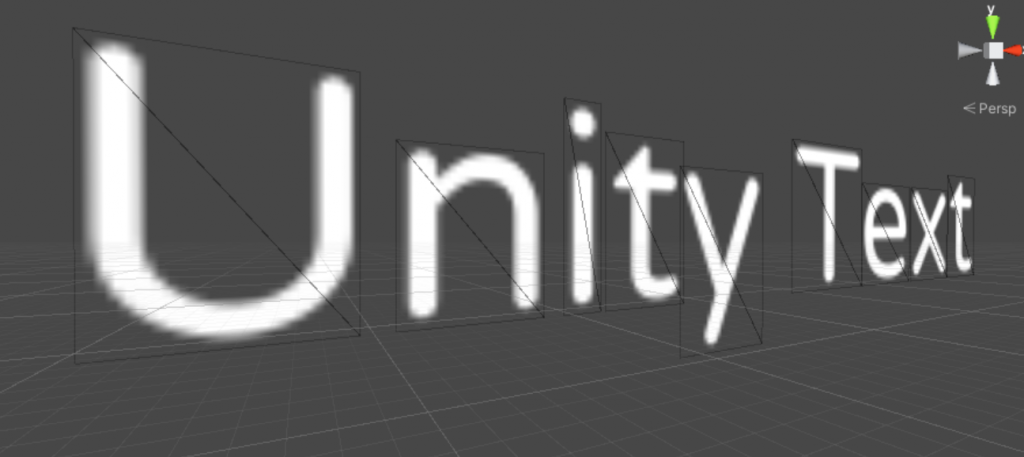
TextMeshPro: In-World
If you want to place TextMeshPro Objects in the 3D world, you will use a different type of TMP object. You can make these by selecting Create > 3D Object > Text – TextMeshPro. This will place a TMP objects into the worldspace. Although it has a Rect Transform, it will work the same way as a regular transform in terms of worldspace position, orientation, and scale.
Changing TextMeshPro Text Values
In the past, we used GetComponent<Text>.text to set the value of a text string. TextMeshPro objects have their own component types – one for UI, and one for In-World objects. To access these, you must also call the TMPro library.
using UnityEngine.UI;
using TMPro;

...

GetComponent<Text>().text = "This is how you set a Unity UI Text value";

GetComponent<TextMeshPro>().text = "This is how you set a TMPro In-World text value";

GetComponent<TextMeshProUGUI>().text = "This is how youet a TMPro UI value";
Note: There is a big difference between TextMeshProUGUI and TextMeshPro components. One is for UI, the other for in-world. They are not interchangeable.
Part 5: The Game Manager (also a Singleton)
During class, we mapped out our game flow and looked at how our various object interactions would move us through our state machine, and then used another singleton, the GameManger, to help coordinate this journey.
As discussed our game flow looks like this:
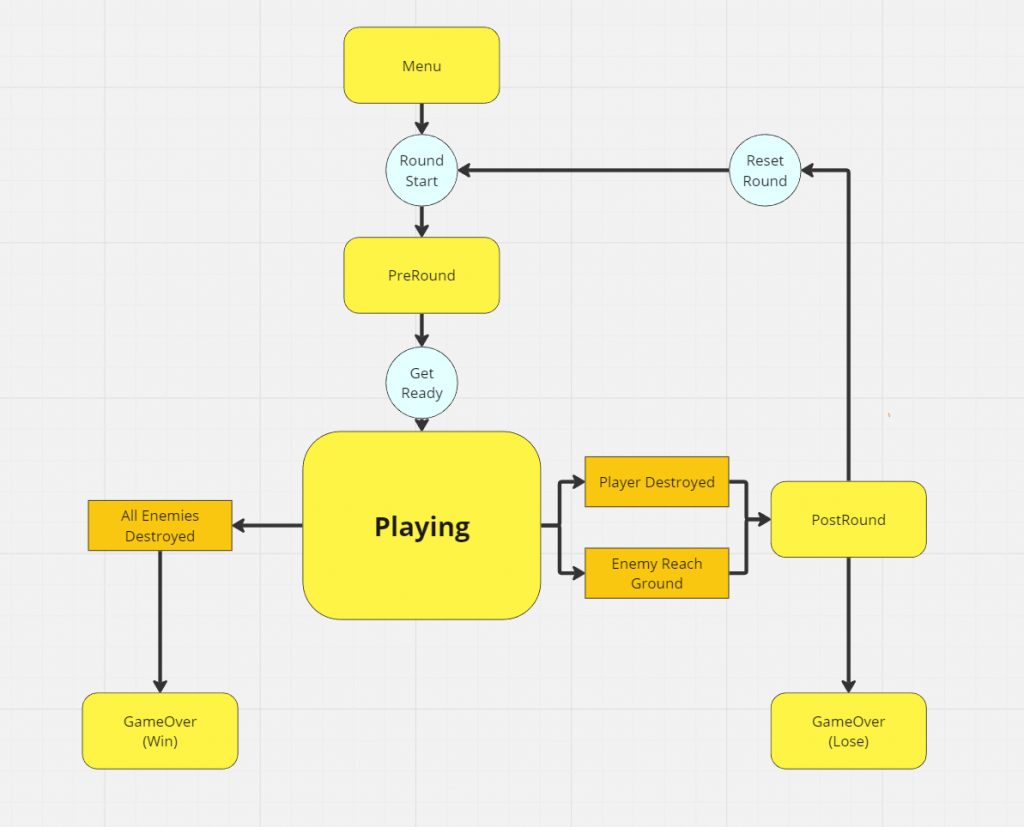
- We start in an inert state that invites us to “Press S to Start”. This is the Menu state and eventually we will replace it with a separate scene with way better UI.
- Pressing S takes us to a new game, where the number of lives are set, and the objects for the first round are prepared. Once ready, we will go into the GetReady state and hold there momentarily.
- Upon completion of the GetReady state, we move into Playing,
- During Playing, the player will have control of the ship and be able to shoot, and the enemies will begin their attack. There are three possible ways to exit this state.
- The first way occurs in case of a win condition – the player destroys all of the enemy ships – and are taken to the GameOver state with a win message.
- The other two methods are losing conditions – the player object is destroyed by an enemy, or the enemy ship reaches the ground. In this case, the player loses a life, and the round is reset after an oops state, or the game is over if the player has run out of lives.
The first step to build out this structure is for us to create our GameManager object (again created from an empty gameobject), and create the GameManager.cs script for it.
We declare our variable to hold the Singleton…
public static GameManager S; // set up the singleton
… and we assign it. This time, we add in some extra protection to make sure that a version of this singleton does not already exist. This can happen when we move between scenes, if we were to preserve our GameManager object, we might enter a scene that already has a GameManager inside of it. We will test for the instance and destroy if we find one already in place.
private void Awake()
{
    // Singleton Definition
    if (GameManager.S) {
        // game manager exists, destroy this object
        Destroy(this.gameObject);
    }  else  {
        S = this;
    }
}
Next we define a number of enumerated values for our various gamestates:
public enum GameState { Menu, PreRound, Playing, PostRound, GameOver};
To implement Step 1, we set up a GameState variable in our script and test against it at appropriate times. For instance, pressing “S” would mean one thing during our Menu stage (it should be interpreted as the “start” command) but might mean something different during gameplay, if we are using our Input.GetAxis(“Vertical”), which relies on pressing WASD keys. We can do a similar thing for the GameOver state with the R key:
    void Update()
    {
        if (currentState == GameState.Menu)
        {
            if (Input.GetKeyDown(KeyCode.S))
            {
                // start a new game
                StartANewGame();
            }
        } else if (currentState == GameState.GameOver)
        {
            if (Input.GetKeyDown(KeyCode.R))
            {
                // restart the game
                ResetGame();
            }
        }
    }
We can begin to set up the stages. We created a StartNewGame() function that resets the lives left (and later will also reset the score, which is part of this week’s assignment)
We also create ResetRound( ) and StartRound( ) functions. ResetRound( ) is Step 2, and will place the block of enemies in the starting position. We make our Mothership object a prefab, and remove it from the scene, but add the prefab to a GameObject variable in this script. ResetRound instantiates the prefab and stores it in another GameObject variable that is our “currentMothership”. Before we instantiate, we test to see if one already exists. If this returns true, then we probably have arrived here after a player lost a round. We want to reset the enemy objects, so we destroy whatever already exists.
    private void ResetRound()
    {
        // does current mothership exist?
        if (currentMotherShip)
        {
            // if so, get rid of it
            Destroy(currentMotherShip);
        }

        // spawn the mother ship
        currentMotherShip = Instantiate(motherShipPrefab);

        // run the Get Ready coroutine
        StartCoroutine(GetReady());
    }
Next we transition to the GetReady state, and kicking off a coroutine that will let us pause for 3 seconds, then trigger StartRound( ), which completes Step 3.
StartRound( ) moves us to the Playing state, and we remain here until it is time to end a round. For our class, we implemented one of the three conditions that will get us out – specifically the case where an enemy bomb hits the player. We created a PlayerDestroyed( ) function and then call it from a OnCollisionEnter that we add to the Player script.
    private void OnCollisionEnter(Collision collision)
    {
        if (collision.transform.tag == "EnemyBomb")
        {
            // player object is destroyed
            GameManager.S.PlayerObjectDestroyed();
        }
    }
So the enemy bomb hits the player, and player calls out to the GameManager and tells it to run the public method PlayerObjectDestroyed( ).
    public void PlayerObjectDestroyed()
    {
        currentState = GameState.PostRound;

        // this is a tragedy!  stop the enemies
        currentMotherShip.GetComponent<MotherShipScript>().StopTheAttack();


        // stop all sounds and play the player explosion sound
        SoundManager.S.PlayerExplosionSequence();

        // process my lives remaining
        livesRemaining--;

        if (livesRemaining > 0)
        {
            StartCoroutine(OopsState());
        }
        // else the game is over and you lost

    }
PlayerDestroyed( ) removes a life from our livesRemaining integer. If there are still lives remaining, we move to the Oops state via a coroutine that operates similar to our GetReady state. Otherwise we move to the GameOver state.
NOTE – In this version, I only destroyed the player. For the homework, you will need to make sure to delete the player object and respawn it. This behavior will be similar to the Mothership object.
Our game is moving through the stages relatively well, but some things are still not behaving quite the way we would prefer. It’s time to dig into some states to add some detail.
The first thing that I don’t like is that the player can always move and shoot, so we add a gamestate check in the Player’s update function. By wrapping the contents with the following “if” statement, we ensure that motion only occurs during the playing state.
if (GameManager.S.currentState== GameState.Playing) {
   ...
}
Again, note that there is no need to associate the game manager with any object in our Player script. No reference to be made. GameManager.S is available to be called globally.
Next, I don’t like that our enemy object starts moving and shooting during the get ready state. I also don’t like that it continues to move after my player has been destroyed. I want to prevent the possibility of multiple state requests coming in while we are in our Oops state, so I am going to create new scripts in the Enemy object that will be responsible for starting and stopping the coroutines.
Since I am instantiating the Mothership in GameManager, I have access to the object that is the instance in our scene. I add public functions to StartTheAttack( ) and StopTheAttack( ) in the MotherShipScript, and then call those from GameManager using:
currentMotherShip.GetComponent<MotherShipScript>().StopTheAttack();
In our StopTheAttack( ) function, we call the StopAllCoroutines( ) function. This will cease any coroutines currently running from the component.
 public void StopTheAttack()
{
    StopAllCoroutines();
}
Finally, we add some messaging so that we understand our current state.
GameManager.cs
using System.Collections;
using System.Collections.Generic;
using UnityEngine;
using TMPro;

public enum GameState { Menu, PreRound, Playing, PostRound, GameOver};

public class GameManager : MonoBehaviour
{
    public static GameManager S; // define the singleton

    public TextMeshProUGUI messageOverlayObject;
    public GameState currentState;

    public int score = 0;
    private int livesRemaining;
    private int MAX_START_LIVES = 3;

    public GameObject motherShipPrefab;
    private GameObject currentMotherShip;


    private void Awake()
    {
        if (GameManager.S)
        {
            // the game manager already exists, destroy myself
            Destroy(this.gameObject);
        } else
        {
            S = this;
        }
    }

    // Start is called before the first frame update
    void Start()
    {
        ResetGame();
    }


    // Update is called once per frame
    void Update()
    {
        if (currentState == GameState.Menu)
        {
            if (Input.GetKeyDown(KeyCode.S))
            {
                // start a new game
                StartANewGame();
            }
        } else if (currentState == GameState.GameOver)
        {
            if (Input.GetKeyDown(KeyCode.R))
            {
                // restart the game
                ResetGame();
            }
        }


    }

    private void ResetGame()
    {
        // set the current state to "menu"
        currentState = GameState.Menu;
        messageOverlayObject.text = "Astral Attackers\nPress \"S\" to Start";
        messageOverlayObject.enabled = true;

        SoundManager.S.StopTheMusic();
    }

    private void StartANewGame()
    {
        //reset our score
        score = 0;

        // reset our lives
        livesRemaining = MAX_START_LIVES;

        // start a new round
        ResetRound();
    }

    private void ResetRound()
    {
        // does current mothership exist?
        if (currentMotherShip)
        {
            // if so, get rid of it
            Destroy(currentMotherShip);
        }

        // spawn the mother ship
        currentMotherShip = Instantiate(motherShipPrefab);

        // run the Get Ready coroutine
        StartCoroutine(GetReady());

    }

    private IEnumerator GetReady()
    {
        messageOverlayObject.enabled = true;
        messageOverlayObject.text = "Get Ready!!!";

        yield return new WaitForSeconds(3.0f);


        messageOverlayObject.enabled = false;

        StartRound();
    }

    private void StartRound()
    {
        // start the music
        SoundManager.S.StartTheMusic();

        // start the attack
        currentMotherShip.GetComponent<MotherShipScript>().StartTheAttack();

        // set our current state to playing
        currentState = GameState.Playing;

    }

    public void PlayerObjectDestroyed()
    {
        currentState = GameState.PostRound;

        // this is a tragedy!  stop the enemies
        currentMotherShip.GetComponent<MotherShipScript>().StopTheAttack();


        // stop all sounds and play the player explosion sound
        SoundManager.S.PlayerExplosionSequence();

        // process my lives remaining
        livesRemaining--;

        if (livesRemaining > 0)
        {
            StartCoroutine(OopsState());
        }
        // else the game is over and you lost

    }

    private IEnumerator OopsState()
    {
        messageOverlayObject.text = "You Died!!!";
        messageOverlayObject.enabled = true;

        yield return new WaitForSeconds(3.0f);

        ResetRound();
    }
}
SoundManager.cs
using System.Collections;
using System.Collections.Generic;
using UnityEngine;

public class SoundManager : MonoBehaviour
{
    public static SoundManager S;

    public AudioSource backgroundMusic;  // play/pause another object
    public AudioClip enemyAdvanceSoundClip; // use playoneshot from sound manager audio source
    public GameObject enemyExplosionSoundPrefab; // spawn this object

    private AudioSource managerAudio; //

    private void Awake()
    {
        S = this; // singleton definition
    }

    private void Start()
    {
        managerAudio = GetComponent<AudioSource>();
    }

    public void StartTheMusic()
    {
        backgroundMusic.Play();
    }

    public void StopTheMusic()
    {
        backgroundMusic.Stop();
    }

    public void MakeTheEnemyAdvanceNoise()
    {
        // make our enemy advance sounds
        managerAudio.PlayOneShot(enemyAdvanceSoundClip);
    }

    public void MakeEnemyExplosionSound()
    {
        GameObject thisExplosion = Instantiate(enemyExplosionSoundPrefab, transform);
        Destroy(thisExplosion, 5.0f);
    }

    public void PlayerExplosionSequence()
    {
        // turn off all currently playing sounds
        AudioSource[] childAudioSources = GetComponentsInChildren<AudioSource>();
        foreach (AudioSource thisChild in childAudioSources)
        {
            thisChild.Stop();
        }

        // play the player explosion sound

    }

}
MotherShipScript.cs
using System.Collections;
using System.Collections.Generic;
using UnityEngine;

public class MotherShipScript : MonoBehaviour
{
    public int stepsToSide;
    public float sideStepUnits;
    public float downStepUnits;
    public float timeBetweenSteps;

    public float timeBetweenBombs;

    // Start is called before the first frame update
    void Start()
    {

    }

    // Update is called once per frame
    void Update()
    {

    }

    public void StartTheAttack()
    {
        StartCoroutine(MoveMother());
        StartCoroutine(DropOneBomb());
    }

    public void StopTheAttack()
    {
        StopAllCoroutines();
    }

    public IEnumerator MoveMother()
    {
        // define the  step vectors
        Vector3 sideStepVector = Vector3.right * sideStepUnits;
        Vector3 downStepVector = Vector3.down * downStepUnits;

        // move the swarm
        while (transform.childCount > 0)
        {
            // move to the side
            for (int i = 0; i < stepsToSide; i++)
            {
                // move by the offset
                transform.position = transform.position + sideStepVector;

                // run swap frames
                BroadcastMessage("SwapFrames");
                SoundManager.S.MakeTheEnemyAdvanceNoise();


                // wait for the interval
                yield return new WaitForSeconds(timeBetweenSteps);
            }


            // move down

            // run swap frames
            BroadcastMessage("SwapFrames");
            transform.position += downStepVector;
            yield return new WaitForSeconds(timeBetweenSteps);

            // flip the direction
            sideStepVector *= -1;


        }

    }

    public IEnumerator DropOneBomb()
    {
        bool _isRunning = true;

        while (_isRunning)
        {
            // wait for the interval
            yield return new WaitForSeconds(timeBetweenBombs);

            // see how many children there are
            int enemyCount = transform.childCount;

            // if we have children,
            if (enemyCount > 0)
            {
                // pick one at random
                int enemyIndex = Random.Range(0,enemyCount);

                // get the child of this
                Transform thisEnemy = transform.GetChild(enemyIndex);

                // get the component
                EnemyScript thisEnemyScript = thisEnemy.GetComponent<EnemyScript>();

                if (thisEnemyScript)
                {
                    // have it send a bomb
                    thisEnemyScript.DropABomb();
                }


            } else
            {
                // else we don't have children, so stop the script.
                _isRunning = false;
            }

        }
    }


}
EnemyScript.cs
using System.Collections;
using System.Collections.Generic;
using UnityEngine;

public class EnemyScript : MonoBehaviour
{
    public GameObject enemyBombPrefab;

    public GameObject enemyFrameOne, enemyFrameTwo, enemyExplode;

    [HeaderAttribute("Explosion Parameters")]
    public float explosionForce;
    public float explosionRadius;

    // Start is called before the first frame update
    void Start()
    {
        enemyFrameOne.SetActive(true);
        enemyFrameTwo.SetActive(false);
        enemyExplode.SetActive(false);


    }

    // Update is called once per frame
    void Update()
    {
        if (Input.GetKeyDown(KeyCode.B))
        {
            DropABomb();
        }

        if (Input.GetKeyDown(KeyCode.S))
        {
            SwapFrames();
        }

        if (Input.GetKeyDown(KeyCode.E))
        {
            EnemyExplode();
        }

    }


    private void EnemyExplode()
    {
        // turn off the other objects and turn on the explosion frame
        enemyFrameOne.SetActive(false);
        enemyFrameTwo.SetActive(false);
        enemyExplode.SetActive(true);

        // Make the enemy explosion noise
        SoundManager.S.MakeEnemyExplosionSound();


        // get all of the rigidbodies
        Rigidbody[] enemyBlocks = GetComponentsInChildren<Rigidbody>();

        foreach (Rigidbody block in enemyBlocks)
        {
            block.AddExplosionForce(explosionForce, (transform.position + Vector3.back * 2f), explosionRadius, 0f, ForceMode.Impulse);

        }
        // orphan the explosion object
        enemyExplode.transform.parent = null;
    }

    private void SwapFrames()
    {
        enemyFrameOne.SetActive(!enemyFrameOne.activeSelf);
        enemyFrameTwo.SetActive(!enemyFrameTwo.activeSelf);
    }

    private void OnCollisionEnter(Collision collision)
    {
        if (collision.transform.tag == "PlayerBullet")
        {
            // make everything explode
            EnemyExplode();

            // destroy this enemy object
            Destroy(this.gameObject);

            // destroy the bullet
            Destroy(collision.gameObject);
        }
    }

    public void DropABomb()
    {
        // make an instance of the bomb
        Instantiate(enemyBombPrefab, transform.position + Vector3.down, Quaternion.identity);
    }

}
PlayerObjectScript.cs
using System.Collections;
using System.Collections.Generic;
using UnityEngine;

public class PlayerObjectScript : MonoBehaviour
{
    // movement variables
    public float playerSpeed;
    private float MAX_OFFSET = 15.0f;

    // bullet variables
    public GameObject bulletPrefab;

    // Start is called before the first frame update
    void Start()
    {

    }

    // Update is called once per frame
    void Update()
    {
        if (GameManager.S.currentState == GameState.Playing)
        {
            MovePlayer();

            if (Input.GetKeyDown(KeyCode.Space))
            {
                FireBullet();
            }

        }

    }

    private void FireBullet()
    {
        // spawn a new bullet
        GameObject bulletObject = Instantiate(bulletPrefab, (transform.position + Vector3.up * 1.5f), Quaternion.identity);

        // set the self destruct timer
        Destroy(bulletObject, 2.0f);
    }

    void MovePlayer()
    {
        // getting the vector
        Vector3 currentPosition = transform.position;

        // set the x value based on input
        currentPosition.x = currentPosition.x + (Input.GetAxisRaw("Horizontal") * playerSpeed * Time.deltaTime);

        // check our values with clamp
        currentPosition.x = Mathf.Clamp(currentPosition.x, -MAX_OFFSET, MAX_OFFSET);

        // update our position
        transform.position = currentPosition;
    }

    private void OnCollisionEnter(Collision collision)
    {
        if (collision.transform.tag == "EnemyBomb")
        {
            // player object is destroyed
            GameManager.S.PlayerObjectDestroyed();

            // destroy this


        }
    }


}