This week we take a closer look at Unity’s 2D systems, and start out on our own side-scrolling adventure. Over the next two weeks, we will develop a fully functional platform game complete with hero, enemies, and so many moving platforms. Let’s begin!
Part 1: 2D Basics
An important distinction to make about building a 2D game in Unity is that it is all the same Unity game engine. There are 2D and 3D capabilities built into the engine, but up to now we have dealt exclusively in the 3D realm. To make development (and project filesizes) efficient, many of the packages that are specific to 2D are turned off in the 3D templates. The best way for us to activate these packages is to launch a new project, but use the built-in 2D Template instead.
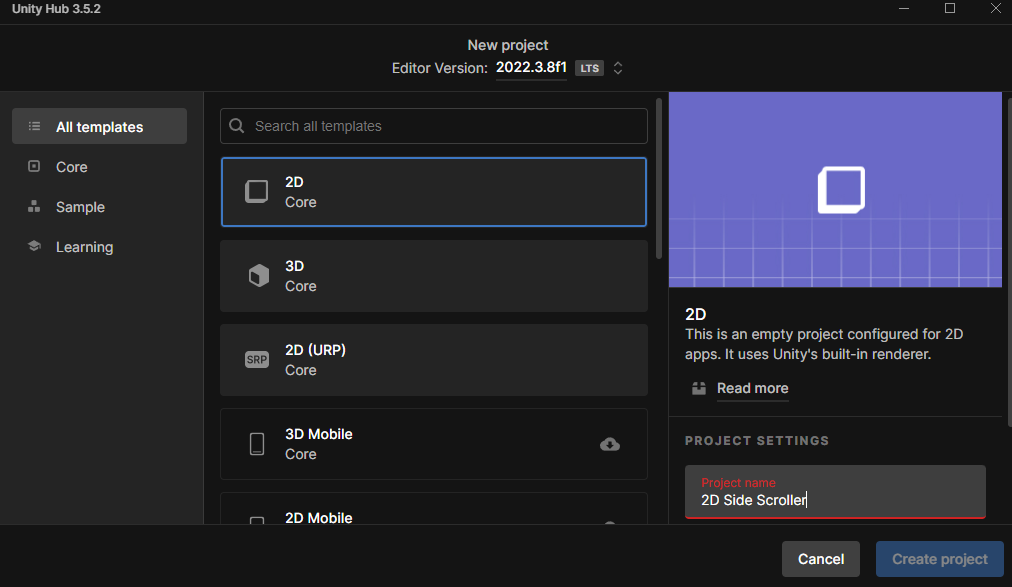
When we launch this, our editor will look mostly the same, with a few small, but significant differences. First, you will notice that our Scene window is set to “2D” mode, with our camera facing the XY plane.
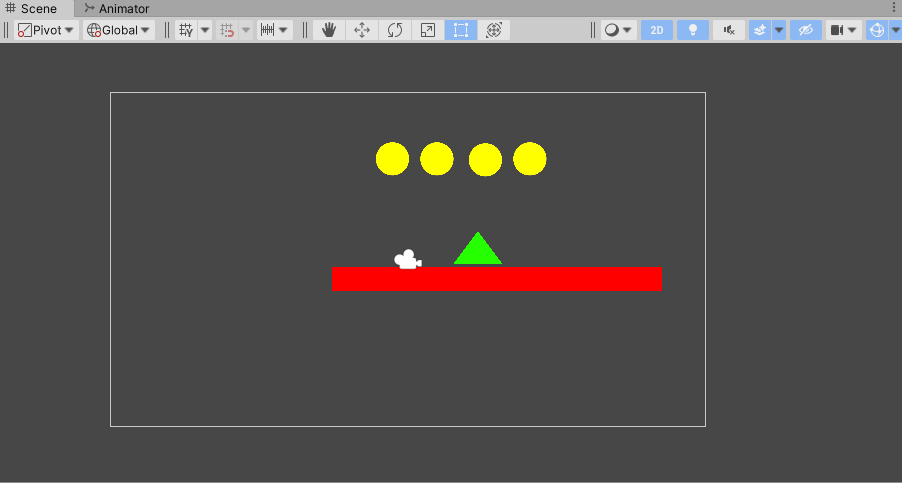
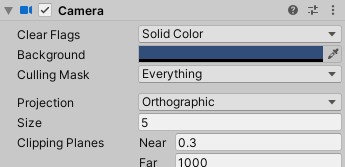
You will also notice that our scene only include a camera – by default there is no directional light, because we will be using sprite rendering in this project instead. Also, our Main Camera is a little different – our Projection is set to Orthographic, and there is no Skybox. (There can be a skybox, but none is included by default, so the Clear Flags option falls back to the Solid Color designation.
While the 2D / Orthographic camera can be used to render 3D content – remember, we did this with our Pong game – the primary method of drawing objects on the screen for 2D content is to use Sprites. More on these later, for now we will simply create objects with the built-in sprites that Unity provides. We can achieve this through the menus by navigating to GameObject > 2D Objects > Sprite > Square (or other shapes). This creates an object with a SpriteRenderer component.
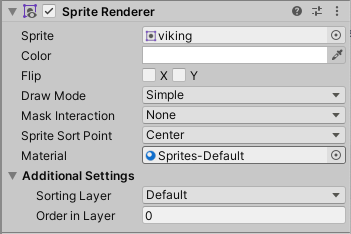
Our Sprite Renderer component gives us access to a few controls that we will use. The “flip” property is useful for swapping a sprites direction without resorting to rotation or scaling tricks. The “color” property lets you set a tint for the sprite, as well as the alpha (transparency) value. This means that any sprite can be faded using an alpha channel, without the use of special shaders or render modes that were required for 3D objects.
Under Additional Settings we find perhaps the most important setting, the Sorting Layer. Unity’s sprite rendering works a little different from what you have experienced up to this point, in that it often doesn’t matter how close or far a sprite is from the camera – the order that sprites are drawn in (and therefore the determination of which sprite will be in front of the other) comes down to a series of comparisons, the most important of which is the Sorting Layer.
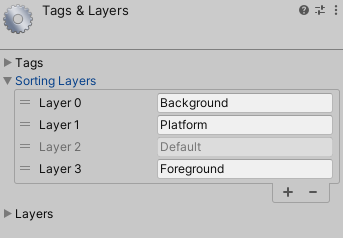
New sprites will automatically be placed on the “Default” layer, but we have the option to generate new layers as well, either by accessing the dropdown and click “Add Sorting Layer…”, or by opening up our Tags & Layers panel. The order of the sorting layers determines which will draw in front of which. Each layer on the list will draw in front of the layer before it, so the objects set to the bottom layer (here we created “Foreground”) will draw in front of everything else.
Back in our Sprite Renderer component, you can also find the Order within Layer setting. This field takes a numeric value (integer) that will be used to determine drawing order between multiple sprites if they happen to inhabit the same Sorting Layer. When these objects overlap, the object with the higher number will render in front of the lower numbered object. If objects share the same sorting layer AND order within layer, then distance to camera will be considered as the tiebreaker. There are a few more decision steps that the engine will make, but those are mostly out of our control.
Part 2: 2D Physics
So we have created our sprites, but how do we make them move? If sprites can render in a pre-set order that ignores depth, how do we calculate things like physics? The answer is, we flatten it. Unity has a separate system to handle 2D Physics that is only concerned with processing movement and collisions within a 2D plane, specifically the XY plane. To handle this, there is a separate physics library, Physics2D and we use 2D-specific components, like the Rigidbody2D and various Collider2D types.
In our workshop, we run some experiments with a few of these colliders and the Rigidbody2D component, which has some notable differences. First is that that constraints are now limited to preventing movement in the X & Y axes, and rotation is only processed and preventable in the Z axis. Second is that “gravity” is no longer a toggle, but rather a scalar value which is set for each object with the Gravity Scale property of the Rigidbody2D.
We look at the CircleCollider2D (which replaced our SphereCollider), the BoxCollider2D, the PolygonCollider2D, and the CapsuleCollider2D. In a later section for this lesson we will also look at the Tilemap Collider.
Part 3: Character Controller
Character Controller 2D
For 3D projects, Unity has long featured a helpful component called the Character Controller. It’s a physics-like-but-not-quite-physics object that can be used to efficiently move a character in a level. This can be useful if you are building a first-person-shooter (FPS) style game, or a platformer with 3D characters. It allows you to pull off all of the moves that real physics NEVER would allow. But there is no built-in version of this for 2D character. Thankfully, plenty of people have tackled this problem and there are a number of excellent free resources that address this.
For this class, we are going to create our own code that is based on the free CharacterController2D from SharpCoder Blog. (In past years I would typically use Brackeys’ free controller, and that YouTube channel is an outstanding resource of Unity tutorials, however are sadly no longer making new content).
For setting this up, I strongly recommend watching the YouTube workshop for this class, as there are a number of necessary steps. The key steps you need to keep in mind:
- We will use Input.GetAxis (or GetAxisRaw if you like precision) to give us input from the “Horizontal” channel. We will apply this “moveDirection” times our speed value to modify the velocity of our Rigidbody2D.
- We will also adjust the y-value of the velocity when we perform a “Jump” movement, which we will detect with the Input.GetButtonDown(“Jump”) method. HOWEVER, we can only jump when we are on the ground. (This is a feature of the built-in 3D character controller that is incredibly important – knowing when you are on the ground factors into controls and animations and is an important data set.
- We detect the ground by running a Physics2D.OverlapCircle( ) command to find colliders that are listed as being on the “Ground” layer. This circle is defined with a radius slightly smaller than our CapsuleCollider2D’s width, and is vertically placed so that just a small sliver of the collision check falls below our CapsuleCollider. We also use a LayerMask to only detect “Ground” layer collisions – this way if any collision is detected, we can assume that we are grounded and set our boolean to true.
We adjust our speed in our player script, and our Jump Force in our SideScrollerController script until we have a motion that we like. Next we create a Physic Material 2D to provide a frictionless experience for our player so that our character cannot stick to walls through mere force.
Part 4: Camera Control
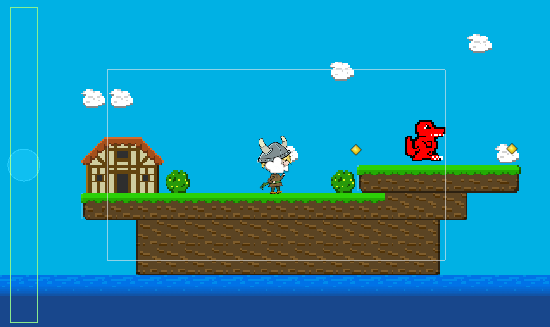
Now we have created a player object and let it run through our level. Our next problem is that the player runs out of view. There are a number of ways to address this. The simplest way to let the camera follow our player is to make the camera a child of the player object. This way, any movement of the player was automatically reflected in the camera. The end result is that the player remains perfectly still as the rest of the world moves around it.
This solution is OK, but does not really fit what we are going for. This should be a side scroller, meaning we move our camera to the side, and so we need a better solution.
Our first step is to move the camera horizontally with the player, but not vertically. We accomplish this by placing a script on the Camera object that would mirror the X value of the player object, like so:
  public Transform player;

  void Update () {
      Vector3 cameraposition = transform.position;
      cameraposition.x = player.position.x
      transform.position = cameraposition;
  }
IMPORTANT NOTE: Although our game is 2D, our transforms are still very much 3D. This means when working with position, we always need to use Vector3 rather than Vector2 structures.
We set a public game object and assign the Player object to it in the Inspector. Then on each frame, we find the X position and match it. The result was just OK. The side motion worked but things feel a little jittery. We want to give our player a little room to move away from the center and have the camera catch up, as though it were controlled by some camera person trying to keep up with the action. To facilitate that, we used Mathf.SmoothDamp( ), a dampening function to create a gentle curve to the updating X values, giving the camera an eased, elastic feel.
    public Transform player;
    public float smoothTime = 1f;
    public float currentVelocity = 0f;

    void Update()
    {
        Vector3 cameraPosition = transform.position;
        cameraPosition.x = Mathf.SmoothDamp(cameraPosition.x, player.position.x, ref currentVelocity, smoothTime);
        transform.position = cameraPosition;
    }
SmoothDamp ( ) is part of the float math libraries, and takes 4 parameters – the start value, the end value, the current velocity (as a reference), and the time the smoothing should occur. Velocity here is tricky, as SmoothDamp ( ) will modify it each time it runs. In order to let that persist, we pass the velocity variable as a “ref”, which is the closest we will get to pointers in this class. Normally when we call a method we say “here is a value” but in this case by declaring “ref” we say “here is access to the variable itself”. SmoothDamp ( ) will update velocity each time it runs.
Playing this again, this is getting better. My player runs away and the camera catches up again. Since I’ve decided to use “Mario” rules, I want to make sure that the player can only advance, not move backwards. I’ll do that by defining two rules.
Rule #1: Any time the player moves right of the midpoint on the screen, the camera will follow.
Rule #2: The player can only move as far left as is currently visible on the screen.
Rule #1 is easy enough to implement. To do this, we set a condition around the SmoothDamp and transform position update that test to see if playerposition.x is greater than cameraposition.x and if so, it will let the camera follow.
    public Transform player;
    public float smoothTime = 1f;
    public float currentVelocity = 0f;

    void Update()
    {
        Vector3 cameraPosition = transform.position;
        if (player.position.x > cameraPosition.x)
        {
            cameraPosition.x = Mathf.SmoothDamp(cameraPosition.x, player.position.x, ref currentVelocity, smoothTime);
        } else
        {
            currentVelocity = 0f;
        }
        transform.position = cameraPosition;
    }
Rule #2 is a little trickier, as we don’t really know where the left edge is. We could do all kinds of math to figure this out, casting rays and such, but we are going to do this the lazy way.
OPTION 1: (the complicated way) In a previous semester, we included a value called “leftSideOffset” that held the distance in x units that corresponded with the left edge of the screen from the center of the camera. Since the camera is always the same z-distance from the player, this number can be a constant. In our update loop, we then check the offset as a bounding x-value for the player, with the following code:
    Vector3 checkposition = transform.position;
    float leftx = gameCamera.transform.position.x - leftSideOffset;

    if (checkposition.x < leftx) {
        checkposition.x = leftx;
        transform.position = checkposition;
    }
OPTION 2: (the cheap way) For this class, I have implemented a much more rudimentary system. I create an object and assign it a BoxCollider 2D. I size this to span beyond the vertical length of my camera view, and move it to the very left of the camera. Finally, I make this object a child of the Main Camera, meaning that it will follow along wherever our camera goes. This prevents our player from being able to run beyond the edge of the screen. (Once we place enemy objects, you will want to adjust your Collision Matrix in the Physics 2D panel in your Project Settings, just like we did with our 3D collisions in Astral Attackers, so that your non-player objects can pass through unimpeded.)
Part 5: Sprites
“Sprite” is a term that has been used in the video game industry almost since it’s inception. In the beginning, it referred to an image of a specific size and type that could be drawn directly to the the screen without having to be processed by the CPU, and was used to improve the performance of a game. These days, the term refers to any bitmap (or image) that is used primarily as a 2D object in a game, rather than a texture or mesh object. 2D games still rely heavily on these for their characters and worlds.
Technically, our Sprite objects in Unity are still manipulated in a manner similar to mesh objects. Unity generates a simple flat shape, and applies the bitmap to it as a texture, but instead uses an optimized shader to draw this without considering many of the procedure we would include in 3D rendering. Even our text objects generate a simplified mesh and apply the font as a texture to it. For our purposes, however, we will refer to “mesh” objects as those belonging in the 3D realm, and our “sprite” object meshes simply as Sprites.
A “sprite sheet” refers to an image that contains a collection of images to be used as sprites. Sometimes these are collections of common objects or “tiles” that can be used to create a level, as we will do here, but more often you will encounter them as collections of sequential frames for animation. The reason that these sprite sheets are used is that it is far more costly to load a number of small images into memory and swap them in and out as objects in the scene than it is to have a single large image and instead adjust which coordinates of the image will be drawn in a particular frame.
For this demo, we are going to use three files as sprites:

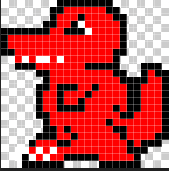
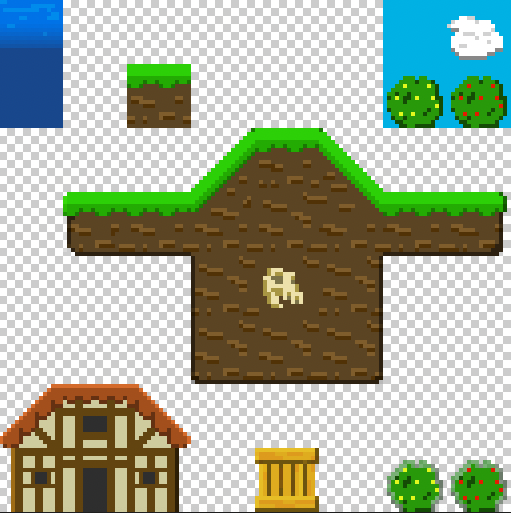
In this case, we have:
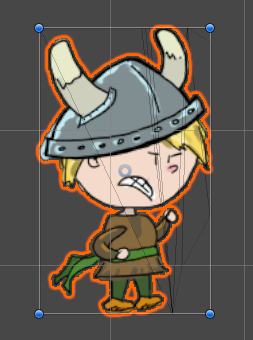
- Our hero, a little Viking Boy (a high resolution drawing, and part of a larger sprite sheet comprised of frames of animation. I’ll be showing these next week)
- An enemy (a very small pixelated dragon, also from a sprite sheet comprised of frames of animation)
- Environment Tiles (a 128×128 sprite sheet composed of 16×16 pixelated blocks, each one intended as a “Tile” for our Tilemap)
We start by placing an instance of our Viking Boy into the Scene. You’ll notice when we do this, that we have a new Component, the Sprite Renderer. (This replaces the Mesh Renderer and Mesh components from our 3D games.) You will also notice that the default tool to move the Sprite is the Rect Tool, located to the right of the Scale button. (The hotkey for this is: Y) You can still use move/scale/rotate, but the Rect tool is easier for 2D workflows.
Importing and Editing Sprite Sheets
Sprites and sprite sheets come into our game the same way as the rest of our resources – we import them using Assets> Import New Assets…
Once imported, you will want to select it so that you can make edits to the Import Settings. Remember, these assets are external to your editor. Nothing you do here will change the contents of the sprite sheet, only how the Editor interprets it. Also remember that once you have made changes you will need to confirm the changes by clicking the Apply button at the bottom of the panel.
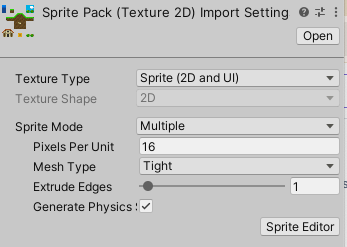
If you started your project with Unity’s 2D template, then your image’s Texture Type should automatically be set to “Sprite (2D and UI”. This tells Unity a bit about how you intend to use the file. (If it is not, go ahead and make that change.)
If your sprite is a single image, then the default Sprite Mode setting of “Single” will work for you. However, if this is a sprite sheet, change this setting to “Multiple”, which lets Unity know to expect more than one object will come out of this texture atlas. Your Pixels Per Unit setting serves as the scale for how big your sprites should be if you drop them into the scene (of course you can always scale them to meet your preference). By default this value is 100 pixels to a unit. This is great for our Viking Boy as this will make him about 2 units high, but our Environment object is only using 16×16 pixels per sprite. We change this value to “16” so that each block will be 1 unit by 1 unit.
Next, we want to correct the “fuzzy” look of our smaller objects. If we post this to our level, we see the edges are blurry. This is because Unity is “sampling” the image to visualize it at a higher resolution. This is great for things like photorealistic textures, but terrible for our pixel art. To correct this, we go to the Advanced Settings and set the Filter Mode to “Point (no filter)”. This setting controls how to handle scaling images. Using “point” tells the editor that we want the images sharp edges to be preserved.

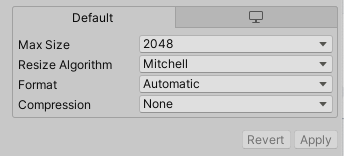
If you are using pixel art, and are still getting images that don’t look quite right (i.e. the edges are sharp, but the sprites themselves are blocky or the colors somehow.. wrong) you might be having issues with the “compression” settings. Unity automatically puts compression on all images that it imports, but for pixel art this can often create a degraded look, and the gains are super minimal because the source images are so small to begin with. To correct this, look at the Default settings at the bottom of Import Settings and set your Compression to “None”. This will remove any adjustment and use your source material as-is.
Now it is time to split the sprites, which we will do with the Sprite Editor, which you access from the sprite’s Import Settings.
NOTE: If you want to use the Sprite Editor with the 3D template, you may need to install the 2D Sprite package, which you can do from the Package Manager. If you are starting from a 2D template, this package is already activated.
For our Environment sprite sheet, go to the Slice dropdown button at the top and select Grid by Cell Count. This will let you define the how the image should be split into pieces. For this object, we want to set the count to 8 columns and 8 rows. Keep the pivot at “Center” (you’ll want this for proper placement in the Tilemap.) Once you are ready, hit slice. You will see that small boxes have been drawn for these, but also that any empty square has been removed. If you update your sprite sheet with more sprites, you may need to run the Sprite Editor again to include the new content.
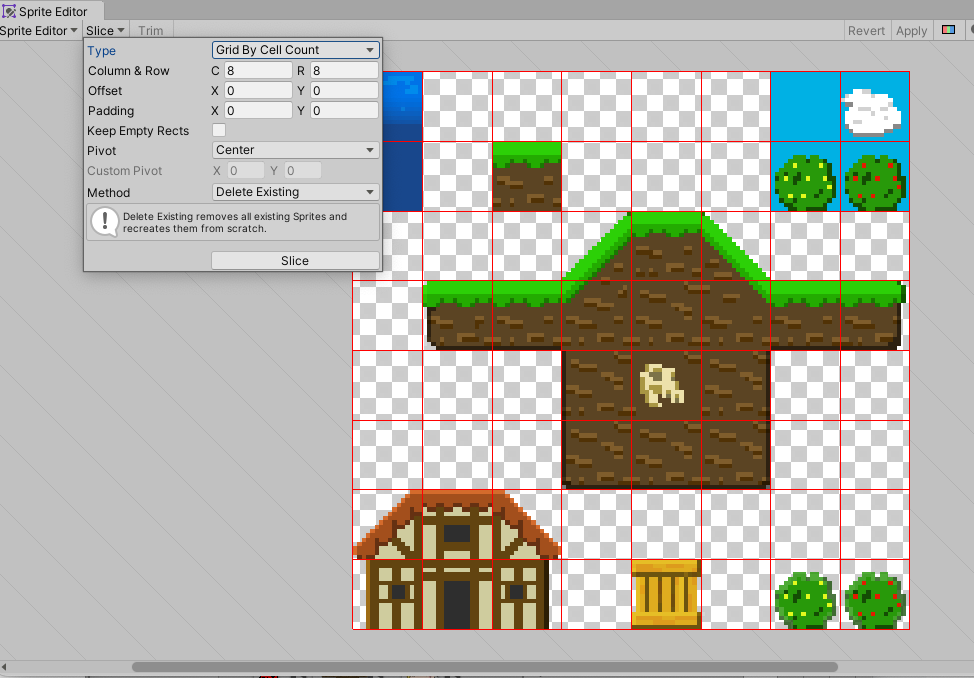
If you click one of these boxes, you will get a Rect controller, and call up information about the sprite itself. You can adjust values, or change the name of the individual sprite.
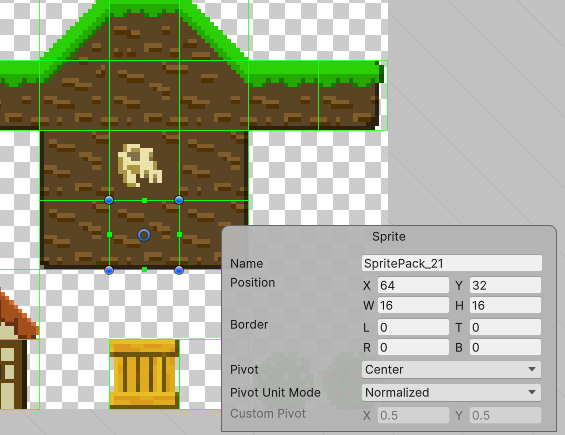
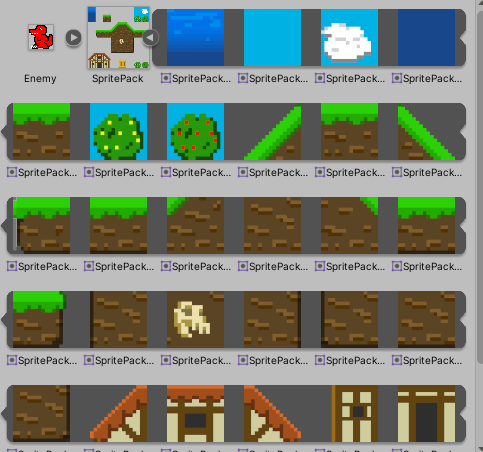
When you have completed your set-up & edits, click the “Apply” button in the Sprite Editor window, and then also the “Apply” button in the Import Settings. Now in the Asset window your sprite sheet will have a small arrow in a circle next to it. Clicking on this arrow will expand the list to show the individual sprites contained within this object.
Part 6: Tilemaps
Now that we have set up our sprites, it is time to build a level. While we could place individual sprites and colliders throughout the environment, Unity gives us an excellent tool for designing sprite content – the Tilemap. The Tilemap is a system of components which handles Tile assets and allows you to place them in your scene.
To create a new Tilemap, go to Create > 2D Object > Tilemap. This will also generate a Grid object, and your Tilemap will be a child of this object. (You can create more than one Tilemap, each will become a child of this Grid). This parent object has a Grid component within which you can set the size, spacing, and orientation of the Grid.

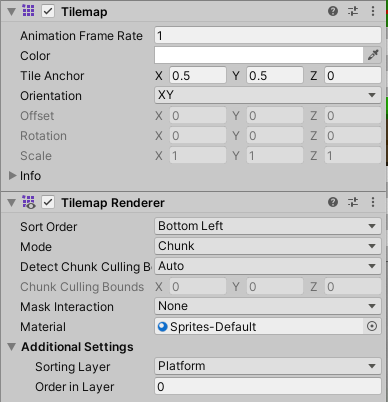
The Tilemap object will contain the Tilemap Component and the Tilemap Renderer component. The most important setting to notice here is the Sorting Layer setting in the Tilemap Renderer. For our game, we will set up multiple Tilemaps under the same grid, and set them to different sorting layers to create foreground and background objects.
Once your Tilemap is created, you will want to create a Tile Palette – a collection of tiled sprites that you can use to populate the grid cells on your Tilemap. Access this by going to Window > 2D > Tile Palette. Once here, select “Create New Palette…” and give it a location and a name. Then you can drag sprites into this window which will create Tiles for each sprite. (You will see a window asking where you want to save these in your Asset directory. I recommend creating a new folder, as these can get pretty numerous if you are working with even a modestly sized sprite sheet.)
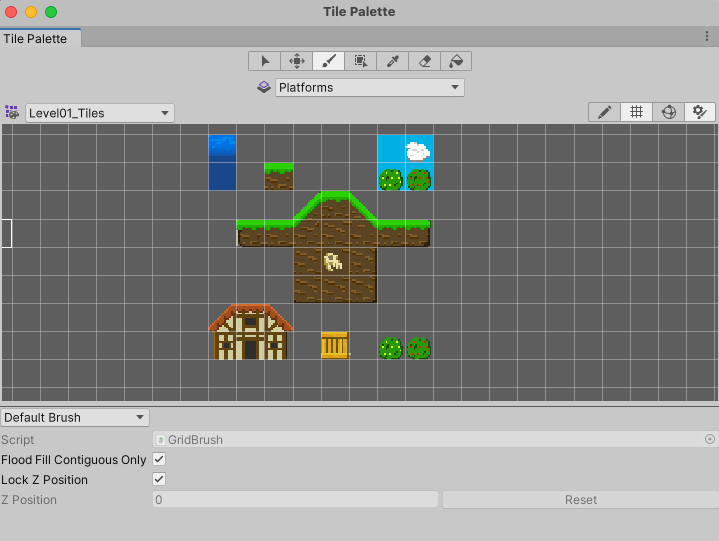
The Tile Palette window features a list of tools at the top. These are:
- Select – allows you to select one or more grid cells
- Move – allows you to relocate a tile (you must first select the tile)
- Paint – select a palette tile or tiles and use this to paint that selection onto your scene’s tilemap.
- Box Fill – fill an area of your tilemap with the selected tile(s) from your palette
- Pick – click on a tile to change your active brush selection to that type of tile
- Erase – click on a tile to remove it
- Flood Fill – fill a large area with the active tile(s)
Below the tile tools is the Active Tilemap setting. If you have multiple tilemaps (which is common with layering) you will want to make sure that you have the correct Tilemap selected before you paint. For this reason, it is recommended to give each of your Tilemaps a unique name that identifies their purpose (such as Foreground, Background, etc)

Rule #2 is a little trickier, as we don’t really know where the left edge is. We could do all kinds of math to figure this out, casting rays and such, but we are going to do this the lazy way.
Part 7 – Tilemap Collider
Now that we’ve created our level, we need to set up colliders. We could painstakingly create and hand-place dozens of box colliders, or we could simply select our Platform tilemap and apply the Tilemap Collider. This will use the physics shape generated for each sprite (based on it’s alpha channels) to generate colliders around each tile. We set our Platform to the “Ground” layer, and we can then add our SideScrollerController to our player character.
The Pixel Perfect Camera
As we are using non-filtered sprites (16×16 pixel tiles with the “point” filter on), it is possible that our camera may not render all of the intersections of tiles as seamless, uninterrupted pixels. Instead, we may find that we have some tearing (more commonly found as vertical stripes). This is caused by a sampling error where “most” of the pixels should not be drawn, and so it leaves this blank. (this problem tends to be more pronounced when using pixel art with the point filter – larger images have less likelihood of this sampling error)
One way that designers will address this is by creating textures that are designed to have a one-pixel overlap from one another. This means that one will always overlap the other, so no seam will be present. This version requires meticulous planning, and careful slicing of your sprites in the editor.
The other method to cover this is to use the Pixel Perfect Camera, which will resize your camera to a compatible depth to ensure that such tearing does not happen. It is great at cleaning up this problem, but it will resize your screen so make sure that you preview this.
2D Pixel Perfect: How to set up your Unity project for retro 8-bit games – [ Unity Blog ]
Part 8: Enemy Movement & Triggers
Finally, let’s create some enemy objects to interact with. We will get them into our scene, behaving the way we expect them to behave (patrolling platforms!) and show a simple processing for player or enemy death.
We created an object similar to our player but with our Enemy sprite. We generated a new script that was similar to our SideScrollerController, but with less options. Basically this sprite will always move in a direction based upon where it is facing. We use a simple boolean in our script called “facingLeft” which will indicate if our enemy is facing left or right, and uses that value to maintain the velocity and flip the sprite.
To create behaviors, we will use Triggers to give our Enemy the illusion of intelligently patrolling its platform. Triggers are a variation of colliders that don’t actually collide – they simply define a volume, and that volume will create a collision-like event when another object’s collider enters it.
For our purposes, we are going to create a “turn around” box – a cube volume that our enemy will enter, register, and react by reversing direction. First, create an empty object, add a Box Collider 2D, and check the Is Trigger box. Create a tag called “TurnAround” and assign it to this box. Make this object a prefab so that we can place them throughout the level. Then we add this to the Enemy script:
    private void OnTriggerEnter2D(Collider2D collision)
    {
        if (collision.gameObject.tag == "TurnAround")
        {
            Debug.Log("Hit the Collider");
            faceLeft = !faceLeft;
        }

    }
Once the Enemy object enters the trigger object, it checks for the “TurnAround” tag, and if it finds one, it will invert the “faceLeft” value of the Enemy causing him to walk in the other direction. This will only fire when the enemy first enters the volume as OnTriggerEnter2D only occurs at the first point of overlap. You can use OnTriggerExit2D to register when the overlap has ended, or OnTriggerStay2D to confirm that an overlap is ongoing.
NOTE: Trigger’s use the OnTrigger commands, as opposed to the OnCollision commands. Unity treats these differently, so they will only apply to the corresponding setting for isTrigger. Also, because this is 2D physics, note the 2D designation at the end of each of these. OnCollisionEnter and OnCollisionEnter2D use different physics systems and are not interchangeable, so if your collisions are not registering, check that you are using the proper command.
SideScrollerController.cs
using System.Collections;
using System.Collections.Generic;
using UnityEngine;

// SIDE SCROLLER CONTROLLER
// Created for Understanding Game Engines
// Based on SharpCoder Blog's CharacterController2D
// https://sharpcoderblog.com/blog/2d-platformer-character-controller


[RequireComponent(typeof(Rigidbody2D))]
[RequireComponent(typeof(CapsuleCollider2D))]

public class SideScrollerController : MonoBehaviour
{
    // public variables
    public float maxSpeed = 1f;
    public float jumpHeight = 1f;
    public float gravityScale = 1f;

    // ground check variables
    public Vector2 groundOffset;
    public float groundRadius;
    public LayerMask layerMask;

    // private variables
    float moveDirection = 0;
    public bool isGrounded = false;
    private bool facingRight = true;

    Rigidbody2D rb;
    CapsuleCollider2D mainCollider;

    // Start is called before the first frame update
    void Start()
    {
        rb = GetComponent<Rigidbody2D>();
        rb.freezeRotation = true;
        rb.collisionDetectionMode = CollisionDetectionMode2D.Continuous;
        rb.gravityScale = gravityScale;
    }

    // Update is called once per frame
    void Update()
    {
        // get our movement direction
        moveDirection = Input.GetAxis("Horizontal");

        // TODO: Facing L/R logic
        if (moveDirection < -0.01f && facingRight)
        {
            // flip to left
            facingRight = false;
            Vector3 currentScale = transform.localScale;
            currentScale.x *= -1;
            transform.localScale = currentScale;
        } else if (moveDirection > 0.01f && !facingRight)
        {
            // flip to right
            facingRight = true;
            Vector3 currentScale = transform.localScale;
            currentScale.x *= -1;
            transform.localScale = currentScale;
        }


        // Jump Controls
        if (Input.GetButtonDown("Jump") && isGrounded)
        {
            rb.velocity = new Vector2(rb.velocity.x, jumpHeight);
        }


    }

    private void FixedUpdate()
    {
        // Check for Ground Collisions
        isGrounded = false;

        // look for a collision
        Collider2D collider = Physics2D.OverlapCircle(getCollisionCenter(), groundRadius,layerMask);

        if (collider) { isGrounded = true; }


        // move the player
        rb.velocity = new Vector2((moveDirection) * maxSpeed, rb.velocity.y);
    }

    void OnDrawGizmos()
    {
        // Draw a yellow sphere at the transform's position
        Gizmos.color = Color.yellow;
        Gizmos.DrawWireSphere(getCollisionCenter(), groundRadius);
    }

    private Vector3 getCollisionCenter()
    {
        Vector3 collisionCenter = new Vector3();
        collisionCenter.x = transform.position.x + groundOffset.x;
        collisionCenter.y = transform.position.y + groundOffset.y;
        return collisionCenter;
    }

}
EnemyScript.cs
using System.Collections;
using System.Collections.Generic;
using UnityEngine;

public class EnemyScript : MonoBehaviour
{
    public float enemySpeed;

    private Rigidbody2D rb;
    public SpriteRenderer spriteRender;
    public bool facingLeft = true;

    // Start is called before the first frame update
    void Start()
    {
        rb = GetComponent<Rigidbody2D>();
        // spriteRender = GetComponent<SpriteRenderer>();
    }

    // Update is called once per frame
    void Update()
    {
        if (facingLeft && spriteRender.flipX == true)
        {
            spriteRender.flipX = false;
        } else if (!facingLeft && spriteRender.flipX == false)
        {
            spriteRender.flipX = true;

        }
    }

    private void FixedUpdate()
    {
        Vector3 currentVelocity = rb.velocity;
        currentVelocity.x = enemySpeed;
        if (facingLeft) { currentVelocity.x *= -1f; }
        rb.velocity = currentVelocity;

    }

    private void OnTriggerEnter2D(Collider2D collision)
    {
        if (collision.gameObject.tag == "TurnAround")
        {
            facingLeft = !facingLeft;
        }

        if (collision.gameObject.tag == "Player")
        {
            Destroy(this.gameObject);
        }

    }

    private void OnCollisionEnter2D(Collision2D collision)
    {
        if (collision.gameObject.tag == "Player")
        {
            Debug.Log("Player Killed");
            Destroy(collision.gameObject);
        }
    }


}
CameraFollow.cs
using System.Collections;
using System.Collections.Generic;
using UnityEngine;

public class CameraFollow : MonoBehaviour
{
    public Transform player;
    public float smoothTime = 1f;
    public float currentVelocity = 0f;

    // Start is called before the first frame update
    void Start()
    {

    }

    // Update is called once per frame
    void Update()
    {
        Vector3 cameraPosition = transform.position;

        // cameraPosition.x = player.position.x;

        if (player.position.x > cameraPosition.x)
        {
            cameraPosition.x = Mathf.SmoothDamp(cameraPosition.x, player.position.x, ref currentVelocity, smoothTime);

        } else
        {
            currentVelocity = 0f;

        }

        transform.position = cameraPosition;
    }
}