It’s time to bring our world and our characters to life. This week, we dive into the wonderful world of animation – more specifically, how animation is implemented in the Unity engine.
Part 1: Basic Sprite Animation
“Moving” sprites share a great deal in common with the old cartoons that your parents (and grandparents) used to watch. The characters and objects that appeared to move were most often generated from a series of individual images, swapped out with one another. These images were painted onto “cels” (short for “celluloid”) which were transparent sheets. These sheets would be placed over a background image and photographed to create a single frame of animation. The “movement” these individual images evoked was due to the similarity of one image to the next, each offset only slightly from the other. Artists would create this smooth motion by defining “keyframes”, or drawings that would represent the start and end of a particular movement, and then generate drawings in between that would approximate the adjustment of items in the first drawing to items of the last, and these frames were known as “in-betweens”.
In our modern software, we rely on similar approaches to create pre-defined animations. For simple sprite animation, we replace the paintings with digital images (and use transparent pixels to replicate the effect of the transparent celluloid sheet). This creates a discrete progression, where each frame of motion is represented with its own distinct sprite. The other method – which we will use most often for animating objects themselves – allow us to define “keyframes” for our properties, and then the engine will “interpolate” the frames that occur in between.
First, we are going to start simple, with an animated sprite. These are very easy to generate – if we have a series of images (or a series of sprites generated through a sprite sheet), we can select these from our Asset Window and drag them into our scene. When you do this, you will be asked to choose a location and name for your “anim” file. This file is an AnimationClip, and it defines the specifics of this particular animation. You will see this along with an Animation Controller file in your Asset folder, likely with the same name as your new GameObject in the scene. Like in the last lesson, your GameObject will have a Sprite Renderer component, but now it will be accompanied by the Animator component.
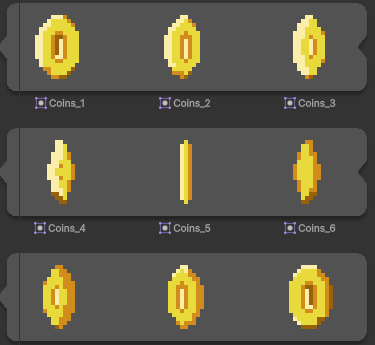
By dragging the individual frames of this coin sheet to the screen, we have created a fancy coin animation.

Easy, right?
Part 2: Tile Animation
So what about adding animation to our Tiles? That process, although the underlying principles are nearly identical, is slightly more complicated due to the way that Unity defines its tiles.
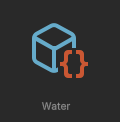
Right-click in your Assets panel, and select Create > 2D > Tiles > Animated Tile. This will create a new object that is your animated tile definition.
Select this object. In the Inspector, you will see an area indicating that you can drag tiles to define the animation. Drag your sprite frames into this, and then arrange the individual entries into the proper order (if they are not already so).
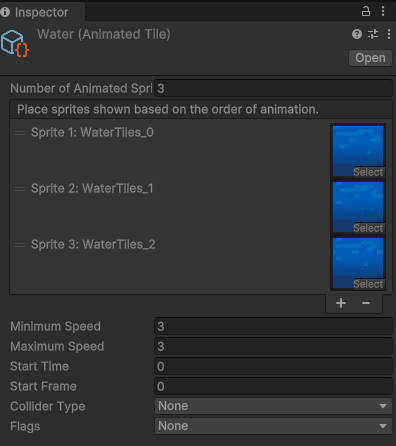
Now you have a tile that you can bring into your Tilemap, either by dragging it directly from the Asset Folder onto your Grid, or by adding it to your Tile Palette (again, dragging the tile into your grid object). If this tile is something you expect to use frequently, such as our water animation, I recommend placing it in your Tile Palette so that you can “paint” it into your grid where needed.
Part 3: Keyframe Animation (Moving Platforms)
Now it is time to make some moving platforms. We start with an “up and down” movement. To do this, we will use the Animation window (not to be confused with the Animator window) to create a keyframed animation.
Before we begin, it is important to note that when you run an animation clip that animates the property of an object, such as position, those values will override everything else. You can make an animated platform, define a prefab, and then copy it all over the board, but when you hit “play” they will all move back to the same position as the original because that it what the animation clip demands. There are two methods to solve this. One is to use the Apply Root Motion checkbox in the Animation component of the object, which will treat this animation as an offset of the transform of the object it is attached to. The other method is to animate them relative to a parent object so that they inherit the world position of the parent and move only in relation to that. In a way, it’s doing the same thing, except giving you a little more control over the placement and movement.
For this reason, it’s always best to build these prefabs by placing all objects at (0,0,0), building your and animating there, then defining your prefab from that object.
NOTE: It is also important to note that any transformation will be applied to animated and their children. This means that our “scale” value can cause objects to move differently than expected or defined. Best to leave “scale” alone if you can, especially if you will be parenting an object like an enemy or player that have movement controls of their own.
First, we create a new platform by creating an empty game object that will serve as our platform parent. We place some child sprites adjacent to one another to define our platform, and then add a Box Collider 2D component to the empty parent object, editing the boundaries to fit the children.
With our parent object selected, open the Animation Window (Window > Animation > Animation) and click the “Create” button to generate a new clip. Give your clip a name.
Once you do this, you will see the Dopesheet, showing the individual frames.
We will want to animate the x-position of this platform, so we click Add Property > Transform > Position > +
Now your dopesheet will show your Transform channels, and you will see diamonds at the start and end of your clip – these are the keyframes. These are the positions in the timeline when a value is defined. In between these frames, the game engine will interpolate between the values.
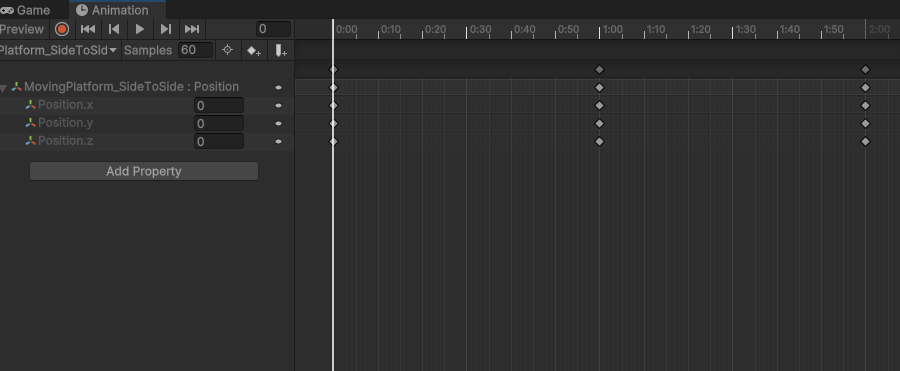
Since we want our animation to loop, it is important that the values for the keyframes be the same at the start and end of the clip. By adding the property as we did, Unity automatically creates the start and end position.
Next we want to set a new keyframe – the “right” position of the platform. First we move our time position (indicated by the thin white vertical line on the dopesheet) to the mid-point, here at 0:30. Then we hit the Record button (the red circle in the upper left). This will turn the timeline header from blue to red, indicating that recording is on. Any changes made to the object now will automatically be keyframed into the position on the timeline.
With recording on, select the Move tool and position your gizmo object to the right-most position of your path. (The platform child will follow with you). You will see that a new set of keyframes are generated.
Turn recording off, then hit the Play button and you can watch your platform move up and down. If you want to see how the motion path is defined, use the Curves view, found at the bottom left. Here you can see each property color coded and mapped out over time, and each keyframe is a bezier point with handles that can be edited similar to applications like Illustrator or Photoshop.
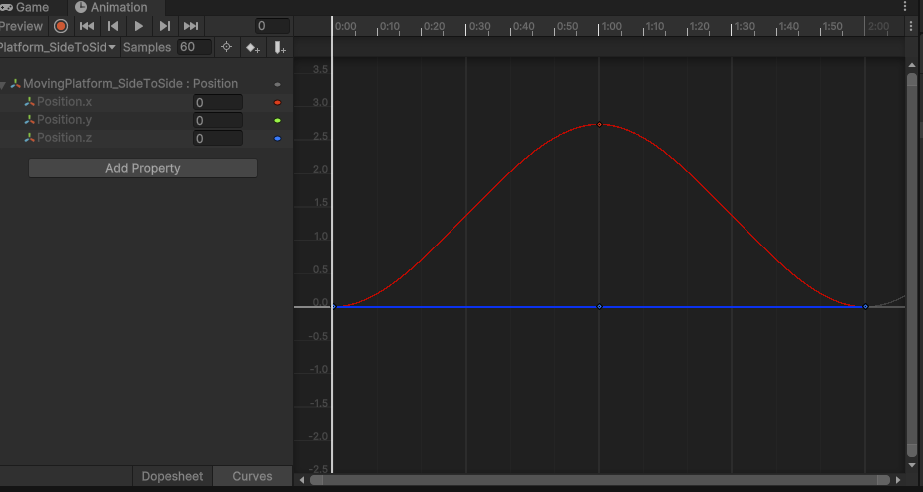
Now try it out in your world. If you are happy with the result, drag the top parent object to the Assets window to convert it into a prefab. Then you can move your instance to whatever location you prefer. Run your hero character over and see what happens.
You’ve probably noticed that our hero character isn’t behaving as one would hope. Instead of sticking to the platform, he’s bouncing as we move up and down. And if you created a side-to-side platform, he slides right off.
The problem here is that by creating a slippery rigidbody, we have given up the friction that keep us connected to the objects that we stand on. Also, our platform’s movement is predetermined and falling faster than gravity would initially imply. Our character keeps landing, then falling, catching up and landing again. Thankfully, there is an easy answer to this.
We have already defined the motion of these objects. If we want our player object to move in the exact same way as the platform it is standing on, we can simply make it a child a child of the platform. Rigidbody physics will still be applied in the FixedUpdate, and pull our player down or hold its momentum, but now its position will also adjust with the frames of the animation itself.
Now, unless we want our entire game to play out on this one platform, we need to let the player hop from object to object, meaning we need to let it change parent objects. Basically we need to let a platform “adopt” the player, and then let the player “emancipate” itself by breaking the lineage. This is performed using a simple assignment of parentage that we run in a script attached to our platforms.
    private void OnCollisionEnter2D(Collision2D collision)
    {
        if (collision.gameObject.tag == "Player")
        {
            collision.transform.parent = transform;

        }
    }

    private void OnCollisionExit2D(Collision2D collision)
    {
        if (collision.gameObject.tag == "Player")
        {
            collision.transform.parent = null;
        }
    }
Now our character will become a child of the platform when it touches it, and un-child itself once it leaves the surface, through running, jumping, getting pushed off, etc.
Part 4: Animation on Demand
Next we want to create a side-to-side animation to build a platform that will “ferry” us over a great expanse. Like before, we want to set up the animation clip using the Animation window, but this time we the platform to remain stationary until we land on it, which will be the cue for it to start moving.
We build the same structure – an empty object, containing an empty gizmo object that contains a platform prefab. Our gizmo gets a box collider set to trigger, and an Animator component.
We build the animation clip, editing the X-value to move from 0 to a new position and ending there. This way I have created a start and end keyframe, rather than a looping sequence. I adjust the control points by selecting and dragging them until the movement takes the amount of time I wish it too. I also disable looping in the animation clip that I have created by unchecking Loop Time.
Since we want our object to stay in place, we need to give it some other animation to run until we are ready to trigger our ferry animation. In order to do this, we will create a new, empty Animation Clip. With our object selected, go to the Animation Window and select the drop-down with our current clip name. Select the “Create New Clip…” option, name it, and just don’t put anything in it. This will be our “idle” state.
You may have noticed that when we create an animation clip for an object, it also adds the Animator component, just as we had with our sprite. If you open the Animator window and select your platform, you will see an animation state set with our movement clip and our idle clip. Our movement clip is going to be the default clip (highlighted in orange) because we just created it.
Right-click the idle state and select the “Set As Layer Default State” option. Now our Idle clip turns orange, and the arrow from Entry moves directly to it.
Next, we need to set up a transition to move us from the Idle to Movement state. Right click on the Idle state, select “Make Transition” and move your mouse over the movement clip and click it to establish the line.
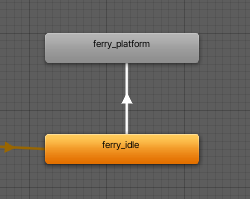
Before we move on, we also want to set up a Parameter, which is a condition that the Animator will use to determine when it is time ot move to the next clip. With the Parameters tab selected, we press the “+” button and add a new Trigger. (A trigger is kind of like a function call – it is only active at the moment it is called. The other types – float, int, and bool, compare their values throughout playback. ) Here we create a Trigger called “StartPlatform”.
When we select our transition you will see details about it appear in the Inspector. There are a few important settings for Sprite animation – you will want to uncheck the Has Exit Time checkbox, and set the Transition Duration to 0.0 (this is found under the Settings dropdown). Blending is great for 3D animation, where we need to interpolate between one set of movements and another to make our transition smooth, but in sprite frame animation there is no such thing as “blending” and so we want to use these settings to instantly jump to the next clip.
At the bottom of the Inspector you will see the Conditions panel, which defines the conditions that must be met in order for this transition to take place. Right now we only have one option – the StartPlatform trigger.

Now if we play our game, our platform remains stationary. This is because we now need to pass a command to the Animator to fire the trigger that we defined, thus moving us through the clip. (If you have the object selected and the Animator window open, you can do this by clicking the button next to the StartPlatform parameter.
In our Platform script, we need to set up a reference to the Animator component. We define a variable:
public Animator animator;
… and then we get the component in the start menu…
animator = GetComponent<Animator>();
… and finally we set our command to launch. If we use the existing collider, then we risk our platform taking off even if our hero just glances the side of it. So instead, I have created a second Box Collider 2D, defined is as “is Trigger” and placed it above and towards the middle of the platform so that it does not accidentally take off without us.
private void OnTriggerEnter2D(Collider2D collision)
{
    if (collision.gameObject.tag == "Player")
    {
        if (isTriggeredByPlayer)
        {
            animator.SetTrigger("StartPlatform");
        }
    }
}
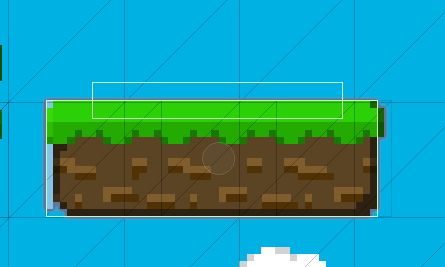
When the player enters our platform, the SetTrigger( ) command is called, passes our trigger name as the function parameter, and that triggers the animation to run. Because we have turned off the looping action in the animation clip, it will simply hold here.
Part 5: Animating Properties
Next we want to make our enemy move. Our enemies here are relatively simple, and they only need to have two states – walking, and dying. Our first step is to create our walking animation, which we will do from the sprites included in the sprite sheet.
Since our enemy object already exists, and the prefab has been placed into multiple places, it would be easier for us to add the sprite animation to the existing object. We open the prefab, select the enemy object, and open our Animation Window. You should see a message indicating that there is no Animator or Animation Clip associated yet, and a button to let you create those. Click that button, and give your walking clip a name (and location, if you’re trying to keep your file structure neat).
Now this will create an empty Animation Clip. From here, the sprite animation is easy to create. We can simply grab the sprites from the Asset Folder and drag them directly into the Dopesheet on the Animation Window. This will create a sprite animation.

If you play this, you will notice that it moves very fast. That is because Unity by default creates animation clips to run at a sample rate of 60, meaning it holds 60 timing frames per second. Since we are dealing with sprites, turn this setting down to 12, which is the default setting for sprite animation.
Next, create a new clip that will be our “dying” clip. Here, we are going to use the Animation Clip to manage a few properties for us, saving us the trouble of having to make these happen through programming. Our intended behavior is that when an enemy is hit, it will stop moving, blink rapidly, then disappear. During this time, it’s colliders should also be turned off so that the player cannot be affected by accident.
Inside of our empty dying clip, I add the SpriteRenderer.Enabled property and set keyframes every few frames to cycle this property on and off quickly to create a blinking movement.

Next, I set up the clips in my Animator to move from Walking to Dying only when a particular trigger is called (I’ve called mine “Dying”).
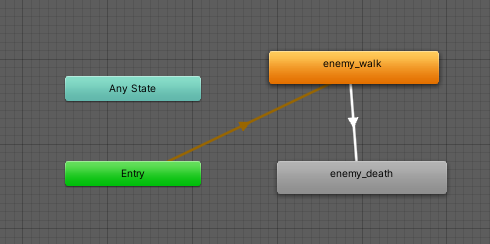
This only turns off the Renderer itself. The collider and trigger of the enemy object still stay, and the player’s collider touching the enemy collider causes the player to die, even though we just defeated the enemy. To resolve this, I set up a boolean on our Enemy character isAlive and set the value to true. When the player enters the Enemy trigger, isAlive is set to false. I add a check to the Enemy/Player collision so that the player is only killed if the enemy object is still alive, and this resolves the death. Additionally, I turn off the CircleCollider2D, and adjust the Rigidbody2D to turn off gravity and set the velocity to zero, ensuring that our enemy object stays still and our player object can pass through it.
Part 6: Player Animation
The principles behind our player animation are very similar to those of our Enemy object, except now we have many more clips to move between. For this section, I highly recommend watching the video walkthrough, as a writeup will not do the process justice. However, here is a brief summary of the various animation states we attach to the player object.
We set up parameters to assist with the various conditions that we will want to cause a transition to occur. These include:
- speed: a float value that will determine if our character should walk, run, or stand idle.
- isOnGround: a boolean that we will use to determine if our player is mid-air or grounded.
- Death: a trigger that we will call as events to move us between states
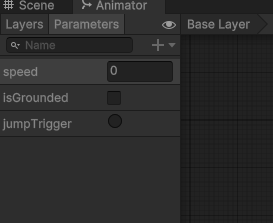
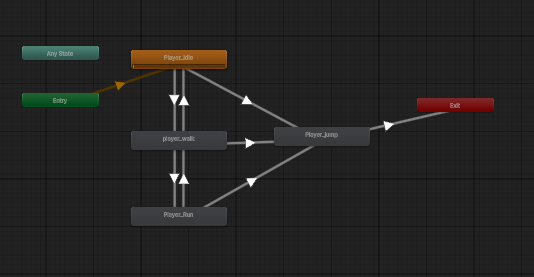
Above is our finished controller, with transitions in place. Here is how I have them configured:
- Entry: This step is automatic. Anytime the animation controller is enabled, or if another animation passes through the “Exit” state we will reset to here. Immediately moves to the default state, “player_idle” which holds our idle animation.
- Idle/Walk: uses the “speed” float as a condition to move between states. If we are Idle and speed is > 0.1 we will move to “player_walk”. If the current state is Walk and speed is < 0.1 we will move back to “player_idle”.
- Walk/Run: Similar to Idle/Walk, transition occurs when the speed crosses a value of 0.9
- Jump: All three of these transitions will use the “grounded” boolean, which we will populate from the “isGrounded” property of our character controller. A value of “false” will trigger this transition.
- Exit from Jump: Rather than creating multiple return paths and testing each path for speed values inside a range, we end our jump by exiting the animation when “isOnGround” equals “true”. This sends us back to the “Entry” state, which moves us to Idle and then evaluates based on our current speed to arrive at the correct position.
- Death: Because we may die at any time, we build the transition to the “Death” animation from the “Any State”, and set the condition to the “Death” trigger.
- Exit from Death: We did not use this path this year, but in past years I have also set a trigger “PlayerRevive” to act as a singular event that can move us out of the “Death” state. By going to Exit, we re-enter the flow at the “Entry” point and our animation starts again. However, this only makes sense if we are going to have our player object continue to exist. Since we are likely going to reset by destroying and instantiating, or by simply reloading a scene, this is extraneous and so we did not use it this year.
Animations can be looped by selecting the individual animation in the Asset Window and checking the Loop Time box in the Inspector. Our “Death” animation does NOT loop, as we do not want to die over and over again.
As always, I recommend turning off the Has Exit Time checkbox and setting the Transition Duration to 0 to assure instant transition from one clip to the next.
Next we need to connect our “jump” state. We already defined our Animator component, so we can now just use the SetBool( ) command to update our “isOnGround” status. We set our state to “false” when a jump first occurs:
        if (Input.GetButtonDown("Jump"))
        {
            jump = true;
            animator.SetBool("isOnGround", false);
        }
The return is a little more tricky, because it is the CharacterController2D component that is determining whether or not we have hit ground. Thankfully, they anticipated this and have a Unity Event pre-defined to run when the character “lands” on the ground. We create a public function in our PlayerMovement script…
    public void PlayerLanded()
    {
        animator.SetBool("isOnGround", true);
    }
… and then associate that function to be called when the landing event occurs by setting it up in the On Land Event () panel in the CharacterController2D component.
Now when we land, our grounded boolean forces our animation to exit, at which point it jumps back to the entry point, and everything starts again.
PlatformSticky.cs
using System.Collections;
using System.Collections.Generic;
using UnityEngine;

public class PlatformSticky : MonoBehaviour
{
    private void OnCollisionEnter2D(Collision2D collision)
    {
        if (collision.gameObject.tag == "Player")
        {
            collision.transform.parent = transform;
        }
    }


    private void OnCollisionExit2D(Collision2D collision)
    {
        if (collision.gameObject.tag == "Player")
        {
            collision.transform.parent = null;
        }
    }

}
PlatformFerry.cs
using System.Collections;
using System.Collections.Generic;
using UnityEngine;

public class PlatformFerry : MonoBehaviour
{
    private void OnTriggerEnter2D(Collider2D collision)
    {
        if (collision.gameObject.tag == "Player")
        {
            // time to move the platform
            Animator animator = GetComponent<Animator>();
            animator.SetTrigger("StartPlatform");
        }
    }
}
SideScrollerController.cs
using System.Collections;
using System.Collections.Generic;
using UnityEngine;

// SIDE SCROLLER CONTROLLER
// Created for Understanding Game Engines
// Based on SharpCoder Blog's CharacterController2D
// https://sharpcoderblog.com/blog/2d-platformer-character-controller


[RequireComponent(typeof(Rigidbody2D))]
[RequireComponent(typeof(CapsuleCollider2D))]

public class SideScrollerController : MonoBehaviour
{
    // public variables
    public float maxSpeed = 1f;
    public float jumpHeight = 1f;
    public float gravityScale = 1f;

    // ground check variables
    public Vector2 groundOffset;
    public float groundRadius;
    public LayerMask layerMask;

    // private variables
    float moveDirection = 0;
    public bool isGrounded = false;
    private bool facingRight = true;

    private bool isAlive = true;
    private Animator animator;

    Rigidbody2D rb;
    CapsuleCollider2D mainCollider;

    // Start is called before the first frame update
    void Start()
    {
        rb = GetComponent<Rigidbody2D>();
        rb.freezeRotation = true;
        rb.collisionDetectionMode = CollisionDetectionMode2D.Continuous;
        rb.gravityScale = gravityScale;
        animator = GetComponentInChildren<Animator>();
    }

    // Update is called once per frame
    void Update()
    {
        // get our movement direction
        moveDirection = Input.GetAxis("Horizontal");

        // TODO: Facing L/R logic
        if (moveDirection < -0.01f && facingRight)
        {
            // flip to left
            facingRight = false;
            Vector3 currentScale = transform.localScale;
            currentScale.x *= -1;
            transform.localScale = currentScale;
        } else if (moveDirection > 0.01f && !facingRight)
        {
            // flip to right
            facingRight = true;
            Vector3 currentScale = transform.localScale;
            currentScale.x *= -1;
            transform.localScale = currentScale;
        }


        // Jump Controls
        if (Input.GetButtonDown("Jump") && isGrounded)
        {
            rb.velocity = new Vector2(rb.velocity.x, jumpHeight);
        }

        // animation controls
        if (animator)
        {
            // set the speed
            animator.SetFloat("Speed", Mathf.Abs(moveDirection));
            animator.SetBool("isGrounded", isGrounded);
        }

    }

    public void PlayerDeath()
    {
        if (animator && isAlive)
        {
            animator.SetTrigger("Death");
            Destroy(this.gameObject, 2f);
            isAlive = false;
        }
    }

    private void FixedUpdate()
    {
        // Check for Ground Collisions
        isGrounded = false;

        // look for a collision
        Collider2D collider = Physics2D.OverlapCircle(getCollisionCenter(), groundRadius,layerMask);

        if (collider) { isGrounded = true; }


        // move the player
        rb.velocity = new Vector2((moveDirection) * maxSpeed, rb.velocity.y);
    }

    void OnDrawGizmos()
    {
        // Draw a yellow sphere at the transform's position
        Gizmos.color = Color.yellow;
        Gizmos.DrawWireSphere(getCollisionCenter(), groundRadius);
    }

    private Vector3 getCollisionCenter()
    {
        Vector3 collisionCenter = new Vector3();
        collisionCenter.x = transform.position.x + groundOffset.x;
        collisionCenter.y = transform.position.y + groundOffset.y;
        return collisionCenter;
    }

}
EnemyScript.cs
using System.Collections;
using System.Collections.Generic;
using UnityEngine;

public class EnemyScript : MonoBehaviour
{
    public float enemySpeed;

    private Rigidbody2D rb;
    public SpriteRenderer spriteRender;
    public bool facingLeft = true;

    public bool isAlive = true;
    private Animator animator;


    // Start is called before the first frame update
    void Start()
    {
        rb = GetComponent<Rigidbody2D>();
        animator = GetComponentInChildren<Animator>();
        // spriteRender = GetComponent<SpriteRenderer>();
    }

    // Update is called once per frame
    void Update()
    {
        if (facingLeft && spriteRender.flipX == true)
        {
            spriteRender.flipX = false;
        } else if (!facingLeft && spriteRender.flipX == false)
        {
            spriteRender.flipX = true;

        }
    }

    private void FixedUpdate()
    {
        if (isAlive)
        {
            Vector3 currentVelocity = rb.velocity;
            currentVelocity.x = enemySpeed;
            if (facingLeft) { currentVelocity.x *= -1f; }
            rb.velocity = currentVelocity;

        }

    }

    private void OnTriggerEnter2D(Collider2D collision)
    {
        if (collision.gameObject.tag == "TurnAround")
        {
            facingLeft = !facingLeft;
        }

        if (collision.gameObject.tag == "Player")
        {
            // we are no longer alive
            isAlive = false;

            // trigger the death animation
            if (animator)
            {
                animator.SetTrigger("Dying");
            }

            // turn off the collider
            CircleCollider2D collider = GetComponent<CircleCollider2D>();
            collider.enabled = false;
            rb.velocity = Vector3.zero;
            rb.gravityScale = 0f;

            Destroy(this.gameObject, 1.0f);
        }

    }

    private void OnCollisionEnter2D(Collision2D collision)
    {
        if (collision.gameObject.tag == "Player")
        {
            if (isAlive)
            {
                Debug.Log("Player Killed");
                // queue the player death
                SideScrollerController controller = collision.gameObject.GetComponent<SideScrollerController>();
                if (controller) { controller.PlayerDeath(); }

            }
        }
    }
}
CameraFollowScript.cs
using System.Collections;
using System.Collections.Generic;
using UnityEngine;

public class CameraFollow : MonoBehaviour
{
    public Transform player;
    public float smoothTime = 1f;
    public float currentVelocity = 0f;

    // Start is called before the first frame update
    void Start()
    {

    }

    // Update is called once per frame
    void FixedUpdate()
    {
        if (player)
        {
            Vector3 cameraPosition = transform.position;

            // cameraPosition.x = player.position.x;

            if (player.position.x > cameraPosition.x)
            {
                cameraPosition.x = Mathf.SmoothDamp(cameraPosition.x, player.position.x, ref currentVelocity, smoothTime);

            }
            else
            {
                currentVelocity = 0f;

            }

            transform.position = cameraPosition;


        }

    }
}