For this class, we looked at a few more advanced techniques to enhance our platform games. The first is Animation Effects, which allow us to call a scripted event from inside an animation clip, which we used to make a “coin box”. Then we look at defining physics collisions, setting up areas that affect our physics with 2D Effectors, and finally look at Sprite Shapes.
Part 1: Animation Events
Today we want to create a classic element from the old side-scrollers, the coin box. Super Mario Brothers featured these boxes throughout their levels, and they were a wonderful devices. A player would jump from underneath, the box would shift up slightly to indicate that your actions caused a reaction, and a spinning coin would pop out, increasing your coin count and playing a happy coin sound to reinforce that a good thing happened, and your brain would release just a little more dopamine. Ahhh….
To construct our coin box, I first created a prefab element that contains a box sprite from our environment sprite sheet, and that sprite has a box collider to receive the impact event, and the animator component so that we can make it move. (Remember, if you make the moving object a child of the prefab parent object, then the transform animation will be in relationship to its steady parent object. This way the box will work the same wherever the prefab is placed and we do not need to use Apply Root Motion to keep it in place)
I generated two animation clips, a quick upward bump animation (at a sample rate of 12 frames per second) and a single frame idle animation that will be our default state. I generated a Trigger parameter that we can fire off when the player touches our Box Collider 2D. This will move us to the Bounce animation. Rather than set an exit condition to this clip, we select “Has Exit Time”. This way, once the clip has run, the exit transition will automatically be processed and we will return to the idle state.
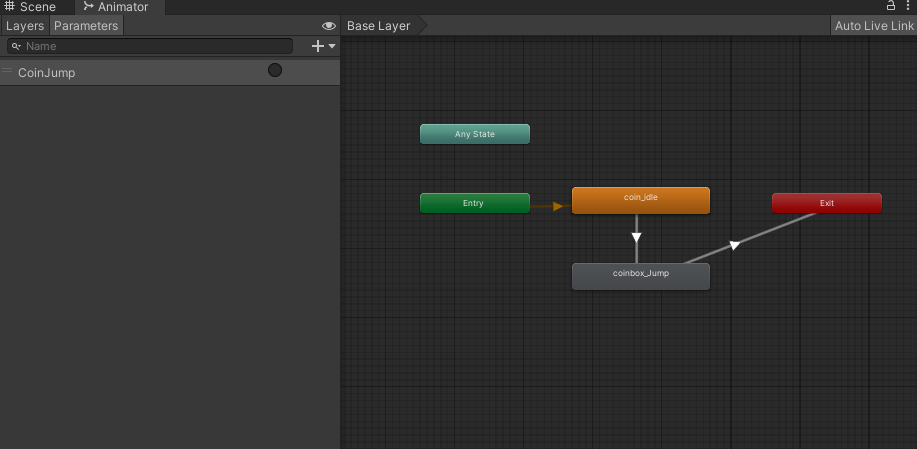
We wrote a quick script (BoxScript.cs) to attach to the box object that uses OnCollisionEnter2D( ) to detect a collision with the player, and the Animator component to set the trigger. First step completed!
Next, we created a jumping coin. We built this with our spinning coin sequence, running at a higher sample rate of 24fps, and animated the position so it made a quick jump up and back down. We made this a prefab object as well, so that we could call it into existence whenever a box is bounced.
Now it is time to connect the two objects. In our box script, we added a public function MakeACoin( ) that would instantiate our coin prefab at the box position when called (and then destroy it momentarily afterwards because it’s always good to clean up after ourselves). Because this BoxScript class is attached to the same object as our Animation, and because the function was made public, it is now available to us as an animation event.
At the height of our boxes bounce clip, I added an Animation Event to the timeline. You can see it up there just under the number 3 – it’s the little white marker. To create an event, you hit the “Add Event” button which is located just next to the “Add Keyframe” marker in the Animation window. (Just under the Sample Rate field).
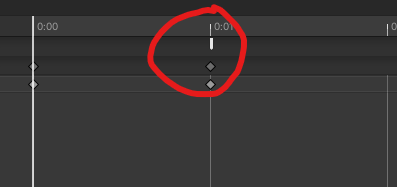
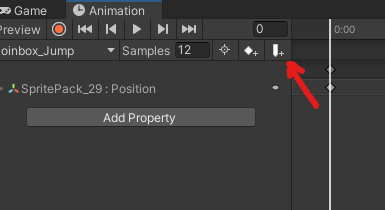
The Event itself can be configured in the Inspector. Select the event marker in the timeline and then use the dropdown in the Inspector to associate it with a public available function attached to that object.
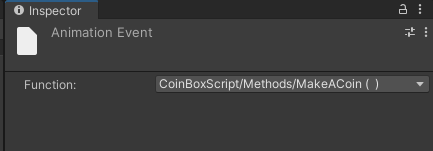
Here our animation event takes no arguments, but you can configure one parameter to be passed when the event is called. This can be either a float, int, string, or object reference. Now we have a coin that pops out of our box. Our coin sticks around a little longer than we would like, so we disable looping on the Animation Clip and set up a Destroy( ) command for the coin prefab when it instantiates.
Although we did not do this in the workshop, a logical next step would be to create a separate CoinScript that registers the scoring event and commands an attached AudioSource to play a coin sound. Using Animation Events again, we could tune the timing of that sound in relation to our animation. Timing sounds to events is one of the more common use case that I have found for these type of event calls, as it allows you to synchronize a sound with a particular frame or feature of animation, such as making a “footfall” sound in a walking or running animation.
Part 2: 2D Effectors
Sometimes our standard platforms don’t quite do what we want them to. Or there are effects we would like to create such as wind, or a conveyor belt, or floating on water. Thankfully, Unity includes a number of “effector” components that modify a standard 2D collider and turn it into a specialty object or zone.
The important thing to keep in mind is that in order for an effector to work, it must be a component on the same object as a 2D collider, and that collider must have the Used by Effector checkbox ticked. Some effectors (like the Platform Effector and Surface Effector) require that the collider be a solid object. Others like the Area Effector and Buoyancy Effector require that the collider be set up as a Trigger. I have a short description of each of these types below, but for more information on how to use them I recommend watching the recording of today’s class.
Platform Effector
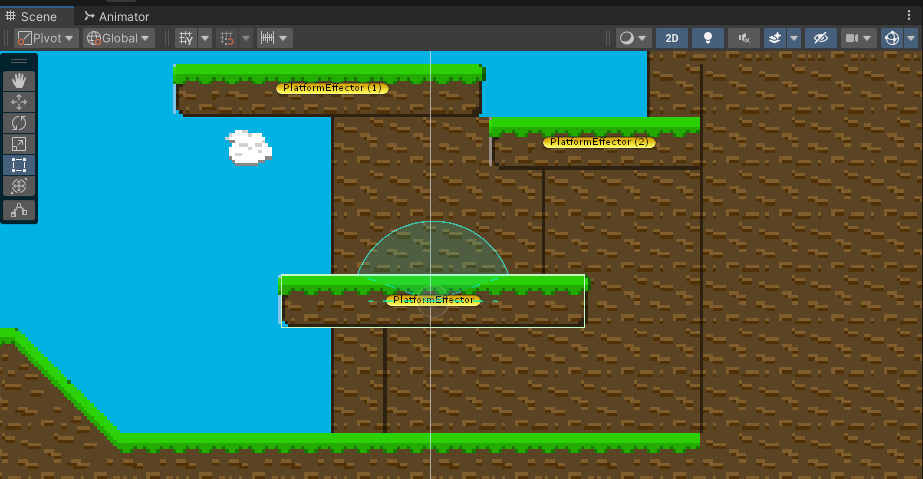
The Platform Effector allow us to create platforms that can be accessed from one direction but solid from another. The most common use of this is a platform that you can jump to from directly underneath, such as in the image below. While these platforms were created in a Tilemap, using the TilemapCollider would result in an impervious surface that my player object cannot jump through.
Instead, I have created a series of empty objects with Box Colliders that fit over these platform tiles, and then added the Platform Effector component to each of these objects. I have set the colliders to Used by Effector, and now I have a one-way platform that will let me pass through as long as I am moving in an upward direction. This is the default setting of 180 degrees, and is represented by the arc in the scene window. This arc and the rotation offset of that arc can be set in the component. You can also mask the physics layer of this effect.
Area Effector
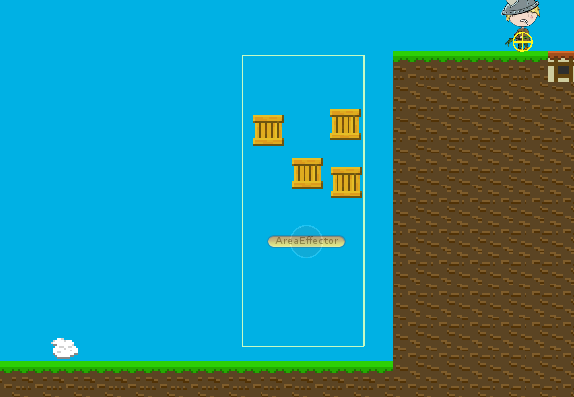
The Area Effector take a Collider that has the Is Trigger property checked, and converts it into a force applying zone of influence. This creates a force applied in a single direction, and you can alter the magnitude of the force, and introduce variations to that magnitude that will apply some randomness into the effect. The Force Target determines whether the force is applied directly to the Rigidbody, or to the Collider itself. If it is the collider, this can generate torque (rotation) if not coinciding the the center of mass. Applying directly to the Rigidbody is the same as applying to the center of mass and so no torque will be generated.
Buoyancy Effector
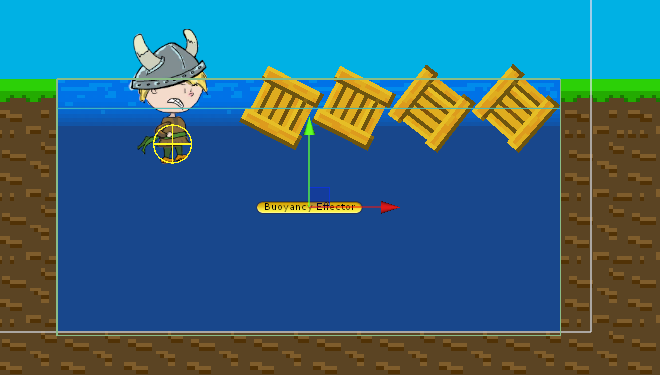
The Buoyancy Effector is useful for creating water-like settings, where you have a character or objects that have to swim or float within a substance. Here, there is a defined Surface Level and a Density that define how objects should float. The more mass an object has across it’s collider, the less buoyant it is considered to be, and will sink further into the area. You can also define a Flow force to be applied as well, if you want your body of water to have a current.
Surface Effector
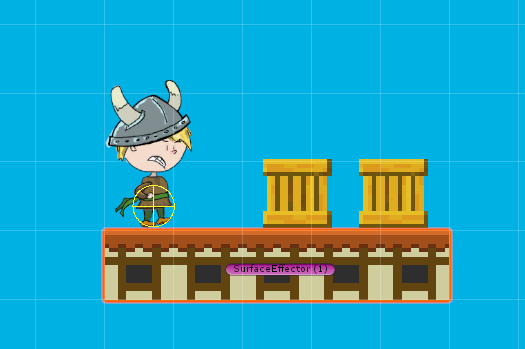
Finally, the Surface Effector creates a conveyor like system, where a tangent force is applied along the surface of the collider, at a set speed. The Force Scale is used to adjust how the effector attempts to get the colliding object to arrive at the set speed. A value of 1 will override all other movement such as walking, so a lesser value is recommended.
Part 3: Sprite Shapes
The 2D Sprite Shape is a powerful tool that can be used for advanced world building, one that generates sprites that tile along a path. In our class today, we used this system to generate long and flowing curved platforms, but we really only scratched the surface of what is possible with this shape-building/defining tool.
In order to properly use this, you will need the 2D Sprite Shapes package to be enabled in your game. (If you have used the 2D Template to start your project, this package is already included.)
The first step towards making these shapes is to generate a new Sprite Shape Profile asset. This must be done in the Asset window, and can be created by right-clicking and selecting Create > 2D > Sprite Shape Profile. This will generate a new profile asset, and you will generate one of these for each type of shape profile that you need.

Once you select the profile, you will see the following menu in your Inspector
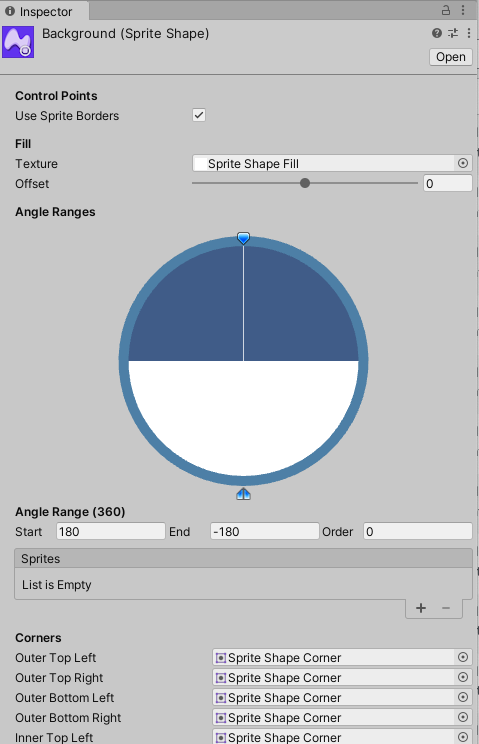
The default profile that is created uses a “Sprite Shape Fill” asset that is included with the package – this is just a white box that can be used to generate shapes, which can be useful for level prototyping, but it is not what we intend to use today. I removed each of these sprite references by setting them to “None” (or just hitting the Delete key).
For today’s class, we are going to use a simple sprite that has a repeating middle tile. For this system, it is important to set the sprite’s Mesh Type to Full Rectangle in the Import Settings, otherwise the results may be distorted as Unity attempts to optimize the mesh to fit.
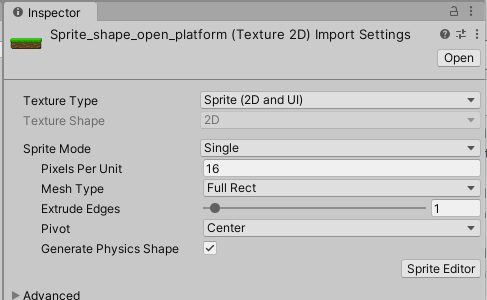
Back in our Sprite Shape Profile, I assign the platform sprite to the “Sprites” slot, like so.
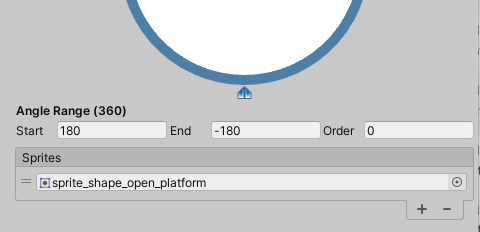
Because this sprite has transparency at the edges, you will see openings between our shape. It may appear like this will create a series of platforms, but really it will generate one continuous shape for us, it is just that part of the shape is transparent. Don’t worry about this now, we will correct this later.
To create a new sprite shape, I drag my Sprite Shape Profile onto the Scene window and it generates a new object. The object is similar to a regular sprite, but with a few modified components:
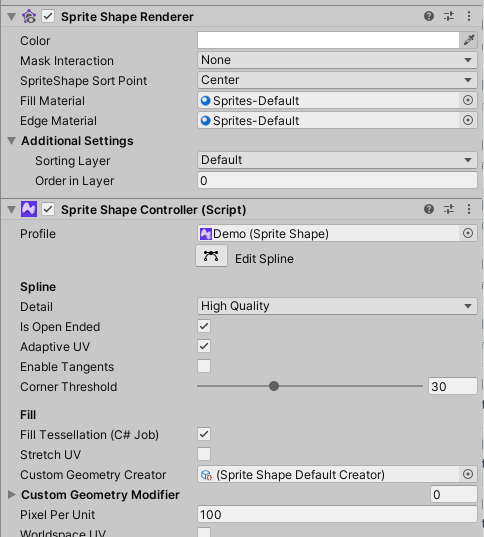
Here we see the slightly altered Sprite Shape Renderer as well as the Sprite Shape Controller. This controller is where we will make most of our changes. By clicking the Edit Spline button, we see that our platform shape now has dots at the endpoints. We can click and drag these dots to stretch and reposition the point in the line, as well as click at other points on the line to generate new endpoints which can also be positioned.
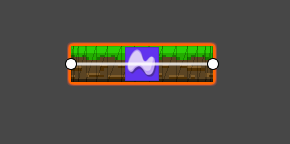
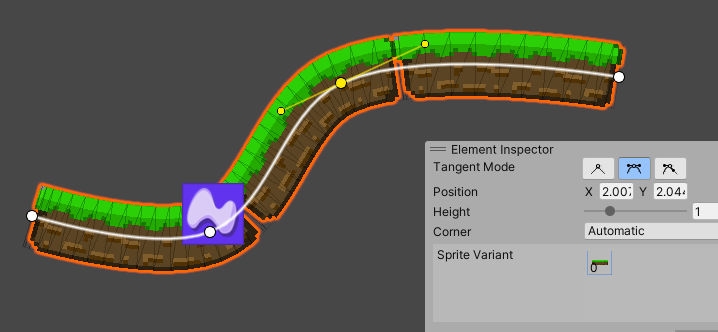
By selecting an endpoint, we can change the behavior of the line at that point by editing the Tangent Mode. This allows us to create a linear intersection, a smoothed intersection with Bezier curve handles, or a “broken” point where the curve handles operate independently of each other. This should be familiar as we saw the same tangent behavior applied to our animation curves.
As we start to create longer shapes, the gap between these is now starting to become a problem. If we would like to make our platform into one continuous curved object, we must modify our sprite definition using the Sprite Editor.
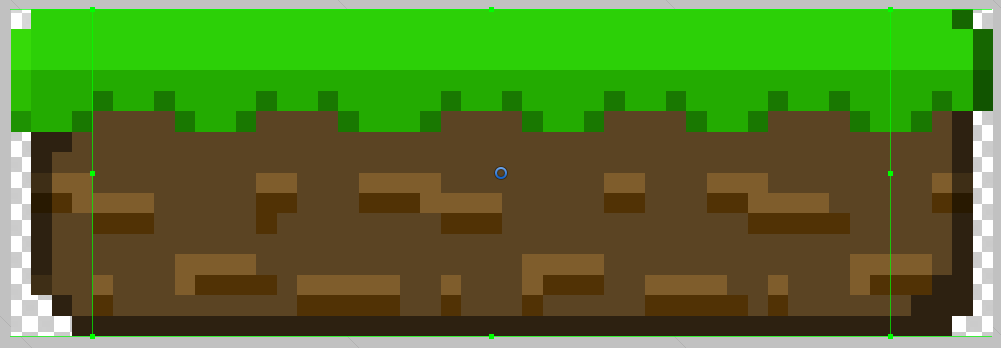
By bringing in the side borders for the sprite, we are now defining the interior repeating element, as well as the endpoint caps that are to be included. Note here that we have also moved the pivot point towards the top, as this will be the point that will sweep along the spline.
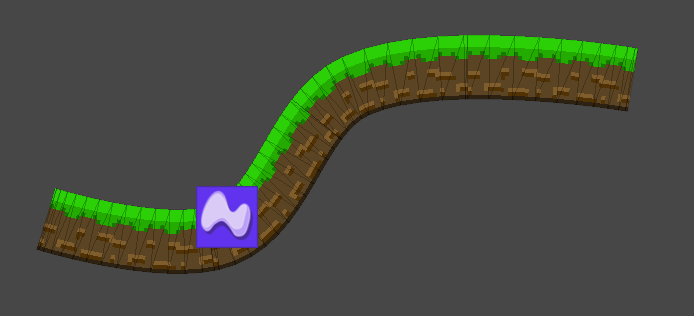
The Sprite Shape Profile has a number of powerful features. We can define multiple zones, each corresponding to a different direction so that different sprites are rendered under different conditions. We can also created a closed ended shape which will automatically connect the two endpoints to create a closed object that can also be filled with a repeating sprite pattern.
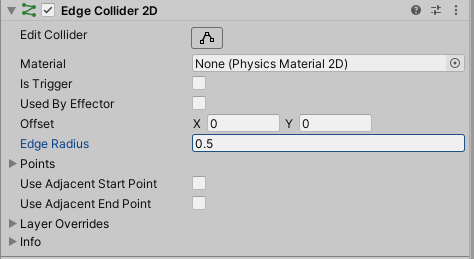
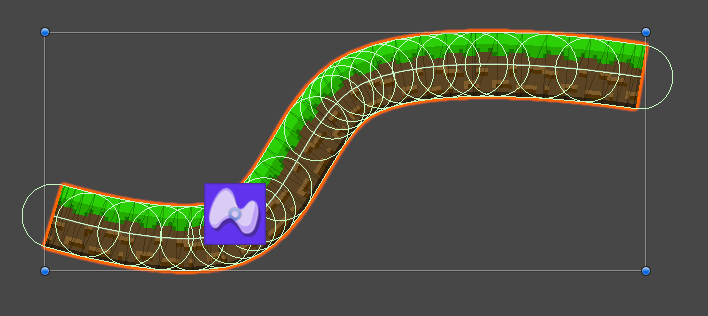
In order to make these platforms walkable, we must also add a collider to this. In this case, that will be the Edge Collider 2D. This will draw a line down the middle of the sprite, but this may not be the effect that you are looking for, especially if you want your player to walk across the top of the platform. One method to correct this might be to use the Y offset for the collider, but the more effective method is to use the Edge Radius to build out a shape that gives this width. While you can edit the line of the collider itself (such as to remove the overrun at the edges) you will want to make sure that Update Collider is turned off in your Sprite Shape Controller, otherwise your changes will be soon overwritten with the Sprite Shape edge.
BoxScript.cs
using System.Collections;
using System.Collections.Generic;
using UnityEngine;

public class BoxScript : MonoBehaviour
{
    private Animator animator;
    public GameObject coinPrefab;

    private void Start()
    {
        animator = GetComponent<Animator>();
    }

    private void OnCollisionEnter2D(Collision2D collision)
    {
        if (collision.gameObject.tag == "Player")
        {

            foreach (ContactPoint2D contact in collision.contacts)
            {
                if (contact.normal.y > 0.8f)
                {
                    // make the bump animation
                    animator.SetTrigger("MakeCoin");


                }
            }

        }
    }

    public void MakeACoin()
    {
        GameObject thisCoin = Instantiate(coinPrefab, transform);
        Destroy(thisCoin, 0.5f);
    }
}
CameraFollow.cs
using System.Collections;
using System.Collections.Generic;
using UnityEngine;

public class CameraFollow : MonoBehaviour
{
    public Transform player;
    public float smoothTime = 1f;
    public float currentVelocity = 0f;
    public Vector3 currentVelocityVector;

    private bool resetCamera = false;

    // Start is called before the first frame update
    void Start()
    {
        currentVelocityVector = Vector3.zero;
    }

    // Update is called once per frame
    void FixedUpdate()
    {
        if (player)
        {
            Vector3 cameraPosition = transform.position;
            Vector3 playerPosition = player.position;

            playerPosition.z = cameraPosition.z;

            Vector3 distance = cameraPosition - playerPosition;

            // check for distance
            if (distance.magnitude > 7.0f)
            {
                resetCamera = true;
            } else if (distance.magnitude < 0.1f)
            {
                resetCamera = false;
            }

            // go to position
            if (resetCamera)
            {
                cameraPosition = Vector3.SmoothDamp(cameraPosition, playerPosition, ref currentVelocityVector, smoothTime);

            } else
            {
                currentVelocityVector = Vector3.zero;
            }

            transform.position = cameraPosition;

        }

    }
}