This week, we take the pieces of a game and assemble them into a full game, complete with a fully compiled executable. We will examine Unity’s Scene Management system, take a deeper dive into the User Interface (UI) by setting up a menu with custom buttons, get hands-on with the Build process, and finally look at how we can manipulate color and materials programmatically to create cool visual effects. Let’s go!
Part 1: Scene Management
1A: Introduction to the SceneManager
In the early days of gaming, developers would divide a game up into small chunks called “levels”. While they were useful for players to measure their progress, their real purpose was to minimize the amount of data a game had to hold in memory in order to be playable. Even today, as games allow us to explore cities, countries, worlds, galaxies… the “level” is commonly used as a way to divide up content. It would be silly to hold the final boss battle of a game in active memory when a player is hours away from encountering it. Each draw call would have to consider every polygon in the entire game, every object and behavior would have to be set just so. In short, it would be chaos. Computationally expensive chaos. Why spend all of those cycles considering things that are hours away from use?
So instead we break up our game into smaller chunks and these load into memory when they are needed, hence the “loading” screen that so many games have. (You may be thinking “but what about sandbox games?” Well, those are divided into smaller areas as well – and not just areas, even objects inside those areas have various levels of detail that can be called up. The loading of that content happens in the background, and will swap places with a lower quality model when ready, usually fading between the two so as to disguise the effect and not distract the eye. Most often this happens in the distance, and the game is using predictive algorithms to determine which content you are most likely to need yet and start to load it.)
When Unity was first created, they also included a level system, which became known as Scenes. You will recognize this today as the format that we save our files in. Scenes have evolved to be much much more than just game levels, and are frequently seen used for other cases such as UI screens/menus, code and asset loading, and animated cutscenes. Sometimes entire games will be saved as scenes. Projects (the things we open when we launch Unity, and where our Assets and such are stored) can contain multiple scenes, and when we build our game we will designate which of the scenes we create will be included in the build. (This is particularly useful when you’re working on branches or variations of your game – you can simply swap one out for another if you need to!)
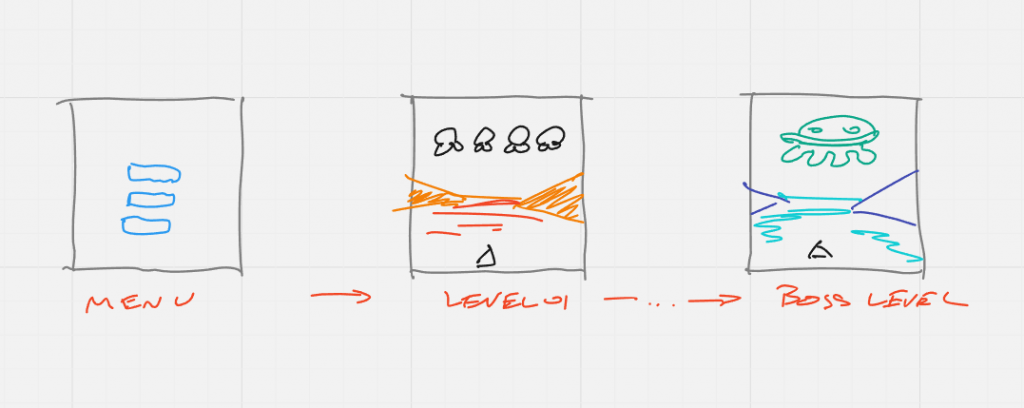
For the demo, I copy our basic scene and create two new “Levels” (named Level01 and Level02) that will serve as our gameplay, and then create a new empty scene (Menu) that will serve as our Title Menu UI for the game.
Creating the “Start” Button
Unity’s UI buttons are easy to generate by going to Create > UI > Button or in the top menu GameObject > UI > Button. This will create a new button object as a child of the Canvas object (which will also be created if you don’t already have one). Buttons consist of two parts, the Button object, and a child Text object. The Button object has two Components to note – the “Image (Script)” component where you define the look of your button, and the “Button (Script)” component where you can define the behaviors and transitions of the buttons. Details for how to use this are covered in the next section.
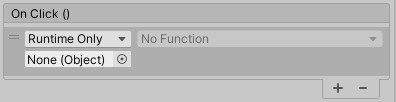
Now for the complicated part – adding an action to your button. Buttons have an “OnClick()” message that they send when a user clicks them but accessing them is not as simple as accessing collider messages. At the bottom of the “Button (Script)” component you will see an “OnClick()” panel that is empty. If you click the “+” button it will create a new action. This action requires an object to be associated with it in order to access its scripted functions. You can add a script to the Button object, but then you will have to self-associate the button with itself. NOTE: The object HAS to be an object currently in the hierarchy. Linking to a prefab does not work.
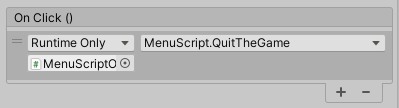
In class, I created an empty game object (“MenuScriptObject”) and added a script (also called “MenuScript”) which contained a single function that we would use to move to the next scene (“btn_StartTheGame”). In the OnClick( ) menu I associate the script object and select a function from the dropdown on the right by going to the specific component “titlescript” and selecting the function I want to use.

NOTE: Any function that will be accessed by a Button must be PUBLIC, and VOID. It can only take up to one (1) parameter.
The Scene Manager
Now that we have a button in place, let’s connect some scenes. I’m going to make my “MenuScript” handle our first scene jump.
First, I have to add a new library to the code, so I start the file by adding this line:
using UnityEngine.SceneManagement;
Now we can access the scene management commands. I can create a button command, so looking at our button example above to make us jump to level 1, I create the following in button script.
    public void btn_StartTheGame()
    {
        SceneManager.LoadScene("Level01");
    }
Again, please note that this must public and void for the editor to see it. Here, ours takes no arguments. And the command itself is rather simple – we run the LoadScene ( ) function and pass in the string name of our level. We can also pass in an integer that corresponds with the scene index. Speaking of…
Adding Scenes to the Build
In order to load scenes, Unity has to have those scenes associated with the build. You can do this by going to File > Build Profiles, and dragging the scenes you will be using from the Asset panel into the Scene List. Notice that when you add a scene, it also assigns it an indexed location.

Once you have associated the scenes, you can close the window. (There is no save button to worry about, your changes are automatically registered.)
1B: Building a “Level Manager”
Our next step is to create a “LevelManager” script that will be included on one object within each level. This script will hold our SceneManagement calls, and each level’s instance will hold information about the level itself, and where to go next. We will make this a script a singleton to provide easy access for other objects (like our GameManager), but there will only ever be one of these objects in a level – it will appear and disappear with the scene itself – so we do not need to worry about testing for a pre-existing version of the manager.
We create variables to hold the current level name (to be used by the level’s UI when we first enter the scene) and a variable that holds the name of the next scene (so that our script knows where to go next once the player beats the level). We replace our GameManager’s success state with a call to LevelManager.S.GoToNextRound( ) and now we move to the next level automatically.
using System.Collections;
using System.Collections.Generic;
using UnityEngine;
using UnityEngine.SceneManagement;

public class LevelManager : MonoBehaviour
{
    public static LevelManager Larry;

    public string levelName; // string to display at level start
    public string nextScene; // name of the scene we move to if successful

    private void Awake()
    {
        Larry = this; // singleton definition
    }
    public void GoToNextRound()
    {
        SceneManager.LoadScene(nextScene);
    }
}
Once we have completed our script, we place LevelManager objects in both of our scenes and test the results. In our Level02 scene, we set our “next scene” to “Menu”, which will return us to the main screen.
1C: Don’t Destroy on Load
Now that we are using the LevelManager to progress to the next level when the player wins, can we also use it to manage the process when the player loses? Yes, but it comes with some new complications that require us to rethink our GameManager and game flow logic.
Restarting the Level
In the past lesson, we spent a lot of time having our GameManager reset the level to the same condition as when we first entered the scene. A fantastically convenient (and conveniently lazy) way to eliminate these steps is to simply reload the scene itself. This way the GameManager does not need to be at all aware of what enemy objects should spawn, or what the range and speed of the player should be, or where shields should go! This only works if you’re treating levels as a non-persistent environment, where all objects completely respawn to the original state, but for classic arcade games this was definitely the case. We accomplish this lazy sorcery within our LevelManager like so:
    public void RestartLevel()
    {
        // reload this scene
        SceneManager.LoadScene(SceneManager.GetActiveScene().name);
    }
Here, we load a scene that happens to be the one we are currently in. How do we know that? Because we use GetActiveScene( ) to return details about the current scene that we are in. After our GameManager passes through its “Oops” state, it deducts a life, tells the LevelManager to load itself, and voila… instant round reset!
Staying Alive (aka Don’t Destroy Me Bro…)
The reset worked wonderfully, but we have created a new issue – our GameManager was also destroyed with our scene.
Most aspects of our game can simply disappear between scenes, but our GameManager is pretty important! It holds a lot of critical information such as our score and the number of lives remaining. In other word, the important attributes of our game that transcend the individual level and are of importance to the game. We made sure to include this prefab in both of our scenes, because we cannot play without it… but we also don’t want to destroy it with our scene, or if we can bring it along, overwrite it when the next instance arrives with a new scene.
To accomplish this, we spare GameManager from an untimely deletion by adding the following line to the Start ( ) function in the GameManager script.
DontDestroyOnLoad (this);
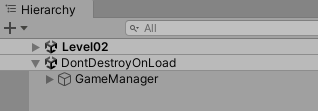
DontDestroyOnLoad ( ) preserves a game object across transitions. It actually creates a little side scene in the Hierarchy and moves the object into it during runtime, as seen below:
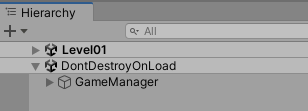
Now when we jump scenes, this object remains, and our score persists as we play through.
But… (you knew there would a “but”, didn’t you?)
For our game to run correctly, we need to have GameManager running in every scene. This means that either we would ALWAYS have to start our game from the very beginning in the scene where we first instantiate it and play all the way through – not fun, especially when we just want to test one tiny thing in level 5 – OR we have to find a way to include it in EVERY scene. To address this, we make our Game Manager into a prefab, and drop an instance of this prefab into every level.
You may remember in our previous class, I discussed the “two manager” situation, where a new manager comes onto the floor (into existence in the scene) and checks for a previous instance. If a previous instance exists, it simply destroys itself.
And so, we build in a check in our Game Manager start script that checks to see if any instance of the singleton exists. If none exists, great – we’re first to the party and we set up shop. But if there is already a singleton defined, we kill this instance of the manager as it is not needed. The script for that looks like this:
    private void Awake()
    {
        if (Gary)
        {
            Destroy(this.gameObject);
            // Singleton already exists, remove this instance
        } else {
            Gary = this;  // Singleton Definition
        }
    }
Here we check for the existence of another version of GameManager. If none exists, GameManager.S will return “null”. If not null, someone is already here. We destroy this new version, and we submit a “return” command, which exits our script rather than continuing on.
Once we’ve passed our null-check, the script is still executing so we know we must be the one true game manager. We assign Singleton status and then in the Start( ) method we declare our intention to live forever.
Bringing the UI
The next issue that we encounter is that our UI references are severed when we move frome one scene to the next. Even though they are similarly named, these UI elements are NOT the same elements that our GameManager is familiar with. Those were destroyed with the rest of the scene.
There are solutions for this, we could run a “Find” if the reference were not intact, or have UI Manager associated in each screen (even our Level Manager could do double duty in this regard).
But an even easier (lazier) way is to simply make the UI elements a child of our GameManager object. Now when a fresh GameManager enters the scene and finds that another GameManager already exists, it will destroy not only itself, but its child objects as well, taking the detached UI with it. The UI from our earlier level is safely preserved down in DontDestroyOnLoad Land.
1D: Updating our Game Flow
Now that we have our scene resetting itself and our LevelManager moving us between levels, it is time to update our flow diagram so that we can have LevelManager and GameManager communicate more effectively.
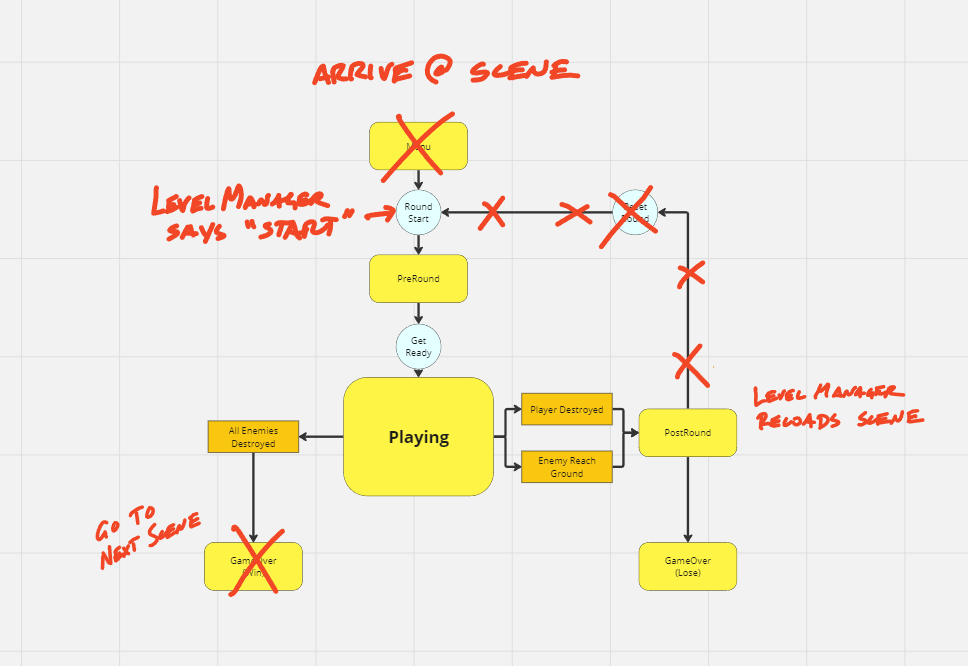
If a pre-existing GameManager enters our scene, it simply continues to exist – the Start( ) command will not be run on this again, and it is unaware that a new scene has begun. Our LevelManager instance, on the other hand, will be brand new with each scene load and so we can use LevelManager.Start( ) to trigger the mechanism that moves us into the pre-rounds state.
    private void Start()
    {
        GameManager.Gary.LevelStarted();
    }
In our GameManager, we set up a corresponding function to handle the call to start the level. To further complicate things, I want to announce the level name when we first arrive, but not if we were killed and respawning – in that case we should just proceed to gameplay. The LevelStarted( ) command is called by the new scene’s LevelManager when it spawns. That serves as the cue for our GameManager to find the new MotherShip object, and to run its GetReady( ) script.
    public void LevelStarted()
    {
        // get the mother ship script
        currentMotherShip = FindFirstObjectByType<MotherShipScript>();

        // go to the get ready state
        StartCoroutine(GetReady());
    }
We add the following lines to GetReady( ) to create a welcome message if this is the first time we have loaded this level. The value “currentLevel” holds the level name as a string, and will compare it against the LevelManager “levelName” variable. – if they do not match, this must be a new level, and so we display the level’s name for a few seconds before progressing. If they do match, this is not our first time through and we progress directly to the remainder of the GetReady( ) script;
...

        // is this the first time we are in this level?
        if (currentLevel != LevelManager.Larry.levelName)
        {
            messageOverlay.enabled = true;
            messageOverlay.text = LevelManager.Larry.levelName;

            yield return new WaitForSeconds(2f);

            // update the current level
            currentLevel = LevelManager.Larry.levelName;
        }

...
Destroying that which Does Not Destroy
One final issue to address with our game flow is “what happens to the GameObject when we DO want to destroy it?”
If we complete our game and return to the “Menu” scene, you will notice that the GameManager is still alive with the UI in the DontDestroyOnLoad scene. Thankfully this is easy to resolve – we simply destroy the object manually. In this case we will use our MenuScript to detect the rogue manager and delete it.
    private void Start()
    {
        if (GameManager.Gary)
        {
            Destroy(GameManager.Gary.gameObject);
        }
    }
Part 2: UI Systems
Rather than go step-by-step through the workshop, here I present a reference for the UI system as this is applicable for most projects.
UI: Canvas
When you create your first UI element, Unity will automatically create a Canvas object inside of your scene, along with the “EventSystem” object that you can ignore for now.
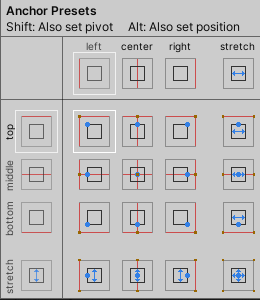
The Canvas is the two-dimensional object that holds your user interface objects. Text, buttons, images, sliders, dropdowns… all of these UI type objects need to be contained inside of a Canvas object. All objects on the canvas are placed using the Rect Transform, a method of rectangular transformation for 2D objects. A Rect Transform defines a rectangle of pixel dimensions W (width) and H (height), and the offsets X and Y measuring the distance the pivot of the object should be placed from the “anchor”. The anchor is a method of defining how it should be offset from it’s parent object, and can be placed at a normalized value horizontally or vertically. The Anchor presets give you options for placement from the Top, Middle, or Bottom vertically, or Left, Center, or Right horizontally. These presets work similarly to text alignment in a word document or spreadsheet cell.
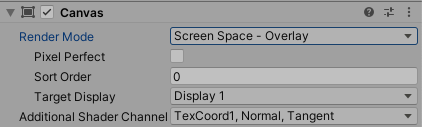
There are two settings inside the Canvas object which are particularly important for setting up your UI. The first is the Render Mode inside the Canvas component. There are three modes available:
- “Screen Space – Overlay” is the default setting and will be your most common use case. This setting causes the canvas objects to be drawn over top of your content on the screen. The canvas will cover the entire area of your screen, and resize if your window resizes. This is similar to the concept of “compositing” video by adding graphics overtop of a video feed. The two do not interact visually at all.
- “ScreenSpace – Camera” works similar to the Overlay method, however it sets the screen out at a distance from the camera, and the camera’s perspective will apply, as opposed to the overlay’s planar projection style.
- “World Space” creates a canvas object in the scene, as opposed to an overlay. This object is a rectangle but has a transform (and thus a position and orientation) within the environment itself. This is what is commonly referred to as a “diagetic” interface, in that it exists within the world itself, rather than just from the perspective of the player/observer.
The Unity Manual has more descriptions and examples of these modes.
The Canvas Scaler controls the way in which objects will respond to different window sizes. You may have noticed that often that the size and placement of UI objects in your game window do not match their size and placement when you run the game at full screen. This is because the Canvas Scaler is set by default to Constant Pixel Size. In this mode, objects retain their width and height values, unaffected by the larger screen. I recommend using the second option, Scale With Screen which will scale the size and positioning of UI objects up and down with the game screen size, thus preserving your layout as it appears in your editor.
UI: Panels
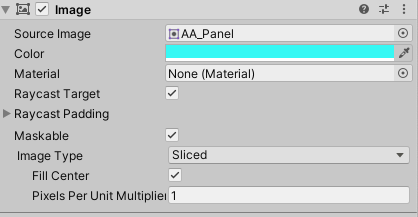
If you want to group your buttons into a more formal menu, you can use the Panel object. This simply creates a UI Image object, but one that has a background that mimics the button background, only more transparent. By default, the Panel will fill the screen, but by changing the Rect Transform you can resize it and make objects children of this object.
Panels are an easy way to collect buttons and other UI elements into one place, and can be activated and deactivated. This can be useful for making menus that slide up or over, or populating a tabbed menu. Panels are also useful for gathering UI elements into one location, and for providing contrast for the UI elements against the game view itself.
Unity’s default panel uses the rounded rectangle UI Sprite to soften it’s edges. If you would prefer to use a solid color, just set the Source Image setting to “None”.
UI: Buttons
Creating Buttons
To create a button, select Create > UI > Button. This will generate a simple grey button with black text on your screen, and place it in your Canvas. (If you have not created a Canvas yet, Unity will generate one for you.)
You can use the Rect Transform to position the object. Clicking the Anchor diagram will call up the Anchor Presets option. Note the modifiers listed at the top for the Shift / Alt keys. Pressing “Shift-Alt” and clicking the center object will move your button to the middle of the screen.
The text of your button is actually a separate text object – to change the text, find the button object in your hierarchy, and expand it to see the child objects (in this case a “Text” object) and edit the value in the Text field.
Button Actions
To assign a function to a button, you must first have an object in your scene that has a script with a public function. In this case, we are accessing the “UIScript” class that has been attached to the “UIManager” object and lives in the scene.
With the button selected, look at the “Button” component and find the On Click ( ) panel a the bottom.
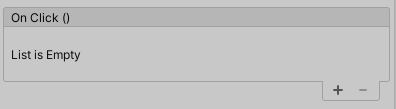
Click the “+” symbol to add a new On Click action. You’ll see an empty Object field.
Drag the object that with the script or component that contains the method you want to trigger with this button into the Object field.
Next, click the dropdown (currently showing “No Function”) and select the script or component, and then the function you want to run. Now the button press will call that function when clicked. Button Actions can also have up to one parameter.
Button Sounds
We can use the same On Click ( ) panel to emit a sound when a button is pressed. We created an empty object and added an audio clip to it, which generated an AudioSource component.
In the OnClick( ) section of our button we add another action, this time adding our sound object, then setting the function dropdown to AudioSource > Play( )
AudioSource is exposed because it is a component of the object, and the Play( ) command is available publicly. Another handy tool is the AudioSource > PlayOneShot( ) method, which lets us play a single pass of an audioClip. Selecting this opens another field of the AudioClip type, and we can drag that directly from our Assets folder into the field, and now it will make that noise when clicked.

Button Sprites (Color & Image)
One way to change the visual appearance of your game is to edit the color of the buttons to move away from the default light gray button that Unity provides. In the Button’s Image component, you can set the Color value to customize the appearance.
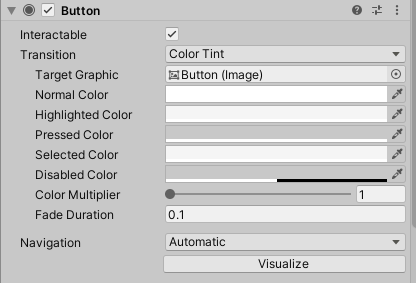
The Button component gives you access to the states of the button so that you can provide feedback for selections, presses, and active vs. inactive states. The default Button object uses Color Tint as the method for changing these states, which provides a subtle adjustment to the overall brightness of the button image (but not the text object)
Another way to customize this is to create your own custom button states using sprites. If you ever created your own buttons to build a website, this process will feel familiar – you generate similar images for each and then swap their placement when in the various states. We will look more at this in the next project.
Button Navigation
You may have noticed that when we have a button selected, we can use the arrow keys to cycle through the selected option. This is thanks to the Navigation system. By default, Navigation is set to “Automatic”, which means that Unity will try to figure out the logic for itself. Sometimes this logic does not make a great deal of sense, so if you want to see what is going on, click the Visualize button and you will see a flow diagram appear between your UI elements.
The yellow arrows indicate where the selected state will transition when a horizontal or vertical button is pressed. If you want to set these yourself rather than rely on Unity’s automatic setting, open the dropdown and deactivate the items so that only “Explicit” is selected, then you can define the object by dragging it into each directional slot.
Part 3: Building the Executable
At last, the time has come to build our project – to take it from the Unity editor and turn it into a completely independent application that we can play and share.
When we “build” the game, Unity will combine all of our code, all of the assets and packages that we use in the game, and all of it’s underlying systems and combine them into an application (if you are running MacOS) or an executable and a series of support files and folders (if you are running on Windows). Unity is also capable of building to other platforms such as Linux, Android, iOS, PS4, XBox, and HTML5. That’s one of the advantages of working with Unity – the platform specific instructions and abstractions are already built in, making it easy to publish cross platform games.
When you are ready to publish your game, you will want to open the Build Profiles panel (File > Build Profiles ).
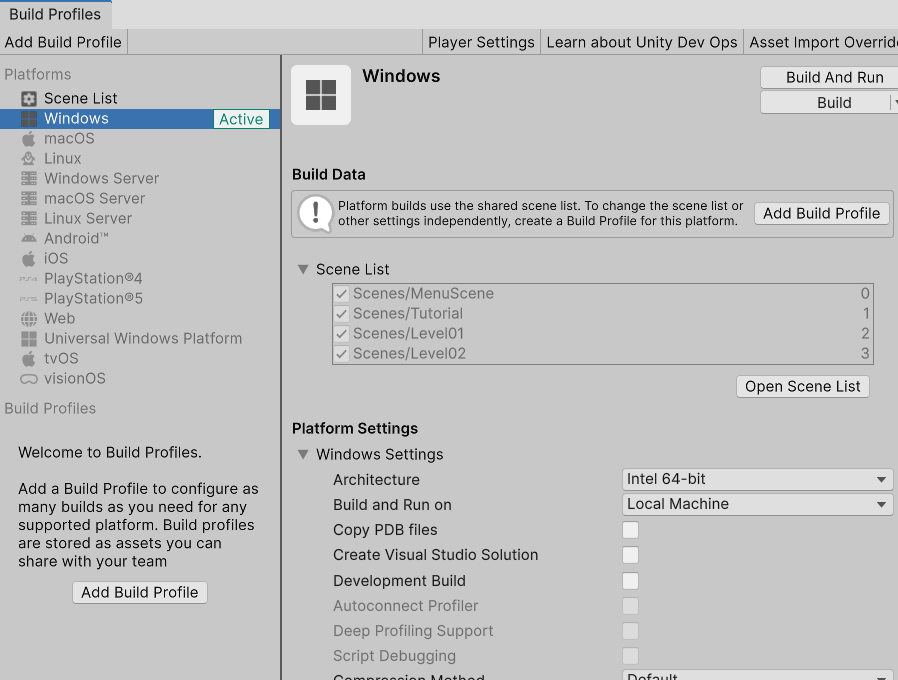
The first thing to do is to add your current scene to the build, by clicking the Add Open Scenes button. This will bring your current scene into the build process. Games can have many scenes, but the build process will only include those that are listed in the Scenes List panel. Also note the number to the right – these scenes have an index number defined by order in this process, that can be used to jump to the next or previous scene. This is the buildIndex that can be used as an identifying option by the SceneManager.
Next, check your Platform Settings to make sure you are building towards the appropriate target. This will be set to the platform you targeted when opening the Editor (the Target setting in Unity Hub). If you change this now, Unity may need to reload the project. For this project, use whatever platform you are currently on – Windows or Mac. While it is possible for one platform to build for the other, we will not get into that in this class.
One final step – open the Player Settings panel by clicking the button in the lower left. This will open up the Project Settings panel to the Player Settings tab. The important items to know about in here are the Company and Product name, the Icon, and the Resolution. By default, applications are set to run as Fullscreen.

Once you are ready to publish your game and your settings are correct, click the Build or Build and Run button. Unity will ask you for a location to save this. If you are building for the Windows platform, you will want to create a new folder to contain the various files.
Then you’ll have to wait for a few moments while Unity does its thing. Now is the time where your game engine takes all of your code and objects and compiles them into raw game code and zipped binaries of data. Often this process is short, mostly just compressing files, but if you generating baked lighting and light/reflection probes as part of the build process this may extend the time required to complete this.
The end result will be either an Application (Mac) or an Executable (Windows) . If you publish for Windows, you will get an“.exe” file and a “Data” folder. (And a few other folders… and a UnityCrashHandler.exe) You need to include these files and folders as they contain contain relevant components – for instance, “Data” holds all of your assets. (Apple users don’t have to worry about this, as both their executable and data are both inside the “application” container, BUT you should still zip your .app files as they are really just folder structures, and when you post an uncompressed .app to a cloud service like Box it never quite comes back out the way it went in.)
And that’s it! Now you have a self contained game. Congratulations!
Part 4: Controlling Color with MeshRenderer
White boxes falling from the sky is a beautiful site, but it would look even better if the debris appeared to change color. In this section we are going to look at how to access the “color” property of an object programmatically using the Mesh Renderer component.
Every 3D mesh object in our scene has a Mesh Renderer component that includes properties about how this will be visualized. Included in this is the Materials channel that holds the material to be applied to this mesh. (Actually, materials… meshes can have multiple materials applied to the same object).
We can access the material properties from the MeshRenderer component, which is (confusingly) named / retrieved as Renderer.
Renderer thisRenderer = GetComponent<Renderer>();
We can change colors of materials by passing in a Color value. The Color type is similar in structure to a Vector3, but instead of (x, y, z) values, it holds (r, g, b, a) values, each one a float corresponding to the Red, Green, Blue and Alpha (transparency) channels. (If you’ve never heard of rgb values to define colors, check out the Wikipedia entry on the RGB color model.)
Also like the Vector3 format, the Color type has some preset values, like Color.red or Color.black. You can read more about these and the methods of the Color type in the Unity script API. We can also declare a public Color variable and our editor will provide us with a color swatch and color selection menu.
Declaring a public Color value in your class will give you a color swatch in your inspector, which makes picking colors much more convenient.

To change the color of our object, we can update the Renderer’s material with code like so:
thisRenderer.material.color = Color.red;
This will update the value of them main color channel for that object’s material. It is important to note that this does not update the source material itself, only this individual instance.
We can also update the color of a specific channel in the shader using Material.SetColor( ) and the channel name. The main color of an object (often referred to as the “Albedo” color) is addressed as “_Color” for the built-in render pipeline, and as “_BaseColor” for the Universal Render Pipeline.
thisRenderer.material.SetColor("_Color", Color.red);
This can also be used to edit other channels, such as the “Emission” channel (which makes your object glow). In order to use this setting, you must first enable the channel like so:
thisRenderer.material.EnableKeyword("_EMISSION");  // you only need to do this once for the material

thisRenderer.material.SetColor("_EmissionColor", Color.magenta);
In the video, both of these methods of color changing are demonstrated, as well as a “color transition” script that uses a Coroutine to move from one color value to another.
private IEnumerator ColorTransition()
    {
        // set things at our start color
        SetColor(startColor);
        // start a timer
        float currentTime = 0f;

        // loop until transition is complete
        while (currentTime < transitionDuration)
        {
            // get my lerp amount
            float lerpAmount = currentTime / transitionDuration;

            // get my color value
            Color lerpedColor = Color.Lerp(startColor, endColor, lerpAmount);

            // set the color
            SetColor(lerpedColor);

            if (includeChildren)
            {
                SetColor(childRenders, lerpedColor);
            }

            // increment my timer
            currentTime += Time.deltaTime;

            // yield
            yield return new WaitForEndOfFrame();

        }
        // make sure we got all the way there
        SetColor(endColor);

    }
Here we use the Lerp command (which is a shmoosh of the phrase Linear Interpolation) to return a color that falls between these values. In order to pass in a value of our progress along the transition, we compare a “currentTime” value against a “duration” value to get the percentage completed, and pass that to our Color.Lerp( ) command.
We also use a different type of yield for our coroutine – WaitForEndOfFrame( ) which will yield and resume at the next frame.
We created a similar but looping effect using Mathf.PingPong( ) to create a continual pulsing between two values over a set duration.
    void Update()
    {
        if (renderer)
        {
            // pulse the object
            Color lerpedColor = Color.Lerp(Color.black, pulseColor, Mathf.PingPong(Time.time, 1f));

            // put this in the emission channel
            renderer.material.SetColor("_EmissionColor", lerpedColor);
        }
    }
Part 5: Animated Materials
Description coming soon.
MenuScript.cs
using UnityEngine;
using UnityEngine.SceneManagement;
using System;

public class MenuScript : MonoBehaviour
{
    void Start()
    {
        // if the game manager still exists, get rid of it
        if (GameManager.Gary)
        {
            Destroy(GameManager.Gary.gameObject); // destroy the instance
        }
    }

    public void btn_StartTheGame()
    {
        SceneManager.LoadScene("Level01");
    }

    public void btn_GoToMenu()
    {
        SceneManager.LoadScene("MenuScene");
    }

    public void btn_GoToScene(string sceneName)
    {
        SceneManager.LoadScene(sceneName);
    }


    public void btn_Quit()
    {
        // tell the app to quit
        Application.Quit();
    }
}
LevelManager.cs
using UnityEngine;
using UnityEngine.SceneManagement;

public class LevelManager : MonoBehaviour
{
    public static LevelManager Larry;

    // scene info
    public string levelName;
    public string nextLevel;

    void Awake()
    {
        Larry = this; // define the singleton
    }

    // Start is called once before the first execution of Update after the MonoBehaviour is created
    void Start()
    {
        // cue the start of level
        GameManager.Gary.LevelStarted();
    }

    public void GoToNextLevel()
    {
        // load the next level
        SceneManager.LoadScene(nextLevel);
    }

    public void ReloadLevel()
    {
        // get the scene we are currently in, and reload it.
        SceneManager.LoadScene(SceneManager.GetActiveScene().buildIndex);
    }

    private void OnDestroy()
    {
        if (Larry == this)
        {
            Larry = null; // clear the static reference
        }
    }
}
GameManager.cs
using UnityEngine;
using TMPro;
using System.Collections;

public enum GameState {Menu, PreRound, Playing, PostRound, GameOver}

public class GameManager : MonoBehaviour
{
    // game variables
    private int score;
    private int livesRemaining;
    private int LIVES_AT_START = 3;

    // Game Manager Singleton
    public static GameManager Gary;

    public GameState state = GameState.Menu;

    // UI Variables
    public TextMeshProUGUI messageOverlay, livesText, scoreText;

    // game objects
    private MotherShipScript currentMotherShip;

    // level info
    public string currentLevel;

    void Awake()
    {
        // check for an existing singleton
        if (Gary)
        {
            // a singleton already exists
            Destroy(this.gameObject);
        }
        else
        {
            // no singleton exists
            Gary = this; // singleton definition
            DontDestroyOnLoad(this.gameObject); // keep this alive in a pocket scene
        }
    }

    // Start is called once before the first execution of Update after the MonoBehaviour is created
    void Start()
    {
        // set up the initial game
        StartANewGame();
    }

    private void StartANewGame()
    {
        // set the state
        state = GameState.Menu;
        // stop the music, if still playing
        SoundManager.Steve.StopTheMusic();

        // reset our score
        score = 0;

        // reset our lives
        livesRemaining = LIVES_AT_START;

        // update the UI
        UpdateLivesUI();
        UpdateScoreUI();

        // Reset the Round
        // ResetRound();
    }

    public void LevelStarted()
    {
        // get the mother ship script
        currentMotherShip = FindFirstObjectByType<MotherShipScript>();

        // go to the get ready state
        StartCoroutine(GetReady());
    }

    private IEnumerator GetReady()
    {
        // enter preround state
        state = GameState.PreRound;

        // is this the first time we are in this level?
        if (currentLevel != LevelManager.Larry.levelName)
        {
            messageOverlay.enabled = true;
            messageOverlay.text = LevelManager.Larry.levelName;

            yield return new WaitForSeconds(2f);

            // update the current level
            currentLevel = LevelManager.Larry.levelName;
        }

        // set the message
        messageOverlay.enabled = true;
        messageOverlay.text = "Get Ready!!!";

        // start the music
        SoundManager.Steve.StartTheMusic();

        // wait for 3 seconds
        yield return new WaitForSeconds(3.0f);

        // turn off the messages
        messageOverlay.enabled = false;

        StartRound();
    }

    private void StartRound()
    {
        // move to the playing state
        state = GameState.Playing;

        // tell the mothership to start the attack
        currentMotherShip.StartTheAttack();
    }

    public void PlayerWasDestroyed()
    {

        // sound manager to stop all sounds and play the explosion
        SoundManager.Steve.PlayerExplosionSequence();

        // stop the attack
        currentMotherShip.StopTheAttack();

        // post round state
        StartCoroutine(OopsState());
    }

    private IEnumerator OopsState()
    {
        // move to the post round state
        state = GameState.PostRound;

        // lose a life
        livesRemaining--;
        UpdateLivesUI();

        // put up a message
        messageOverlay.enabled = true;
        messageOverlay.text = "You Failed.";

        // wait for 2s
        yield return new WaitForSeconds(2f);

        // do we have any lives left?
        if (livesRemaining > 0)
        {
            // reset the round
            // ResetRound();

            // reload the level
            LevelManager.Larry.ReloadLevel();

        }
        else
        {
            // go to the gameover state
            GameOverLose();

        }
    }

    public void AddScore(int value)
    {
        // add the value to the score
        score += value;
        UpdateScoreUI();

        // check at end of frame
        StartCoroutine(CheckEnemiesRemaining());
    }

    private void UpdateLivesUI()
    {
        // update the lives UI
        livesText.text = "Lives: " + livesRemaining;
    }

    private void UpdateScoreUI()
    {
        // update the score UI
        scoreText.text = "Score: " + score.ToString("0000");

    }

    private void GameOverLose()
    {
        // you lost the game
        state = GameState.GameOver;

        messageOverlay.enabled = true;
        messageOverlay.text = "You Lost...\nPress \"R\" to Restart";
    }

    private void GameOverWin()
    {
        // stop the action
        currentMotherShip.StopTheAttack();

        // you won the game
        state = GameState.GameOver;
        messageOverlay.enabled = true;
        messageOverlay.text = "You Won!!!\nPress \"R\" to Restart";
    }

    private IEnumerator RoundWin()
    {
        state = GameState.PostRound;

        // put up a good job message
        messageOverlay.enabled = true;
        messageOverlay.text = "Round Cleared!";

        yield return new WaitForSeconds(2f);

        // time to go to the next level
        LevelManager.Larry.GoToNextLevel();
    }

    private IEnumerator CheckEnemiesRemaining()
    {
        yield return new WaitForEndOfFrame();
        if (currentMotherShip.transform.childCount == 0)
        {
            // round is over
            StartCoroutine(RoundWin());
        }
    }
}
ColorDemoScript.cs
using UnityEngine;
using System.Collections;

public class ColorDemoScript : MonoBehaviour
{
    private Renderer renderer;
    public Color startColor = Color.white;
    public Color endColor = Color.white;

    public float transitionDuration;

    public Color pulseColor = Color.black;

    public bool includeChildren;

    public Renderer[] childRenders;

    // Start is called once before the first execution of Update after the MonoBehaviour is created
    void Start()
    {
        // get the renderer
        renderer = GetComponent<Renderer>();

        // set the color
        // renderer.material.color = Color.red;
        // renderer.material.color = new Color(0.5f, 0f, 1f);
        // renderer.material.color = startColor;
        SetColor(startColor);

        if (includeChildren)
        {
            childRenders = GetComponentsInChildren<Renderer>();
            SetColor(childRenders, startColor);
        }

        StartCoroutine(ColorTransition());

        // activate the emission channel
        if (renderer) { renderer.material.EnableKeyword("_EMISSION"); }
    }

    // Update is called once per frame
    void Update()
    {
        if (renderer)
        {
            // pulse the object
            Color lerpedColor = Color.Lerp(Color.black, pulseColor, Mathf.PingPong(Time.time, 1f));

            // put this in the emission channel
            renderer.material.SetColor("_EmissionColor", lerpedColor);
        }
    }

    private IEnumerator ColorTransition()
    {
        // set things at our start color
        SetColor(startColor);
        // start a timer
        float currentTime = 0f;

        // loop until transition is complete
        while (currentTime < transitionDuration)
        {
            // get my lerp amount
            float lerpAmount = currentTime / transitionDuration;

            // get my color value
            Color lerpedColor = Color.Lerp(startColor, endColor, lerpAmount);

            // set the color
            SetColor(lerpedColor);

            if (includeChildren)
            {
                SetColor(childRenders, lerpedColor);
            }

            // increment my timer
            currentTime += Time.deltaTime;

            // yield
            yield return new WaitForEndOfFrame();
        }
        // make sure we got all the way there
        SetColor(endColor);
    }

    private void SetColor(Color colorVal)
    {
        if (renderer)
        {
            renderer.material.color = colorVal;
        }
    }

    private void SetColor(Renderer[] theseRenders, Color colorVal)
    {
        foreach (Renderer thisRender in theseRenders)
        {
            thisRender.material.color = colorVal;
        }
    }
}
DebrisEffect.cs
using UnityEngine;
using System.Collections;

public class DebrisEffect : MonoBehaviour
{
    private Renderer renderer;

    [Header("Color Settings")]
    public Color startColor = Color.white;
    public Color endColor = Color.white;

    [Header("Debris Timing")]
    public float colorShiftDuration;
    public float fadeDelay;
    public float fadeDuration;

    [Header("Optional Items")]
    public Material materialOverride;

    // Start is called once before the first execution of Update after the MonoBehaviour is created
    void Awake()
    {
        renderer = GetComponent<Renderer>();
    }

    public void StartDebrisEffect()
    {
        StartCoroutine(DebrisSequence());
    }

    private IEnumerator DebrisSequence()
    {
        // PART 1: color transition
        SetColor(startColor);
        // set my timer
        float currentTime = 0f;

        // transition the color
        while (currentTime < colorShiftDuration)
        {
            // get the lerp value
            float lerpAmount = currentTime / colorShiftDuration;
            // get the lerp color
            Color lerpColor = Color.Lerp(startColor, endColor, lerpAmount);
            // set the color
            SetColor(lerpColor);

            // inc timer
            currentTime += Time.deltaTime;
            // yield
            yield return new WaitForEndOfFrame();
        }

        // make sure transiton completed
        SetColor(endColor);

        // PART 2: wait to fade
        yield return new WaitForSeconds(fadeDelay);

        // PART 3: Fade Object
        currentTime = 0f;

        while (currentTime < fadeDuration)
        {
            // get the lerp value
            float lerpAmount = currentTime / fadeDuration;
            // get the lerp color
            Color lerpColor = Color.Lerp(endColor, Color.clear, lerpAmount);
            // set the color
            SetColor(lerpColor);
            // inc timer
            currentTime += Time.deltaTime;
            // yield
            yield return new WaitForEndOfFrame();
        }

        // PART 4: Destroy the object
        Destroy(this.gameObject);
    }


    private void SetColor(Color colorVal)
    {
        renderer.material.color = colorVal;
    }

    public void SetMaterial(Material thisMat)
    {
        renderer.material = thisMat;
    }
}
DebrisSettings.cs
using UnityEngine;

public class DebrisSettings : MonoBehaviour
{
    [Header("Color Settings")]

    [Header("Start Color Range")]
    public Color startColor1 = Color.white;
    public Color startColor2 = Color.white;

    [Header("End Color Range")]
    public Color endColor1 = Color.white;
    public Color endColor2 = Color.white;

    [Header("Debris Timing")]

    [Header("Color Duration")]
    [Range(0f, 10f)]
    public float colorShiftDuration;
    [Range(0, 2f)]
    public float colorShiftDelta;

    [Header("Fade Delay Time")]
    [Range(2f, 10f)]
    public float fadeDelay;
    [Range(0, 2f)]
    public float fadeDelayDelta;

    [Header("Fade Duration Time")]
    [Range(1f, 5f)]
    public float fadeDuration;
    [Range(0, 1f)]
    public float fadeDurationDelta;

    [Header("Optional Items")]
    public Material materialOverride;

    public void ConfigureDebris(GameObject thisObj)
    {
        // get the object's debris effect script
        DebrisEffect debris = thisObj.GetComponent<DebrisEffect>();

        if (debris == null)
        {
            debris = thisObj.AddComponent<DebrisEffect>();
        }

        // override the values
        debris.startColor = GetRandomColor(startColor1, startColor2);
        debris.endColor = GetRandomColor(endColor1, endColor2);

        // randomize the value for this chunkj
        debris.colorShiftDuration = colorShiftDuration + Random.Range(-colorShiftDelta, colorShiftDelta);
        debris.fadeDelay = fadeDelay + Random.Range(-fadeDelayDelta, fadeDelayDelta);
        debris.fadeDuration = fadeDuration + Random.Range(-fadeDurationDelta, fadeDurationDelta);

        if (materialOverride) { debris.SetMaterial(materialOverride); }

        // ready to strat
        debris.StartDebrisEffect();

    }

    private Color GetRandomColor(Color val1, Color val2)
    {
        // set up the color values
        float h1, s1, v1;
        float h2, s2, v2;

        Color.RGBToHSV(val1, out h1, out s1, out v1);
        Color.RGBToHSV(val2, out h2, out s2, out v2);


        Color selectedColor = Random.ColorHSV(h1, h2, s1, s2, v1, v2);

        return selectedColor;
    }
}
EnemyScript.cs
using UnityEngine;

public class EnemyScript : MonoBehaviour
{
    public GameObject bombPrefab;

    public int scoreValue;

    [Header("Enemy Swap Frames")]
    public GameObject enemyFrame1;
    public GameObject enemyFrame2;
    public GameObject enemyFrameExplode;

    [Header("Explosion Parameters")]
    public float explosionForce;
    public float explosionRadius;

    private DebrisSettings debrisManager;

    // Start is called once before the first execution of Update after the MonoBehaviour is created
    void Start()
    {
        // turning on the first frame, turning off the others
        enemyFrame1.SetActive(true);
        enemyFrame2.SetActive(false);
        enemyFrameExplode.SetActive(false);

        debrisManager = GetComponent<DebrisSettings>();
    }

    // Update is called once per frame
    void Update()
    {
        // test code to drop a bomb
        if (Input.GetKeyDown(KeyCode.B))
        {
            DropABomb();
        }

        if (Input.GetKeyDown(KeyCode.P))
        {
            SwapFrames();
        }

        if (Input.GetKeyDown(KeyCode.E))
        {
            MakeExplosion();
        }
    }

    public void SwapFrames()
    {
        // reverse the active values of frames 1 & 2
        enemyFrame1.SetActive(!enemyFrame1.activeSelf);
        enemyFrame2.SetActive(!enemyFrame2.activeSelf);
    }

    public void DropABomb()
    {
        // instantiate a bomb at this position (but slightly below)
        Instantiate(bombPrefab, (transform.position + Vector3.down), Quaternion.identity);
    }

    void OnCollisionEnter(Collision collision)
    {
        // was it a bullet that hit us?
        if (collision.transform.tag == "PlayerBullet")
        {
            // destroy the bullet
            Destroy(collision.gameObject);

            // destroy this object
            Destroy(this.gameObject);

            // make the explosion
            MakeExplosion();

            // make the explosion sound
            SoundManager.Steve.MakeEnemyExplosionSound();

            // tell the game manager to count the score
            GameManager.Gary.AddScore(scoreValue);
        }
    }

    private void MakeExplosion()
    {
        // turn off the animation frames
        // turn on the explosion frame

        enemyFrame1.SetActive(false);
        enemyFrame2.SetActive(false);
        enemyFrameExplode.SetActive(true);

        // get all of the rigidbodies
        Rigidbody[] enemyBlocks = GetComponentsInChildren<Rigidbody>();

        // for each one
        foreach (Rigidbody block in enemyBlocks)
        {
            // add the explosive force
            block.AddExplosionForce(explosionForce, (transform.position + Vector3.back), explosionRadius, 0f, ForceMode.Impulse);

            // tell the debris settings to adjust this object.
            debrisManager.ConfigureDebris(block.gameObject);

        }

         // make the explode frame an orphan
        enemyFrameExplode.transform.parent = null;
    }
}